
Owner's Manual


14
the firing pin simply turn the rear section of the bolt clockwise (when
viewed from the indicator end) until the firing pin sear engages the
notch in the bolt handle (Figure 6, page 13). On a new rifle where
surfaces are not yet burnished from use, it may be difficult to rotate the
bolt sleeve by hand. If so, carefully grasp the firing pin sear in a padded
vise and lift the bolt handle. The A-Bolt III rifle comes packed in a
foam-padded box with the bolt removed from the rifle. To install the
bolt into the receiver perform the following procedure:
1 Align the front of the bolt in the rear opening of the receiver.
2 Push the bolt completely forward and rotate the handle down to
lock it. It is not necessary to depress the bolt stop to insert the bolt,
but you may do so to ease the installation
(Figure 7)
.
3 Immediately place the “safety” in the on safe position. The rifle
is now completely assembled and may be operated normally.
REMOVING THE BOLT
1 Place the “safety” in the on safe position.
2 Press the bolt lock override button and rotate the bolt handle upward.
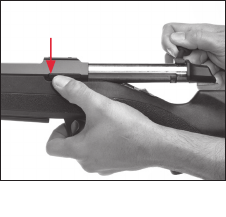
3 The bolt stop is the horizontal bar on the left side of the receiver
(Figure 7).
Press inward on the front of
the bolt stop and carefully draw
the bolt to the rear and out of
the receiver.
NOTICE! when reMoving the bolt
FroM the receiver, taKe care to
Prevent the cocKing indicator
FroM striKing and daMaging the
coMb oF the stocK.
Figure 7
Press the front of the bolt stop to insert or
remove the bolt.
12-BFA-419_ABolt III Rifle OM.indd 14 3/15/13 1:34 PM