
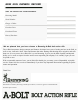
User Guide


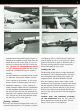


aligned with the bottom bolt lug (See figure 3).
Push the bolt completely forward and rotate the
handle down to lock it (See figure 4). It is not
necessary to depress the bolt stop to insert the
bolt.
RETURN THE THUMB-OPERATED SAFETY
TO THE “ON SAFE” POSITION.
The rifle is now
completely assembled and may be operated
normally.
DO NOT DEPEND ON THE RED COLOR ALONE
TO INDICATE YOUR GUN’S SAFETY STATUS.
Time. exposure to the elements. as well as the
abrasive action of cleaning agents can erase it.
2
REMOVING THE BOLT — FIRST, CHECK TO
MAKE CERTAIN THERE ARE NO CARTRIDGES
IN THE CHAMBER OR MAGAZINE.
Press in on
the forward end of the bolt stop and draw the
bolt to the rear completely removing it from the
rifle. The bolt stop is the horizontal bar on the
left side of the receiver (See figure 5).
Cocking indicator
Below the bolt shroud and ahead of the safety is a
serrated cocking indicator. The indicator is painted
red. When the rifle is cocked it may be readily felt
with the thumb as well as easily seen with a quick
glance downward (See figure 6). When the rifle is
fired, the cocking indicator retracts into the bolt
shroud and cannot be seen or felt.
Loading the rifle
The Browning A-Bolt utilizes a unique detachable
box magazine with a hinged floorplate. The maga-
zine on standard calibers holds four rounds. On
magnum calibers, the Micro Medallion and 284
Win., the capacity is three rounds. Under certain
conditions it may be possible to load an extra round
into the magazine of the Micro Medallion, however,
this practice may alter the function of your firearm.
With an extra round in the magazine and the bolt
closed. it may not be possible to latch the magazine
floorplate.
LOADING WITH THE MAGAZINE ATTACHED
TO THE FLOORPLATE
Hold the rifle with the
barrel angled down toward the ground. The bolt
may be in the open or closed position.