You Are Responsible For Firearms Safety As a gun owner, you accept a set of demanding responsibilities. How seriously you take these responsibilities can mean the difference between life and death. Failure to follow any of these instructions can cause extensive damage to your gun and/or possible serious injury or death to yourself and others. There is no excuse for careless or abusive handling of any firearm. At all times handle any firearm with intense respect for its power and potential danger.
6. BEWARE OF BARREL OBSTRUCTIONS, for the safety of both your gun and yourself. Mud, snow, and an infinite variety of other obstructions may inadvertently lodge in a barrel bore. It takes only one small obstruction to cause dangerously increased pressures that can ruin (swell or rupture) the finest rifle barrels. BEFORE CHECKING FOR A BARREL OBSTRUCTION, BE CERTAIN NO LIVE ROUND IS IN THE CHAMBER AND THAT THE MAGAZINE IS REMOVED AND FEED MECHANISMS ARE COMPLETELY EMPTY.
11. BE SURE OF YOUR TARGET AND BACKSTOP. Particularly during low light periods. Know the range of your ammunition. Never shoot at water or hard object. 12. ALWAYS UNLOAD YOUR RIFLE'S CHAMBER BEFORE CROSSING A FENCE, CLIMBING A TREE, JUMPING A DITCH OR NEGOTIATING OTHER OBSTACLES. Refer to "Unloading The Rifle" for instructions on the unloading of your rifle. Never place your loaded rifle on or against a fence, tree, car or other similar object. 13. WEAR EYE AND EAR PROTECTION WHEN SHOOTING.
20. READ AND HEED ALL WARNINGS in this instruction book, on ammunition boxes and with all accessories that you install on your firearm. It is your responsibility to secure the most up-to-date information on the safe handling procedures of your Browning gun. Browning assumes no liability for incidents which occur when unsafe or improper gun accessories or ammunition combinations are used. 21. PERIODIC MAINTENANCE -- AVOID UNAUTHORIZED SERVICING.
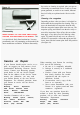
for service or cleaning is required. take your gun to a Browning recommended Service Center or a competent gunsmith, or send it to our Arnold, Missouri Service Facility as explained under “Service or Repair". Cleaning the magazine Disassembly NEVER ATTEMPT TO TAKE YOUR A-BOLT APART This is a specialized, finely fitted mechanism, You may permanently mar it by attempting to disassemble the inner mechanism assemblies. If further disassembly FURTHER THAN EXPLAINED IN THIS MANUAL.
times. Caution should be exercised to ensure that the cleaning rod or handle does not strike the crown of the muzzles, as damage to this area can affect the accuracy of the rifle. 2 The trigger pull adjustment screw is located at the rear of the trigger assembly (See figure 13). To decrease the weight of the trigger pull, turn the adjustment screw in a clockwise direction using a small screw driver. To increase the trigger pull, turn the adjustment screw in a counter clockwise direction.
CONVENTIONAL LOA DING PROCEDURE— The A-Bolt rifle may also be loaded like most other bolt action rifles. Cartridges are inserted down into the magazine through the ejection Port. Place a cartridge on top of the follower and push it down into the magazine until it snaps in. After filling the magazine to capacity, a cartridge can be placed in the chamber by simply working the action.
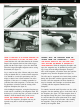
NOTE: IF THE BOLT IS IN CLOSED POSITION, BE LOADING SURE THE SAFETY IS IN THE “ON SAFE” POSI- TACHED FROM THE FLOORPLATE — PLACE THE RIFLE’S SAFETY IN THE “ON SAFE” POSI- TION. Hold the rifle with either hand at the forearm. Depress the magazine latch in front of the trigger guard with the index finger of your free hand and allow the hinged floorplate-magazine unit to swing downward (See figure 7). Lay a round on top of the follower and press down with your thumb until it is retained in the magazine.
Parts KEY # List: PART NO. Browning A-Bolt KEY # 42 15 PO78578 Bolt Shroud, Medallion 15 *PO78A80 Bolt Shroud, Stainless Stalker 16 *PO78093 But Plate 17 PO78094 But Plate Screws 18 PO78096 Ejector 18 PO78596 Ejector, 223R 19 20 PO78099 PO78102 Ejector Pin Ejector Spring 21 PO78106 High DESCRIPTION Power PART NO. PO78162 Rifle DESCRIPTION KEY # Magazine Follower 25-06, 30-06, 270W, 280R Magazine Follower 7MM, 300W, 338W Mag 66 PART NO.
Parts List: Browning A-Bolt High Power Rifle KEY # PART NO. DESCRIPTION KEY # PART NO. DESCRIPTION KEY # PART NO. DESCRIPTION 01 PO78526 Barrel Mounting Block, Hunter 03 †*PO78512 Barrel/Receiver .308W, Hunter 04 *PO78545 Bolt Assembly, 7MM, 300W, 01 PO78525 Barrel Mounting Block, Medallion Barrel Mounting Block, Stainless Stalker 03 03 †*PO78511 †*PO78911 Barrel/Receiver .308W, Medallion Barrel/Receiver .308W, Micro Medallion Barrel/Receiver .
THE BROWNING A-BOLT RIFLE Schematic is provided for parts identification only and should not be used as a guide to assemble the rifle. IMPORTANT: When ordering parts, list code number, part name, caliber, model and serial number. (Do not order parts using key numbers.) CAUTION: Browning parts are made exclusively for Browning guns and should not be used in other guns even though models may be similar. Inadequately fitted parts may be dangerous.
aligned with the bottom bolt lug (See figure 3). Push the bolt completely forward and rotate the handle down to lock it (See figure 4). It is not necessary to depress the bolt stop to insert the bolt. RETURN THE THUMB-OPERATED SAFETY TO THE “ON SAFE” POSITION. The rifle is now completely assembled and may be operated normally. DO NOT DEPEND ON THE RED COLOR ALONE TO INDICATE YOUR GUN’S SAFETY STATUS. Time. exposure to the elements. as well as the abrasive action of cleaning agents can erase it.
then sliding the bolt forward and rotating the bolt downward until it stops. This process takes a cartridge from the magazine and loads it into the chamber for firing. Operation of Left-hand models is identical. except that the bolt is located on the left side of the receiver. All operations of the A-Bolt are illustrated in this manual with a right-hand model. CAREFULLY READ THE FOLLOWING PROCEDURES BEFORE ATTEMPTING TO ASSEMBLE OR SHOOT YOUR A-BOLT RIFLE.
Hold this position for a minimum of 30 seconds. Carefully open the action and remove the cartridge. If the primer is indented, the cartridge should be disposed of in a way that cannot cause harm. If the primer is not indented, your firearm should be examined by a qualified gunsmith and the cause of the malfunction should be corrected before further use. 16 BE DEFENSIVE AND ON GUARD AGAINST UNSAFE GUN HANDLING AROUND YOU AND OTHERS. Don’t be timid when it comes to gun safety.
(See page 11 for instructions on unloading). After assuring yourself that the rifle is completely empty, again, open the bolt and remove it from the receiver (as described in “Removing the Bolt” on page 6). Look through the barrel to he sure it is clear of any obstruction. If an obstruction is seen, no matter how small it may be, clean the bore with a cleaning rod and patch as described in “Cleaning and Maintenance Suggestions” on page 12.
You Are Responsible For Firearms Safety As a gun owner, you accept a set of demanding responsibilities. How seriously you take these responsibilities can be the difference between life and death. NEVER TEST IT WHILE YOUR RIFLE IS LOADED OR POINTED IN AN UNSAFE DIRECTION. Safe gun handling does not stop with your gun’s mechanical “safety” devices — it starts there. Always treat this rifle with the respect due a loaded, ready-to-fire firearm.
NEW GUN OWNERS RECORD KEEP THIS RECORD FOR FUTURE REFERENCE Browning Model Serial Number Gauge / Caliber Purchase Price Purchased From Date of Purchase We are pleased that you have chosen a Browning A-Bolt bolt action rifle. The A-Bolt incorporates design concepts and features developed over years of testing and use in the field, as well as new, innovative ideas. Ideas and features that make hunting and shooting more enjoyable and safer than ever. In every sense, the A-Bolt rifle is a true Browning.