Basic User’s Guide DCP-J140W Version 0 USA/CAN
If you need to call Customer Service Please complete the following information for future reference: Model Number: DCP-J140W Serial Number: 1 Date of Purchase: Place of Purchase: 1 The serial number is on the back of the unit. Retain this User's Guide with your sales receipt as a permanent record of your purchase, in the event of theft, fire or warranty service. Register your product on-line at http://www.brother.
Brother numbers Important For technical help, you must call the country where you bought the machine. Calls must be made from within that country. Register your product By registering your product with Brother International Corporation, you will be recorded as the original owner of the product.
Ordering accessories and supplies For best quality results use only genuine Brother accessories, which are available at most Brother retailers. If you cannot find the accessory you need and you have a Visa, MasterCard, Discover, or American Express credit card, you can order accessories directly from Brother. (You can visit us online for a complete selection of the Brother accessories and supplies that are available for purchase.) Note In Canada only Visa and MasterCard are accepted.
Notice - Disclaimer of Warranties (USA and Canada) BROTHER'S LICENSOR(S), AND THEIR DIRECTORS, OFFICERS, EMPLOYEES OR AGENTS (COLLECTIVELY BROTHER'S LICENSOR) MAKE NO WARRANTIES, EXPRESS OR IMPLIED, INCLUDING WITHOUT LIMITATION THE IMPLIED WARRANTIES OF MERCHANTABILITY AND FITNESS FOR A PARTICULAR PURPOSE, REGARDING THE SOFTWARE.
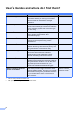
User’s Guides and where do I find them? Which Guide? What's in it? Where is it? Product Safety Guide Read this Guide first. Please read the Safety Instructions before you set up your machine. See this Guide for trademarks and legal limitations. Printed / In the box Quick Setup Guide Follow the instructions for setting up your machine and installing the drivers and software for the operating system and connection type you are using.
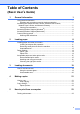
Table of Contents (Basic User’s Guide) 1 General information 1 Using the documentation .......................................................................................1 Symbols and conventions used in the documentation ....................................1 Accessing the Advanced User’s Guide, Software User’s Guide, Network User’s Guide, and Network Glossary ...................................................2 Viewing Documentation....................................................................
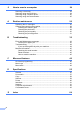
6 How to scan to a computer 24 Scanning a document ..........................................................................................24 Scanning using the SCAN key.............................................................................24 Scanning using a scanner driver .........................................................................25 Scanning using the ControlCenter.......................................................................
Table of Contents (Advanced User’s Guide) The Advanced User’s Guide explains the following features and operations. You can view the Advanced User’s Guide on the CD-ROM.
viii
1 General information Using the documentation 1 WARNING 1 Thank you for buying a Brother machine! Reading the documentation will help you make the most of your machine. Symbols and conventions used in the documentation The following symbols and conventions are used throughout the documentation. Bold Italics Courier New Bold typeface identifies specific keys on the machine’s control panel or on the computer screen. Italicized typeface emphasizes an important point or refers you to a related topic.
Chapter 1 Accessing the Advanced User’s Guide, Software User’s Guide, Network User’s Guide, and Network Glossary Viewing Documentation (Windows®) If the language screen appears, click your language. The CD-ROM Top Menu will appear. d e Click Documentation. 1 This Basic User’s Guide does not contain all the information about the machine, such as how to use the advanced Copy, Printer, Scanner and Network features.
General information d e How to find Network setup instructions Double-click top.pdf. If the country screen appears, choose your country. Your machine can be connected to a wireless network. After the list of User’s Guides appears, choose the guide you want to read. How to find Scanning instructions There are several ways you can scan documents.
Chapter 1 Accessing Brother Support (Windows®) 1 You can find all the contacts you will need, such as Web support (Brother Solutions Center), Customer Service and Brother Authorized Service Centers in Brother numbers uu page i and on the CD-ROM. Click Brother Support on the Top Menu. The following screen will appear: To access our Web site (http://www.brother.com/), click Brother Home Page.
General information Accessing Brother Support (Macintosh) 1 1 You can find all the contacts you will need, such as Web support (Brother Solutions Center) on the CD-ROM. Double-click the Brother Support icon. The following screen will appear: To download and install Presto! PageManager, click Presto! PageManager. To register your machine from the Brother Product Registration Page (http://www.brother.com/registration/), click On-Line Registration.
Chapter 1 Control panel overview 8 100% Normal 7 2 3 Copy keys: You can temporarily change the copy settings when in copy mode. Enlarge/Reduce Lets you enlarge or reduce copies depending on the ratio you select. Copy Quality Use this key to temporarily change the quality of your copies. Number of Copies Use this key to make multiple copies. Copy Options You can quickly and easily select temporary settings for copying. Menu keys: Menu Lets you access the main menu.
General information 7 Warning LED Blinks in orange when the LCD displays an error or an important status message. 8 1 LCD (Liquid Crystal Display) Displays messages on the screen to help you set up and use your machine. Warning LED indications 1 The Warning LED (Light Emitting Diode) is a light that shows the DCP status. The LCD shows the current machine status when the machine is idle. 100% Normal LED 01 DCP status Description Ready The DCP is ready for use. Cover Open The cover is open.
2 Loading paper b Loading paper and other print media Lift the output paper tray cover (1). 2 Load only one size of paper and one type of paper in the paper tray at any one time. a 2 1 Pull the paper tray completely out of the machine. c Note If the paper support flap (1) is open, close it, and then close the paper support (2). With both hands, gently press and slide the paper side guides (1) and then the paper length guide (2) to fit the paper size.
Loading paper e Note When using Legal size paper, press and hold the universal guide release button (1) as you slide out the front of the paper tray. Gently put the paper into the paper tray print side down and top edge in first. Check that the paper is flat in the tray. 2 1 Important d Be careful not to push the paper in too far; it may lift at the back of the tray and cause paper feed problems. Fan the stack of paper well to avoid paper jams and misfeeds.
Chapter 2 f Gently adjust the paper side guides (1) to fit the paper using both hands. Make sure the paper side guides touch the sides of the paper. i While holding the paper tray in place, pull out the paper support (1) until it clicks, and then unfold the paper support flap (2). 1 2 1 Important DO NOT use the paper support flap for Legal size paper. g Close the output paper tray cover. h Slowly push the paper tray completely into the machine.
Loading paper Loading envelopes and postcards About envelopes Loading envelopes and postcards 2 a 2 Before loading, press the corners and sides of the envelopes or postcards to make them as flat as possible. 2 2 Use envelopes that weigh from 20 to 25 lb (80 to 95 g/m2). Some envelopes need margin settings to be set in the application. Make sure you do a test print first before printing many envelopes.
Chapter 2 b c Put envelopes or postcards in the paper tray with the address side down and the leading edge in first as shown in the illustration. Using both hands, gently press and slide the paper side guides (1) and paper length guide (2) to fit the size of the envelopes or postcards. 1 Removing small printouts from the machine When the machine ejects small paper onto the output paper tray cover you may not be able to reach it.
Loading paper Unprintable area 2 The printable area depends on the settings in the application you are using. The figures below show the unprintable areas on cut sheet paper and envelopes. The machine can print in the shaded areas of cut sheet paper when the Borderless print feature is available and turned on.
Chapter 2 Paper settings Paper Type 2 2 To get the best print quality, set the machine for the type of paper you are using. a b c d e Press Menu. 2 You can use the following sizes of paper for copies: Letter, Legal, A4, A5, Executive and 4" 6" (10 15 cm). When you change the size of paper you load in the machine, you will need to change the paper size setting at the same time. Press a or b to choose 2.Copy. Press OK. a b Press Menu. Press a or b to choose 1.Paper Type. Press OK.
Loading paper Acceptable paper and other print media The print quality can be affected by the type of paper you use in the machine. To get the best print quality for the settings you have chosen, always set the Paper Type to match the type of paper you load. You can use plain paper, inkjet paper (coated paper), glossy paper, transparencies and envelopes. We recommend testing various paper types before buying large quantities. For best results, use Brother paper.
Chapter 2 Handling and using print media Paper capacity of the output paper tray cover 2 Store paper in its original packaging and keep it sealed. Keep the paper flat and away from moisture, direct sunlight and heat. Avoid touching the shiny (coated) side of photo paper. Load photo paper with the shiny side facing down. Avoid touching either side of transparencies because they absorb water and perspiration easily, and this may cause decreased output quality.
Loading paper Choosing the right print media 2 Paper type and size for each operation Paper Type Cut-Sheet Cards Envelopes Transparencies Paper Size 2 2 Usage Copy Printer Letter 8 1/2 11 in. (215.9 279.4 mm) Yes Yes A4 8.3 11.7 in. (210 297 mm) Yes Yes Legal 8 1/2 14 in. (215.9 355.6 mm) Yes Yes Executive 7 1/4 10 1/2 in. (184 267 mm) Yes Yes JIS B5 7.2 10.1 in. (182 257 mm) – User Defined A5 5.8 8.3 in. (148 210 mm) Yes Yes A6 4.1 5.8 in.
Chapter 2 Paper weight, thickness and capacity Paper Type 2 Weight Thickness No. of sheets Plain Paper 17 to 32 lb (64 to 120 g/m2) 3 to 6 mil (0.08 to 0.15 mm) 100 1 Inkjet Paper 17 to 53 lb (64 to 200 g/m2) 3 to 10 mil (0.08 to 0.25 mm) 20 Glossy Paper Up to 58 lb (Up to 220 g/m2) Up to 10 mil (Up to 0.25 mm) 20 2 Photo 4" 6" Up to 58 lb (Up to 220 g/m2) Up to 10 mil (Up to 0.25 mm) 20 2 Index Card Up to 32 lb (Up to 120 g/m2) Up to 6 mil (Up to 0.
3 Loading documents How to load documents How to load documents 3 You can make copies and scan from the scanner glass. Using the scanner glass 3 a b 3 Lift the document cover. Using the document guidelines on the left and top, place the document face down in the upper left corner of the scanner glass. 3 You can use the scanner glass to copy or scan pages of a book or one page at a time. Document Sizes Supported Length: Up to 11.7 in. (297 mm) Width: Up to 8.5 in. (215.9 mm) Weight: Up to 4.
Chapter 3 Unscannable area 3 The scannable area depends on the settings in the application you are using. The figures below show the unscannable areas. 1 2 4 3 Usage Copy Scan 20 Document Size Top (1) Left (2) Bottom (3) Right (4) All paper sizes 0.12 in. (3 mm) 0.12 in.
4 Making copies How to copy 4 The following steps show the basic copy operation. a b c 4 4 If you want more than one copy, press Number of Copies repeatedly until the number of copies you want appears (up to 99). Or press a or b to change the number of copies. The machine returns to its default settings 1 minute after it finishes copying. Note You can save some of the copy settings you use most often by setting them as the default.
Chapter 4 Paper Options 4 Paper Type 4 If you are copying on a special type of paper, set the machine for the type of paper you are using to get the best print quality. Paper Size If you are copying on paper other than Letter size, you will need to change the Paper Size setting. You can copy only on Letter, Legal, A4, A5, Executive or Photo 4" 6" (10 15 cm) paper. Press Press a b c Legal Inkjet Paper A4 Brother BP71 A5 Other Glossy Transparency Load your document.
5 How to print from a computer Printing a document 5 5 The machine can receive and print data from your computer. To print from a computer, you must install the printer driver. uuSoftware User’s Guide: Printing (Windows®) uuSoftware User’s Guide: Printing (Macintosh) a Install the Brother printer driver from the CD-ROM. (uuQuick Setup Guide) b From your application, choose the Print command.
6 How to scan to a computer Scanning a document There are several ways to scan documents. You can use the SCAN key on the machine or the scanner drivers on your computer. a To use the machine as a scanner, you must install a scanner driver. If the machine is on a Network, configure it with a TCP/IP address. Install the scanner drivers from the CD-ROM.
How to scan to a computer Scanning using a scanner driver uuSoftware User’s Guide: Scanning a document using the TWAIN driver (Windows®) uuSoftware User’s Guide: Scanning a document using the WIA driver (Windows®) 6 Scanning using the ControlCenter 6 uuSoftware User’s Guide: ControlCenter4 (Windows®) uuSoftware User’s Guide: ControlCenter2 (Macintosh) uuSoftware User’s Guide: Scanning a document using the TWAIN driver (Macintosh) uuSoftware User’s Guide: Scanning a document using the ICA driver (Mac O
A Routine maintenance Replacing the ink cartridges Your machine is equipped with an ink dot counter. The ink dot counter automatically monitors the level of ink in each of the four cartridges. When the machine detects an ink cartridge is running out of ink, the machine will display a message on the LCD. The LCD will show which ink cartridge is low or needs replacing. Be sure to follow the LCD prompts to replace the ink cartridges in the correct order.
Routine maintenance b Press the lock release lever as shown to release the cartridge for the color indicated on the LCD. Remove the cartridge from the machine. d Turn the green knob on the protective yellow cap clockwise until it clicks to release the vacuum seal, then remove the cap (1). 1 A e c Each color has its own correct position. Insert the ink cartridge in the direction of the arrow on the label.
f Gently push the ink cartridge in until it clicks, and then close the ink cartridge cover. Important • DO NOT take out ink cartridges if you do not need to replace them. If you do so, it may reduce the ink quantity and the machine will not know the quantity of ink left in the cartridge. • DO NOT touch the cartridge insertion slots. If you do so, the ink may stain your skin. • If ink gets on your skin or clothing immediately wash it off with soap or detergent.
Routine maintenance Cleaning and checking the machine Cleaning the scanner glass a Unplug the machine from the AC power outlet. b Lift the document cover (1). Clean the scanner glass (2) and the white plastic (3) with a soft lint-free cloth moistened with a non-flammable glass cleaner. Cleaning the print head A A A To maintain good print quality, the machine will automatically clean the print head when needed. You can start the cleaning process manually if there is a print quality problem.
Checking the print quality A i If faded or streaked colors and text appear on your printouts, some of the print head nozzles may be clogged. You can check this by printing the Print Quality Check Sheet and looking at the nozzle check pattern. a b Press Menu. c Press a or b to choose 1.Test Print. Press OK. d The LCD asks you if you want to start cleaning. Start Cleaning? a Yes b No Press a (Yes). The machine starts cleaning the print head. After cleaning is finished, press Color Start.
Routine maintenance Note e Press Black Start or Color Start. The machine starts printing the Alignment Check Sheet. f For the “A” pattern, press a or b to choose the number of the test print that has the least visible vertical stripes (1-9). Press OK. g For the “B” pattern, press a or b to choose the number of the test print that has the least visible vertical stripes (1-9). Press OK.
B Troubleshooting B Error and Maintenance messages B As with any sophisticated office product, errors may occur and consumable items may need to be replaced. If this happens, your machine identifies the error and shows an error message. The most common error and maintenance messages are shown below. You can correct most errors and clear routine maintenance messages by yourself. If you need more help, the Brother Solutions Center offers the latest FAQs and troubleshooting tips.
Troubleshooting Error Message Cause Action Clean Unable XX The machine has a mechanical problem. A foreign object such as a paper clip or ripped paper is in the machine. Open the scanner cover and remove any foreign objects and paper scraps from inside the machine. If the error message continues, disconnect the machine from the power for several minutes and reconnect it. Close Ink Cover The ink cartridge cover is not completely closed. Firmly close the ink cartridge cover until it clicks.
Error Message Cause Action Ink Box Full The ink absorber box or flushing box is full. These components are periodic maintenance items that may require replacement after a period of time to ensure optimum performance from your Brother machine. Because these components are periodic maintenance items, the replacement is not covered under the warranty. The need to replace these items and the time period before replacement is dependent on the number of purges and flushes required to clean the ink system.
Troubleshooting Error Message Cause Action No Cartridge An ink cartridge is not installed properly. Take out the new ink cartridge and reinstall it slowly until it clicks. (See Replacing the ink cartridges uu page 26.) No Paper Fed The machine is out of paper or paper is not properly loaded in the paper tray. Do one of the following: Refill the paper in the paper tray, and then press Black Start or Color Start. Remove and reload the paper, then press Black Start or Color Start.
Printer jam or paper jam B c Close the Jam Clear Cover. Make sure the cover is closed properly. d If the paper support flap is open, close it, and then close the paper support. Pull the paper tray completely out of the machine. e Pull out the jammed paper (1). Take out the jammed paper depending on where it is jammed in the machine. a Unplug the machine from the AC power outlet. b Open the Jam Clear Cover (1) at the back of the machine. Pull the jammed paper out of the machine.
Troubleshooting f Using both hands, grasp the plastic tabs on both sides of the machine and lift the scanner cover (1) until it locks securely in the open position. 1 3 2 Important • If the paper is jammed under the print head, unplug the machine from the power source, and then move the print head to take out the paper. • If the print head is in the right corner as shown in the illustration, you cannot move it. Re-connect the power cord. Hold down Stop/Exit until the print head moves to the center.
i While holding the paper tray in place, pull out the paper support (1) until it clicks, and then unfold the paper support flap (2). 2 1 Important DO NOT use the paper support flap for Legal size paper. j 38 Re-connect the power cord.
Troubleshooting Troubleshooting B Important For technical help, you must call the country where you bought the machine. Calls must be made from within that country. If you think there is a problem with your machine, check the chart and follow the troubleshooting tips. Most problems can be easily resolved by yourself. If you need additional help, the Brother Solutions Center offers the latest FAQs and troubleshooting tips. Visit us at http://solutions.brother.com/.
Printing (continued) Difficulty Suggestions No printout. (Windows® only) Make sure that the machine is online. (Continued) (Windows® 7) Click /Devices and Printers. Right-click Brother DCP-XXXXX (where XXXXX is your model name) and choose See what’s printing. Click Printer and make sure that Use Printer Offline is unchecked. (Windows Vista®) Click /Control Panel/Hardware and Sound/Printers. Right-click Brother DCP-XXXXX (where XXXXX is your model name).
Troubleshooting Printing (continued) Difficulty Suggestions Poor print quality. Check the print quality. (See Checking the print quality uu page 30.) Make sure that the Media Type setting in the printer driver or the Paper Type setting in the machine’s menu matches the type of paper you are using. See Paper Type uu page 14. uuSoftware User’s Guide: Printing (Windows®) uuSoftware User’s Guide: Printing (Macintosh) Make sure that your ink cartridges are fresh.
Printing (continued) Difficulty Suggestions The printouts are wrinkled. (Windows®) In the printer driver Advanced tab, click Color Settings, and uncheck Bi-Directional Printing. (Macintosh) In the printer driver, choose Print Settings, click Advanced, choose Other Print Options, and uncheck Bi-Directional Printing. Make sure you are using Genuine Brother Innobella™ Ink. Cannot perform “Page Layout” printing. Check that the paper size setting in the application and in the printer driver are the same.
Troubleshooting Printing (continued) Difficulty Suggestions Ink is smudged or running when using glossy photo paper. Be sure to check the front and back of the paper. Place the glossy surface (printing surface) face down. (See Paper Type uu page 14.) If you use glossy photo paper, make sure that the paper type setting is correct. Copying Difficulties Difficulty Suggestions Copies are blank. Make sure you are loading the document properly. (See Loading documents uu page 19.
Network Difficulties Difficulty Suggestions Cannot print over the network. Make sure that your machine is powered on and is online and in the Ready mode. Print a Network Configuration list (uuAdvanced User’s Guide: Reports) and check the current Network settings printed in this list. If you are using a wireless connection or are having Network problems uuNetwork User’s Guide: Troubleshooting The network scanning feature does not work.
Troubleshooting Machine Information B Press Menu. Press Menu. c Press a or b to choose 5.Machine Info. Press OK. Press a or b to choose 4.Reset. Press OK. d Press a or b to choose the type of reset, 1.Network or 2.All Settings. Press OK. e f Press a to choose a Reset. B You can see the machine’s serial number on the LCD. c d B a b Checking the serial number a b How to reset the machine Press a or b to choose 1.Serial No. Press OK. Your machine’s serial number will appear on the LCD.
C Menu and features On-screen programming C Menu keys C Your machine is designed to be easy to operate with LCD on-screen programming using the menu keys. User-friendly programming helps you take full advantage of all the menu selections your machine has to offer. Since your programming is done on the LCD, we have created step-by-step on-screen instructions to help you program your machine.
Menu and features To access the menu mode: a b Press Menu. Choose an option. You can scroll more quickly through each menu level by pressing a or b for the direction you want. 1.Ink 2.Copy 3.Network 4.Print Reports 5.Machine Info. 0.Initial Setup c Press OK when that option appears on the LCD. The LCD will then show the next menu level. d Press a or b to scroll to choose the setting you want to change. Press OK. e Press a or b to choose the option you want. Press OK. The LCD will show Accepted.
Menu table C The menu table will help you understand the menu selections and options that are found in the machine's programs. The factory settings are shown in Bold with an asterisk. Menu ( ) C Level1 Level2 Level3 Options Descriptions Page 1.Ink 1.Test Print — Print Quality Lets you check the print quality or alignment. 30, 31 Lets you clean the print head. 29 Alignment 2.Cleaning — Black Color All 2.Copy 3.Ink Volume — — Lets you check the available ink volume. See 1.
Menu and features Network menu C Level1 Level2 Level3 Options Descriptions Page 3.Network 1.TCP/IP 1.BOOT Method Auto* Chooses the BOOT method that best suits your needs. See Static . RARP BOOTP DHCP 2.IP Address [000-255]. Enter the IP address. [000-255]. [000-255]. [000-255] 3.Subnet Mask [000-255]. Enter the Subnet mask. [000-255]. [000-255]. [000-255] 4.Gateway [000-255]. [000-255]. Enter the Gateway address. [000-255]. [000-255] 5.
Level1 Level2 Level3 Options Descriptions Page 3.Network 3.WPS/AOSS — — You can easily configure your wireless network settings using the onebutton push method. See 4.WPS w/PIN Code — — You can easily configure your wireless network settings using WPS with a PIN code. 5.WLAN Status 1.Status Active(11b) You can see the current wireless network status. (Continued) Active(11g) Active(11n) AOSS Active Connection Fail 2.Signal — You can see the current wireless network signal strength. 3.
Menu and features Menu (continued) C Level1 Level2 Level3 Options Descriptions Page 4.Print Reports 1.User Settings — — See 2.Network Config — — Prints these lists and reports. 3.WLAN Report — — 5.Machine Info. 1.Serial No. — — Lets you check the serial number of your machine. 45 0.Initial Setup 1.Date&Time — — Sets the date and time in your machine. See . 2.LCD Contrast — Light Adjusts the contrast of the LCD. See .
Copy Quality ( ) (Temporary settings) C Level1 Level2 Level3 Options Descriptions Page — — — Best Choose the Copy resolution. See Normal* . Fast See Advanced User’s Guide. The factory settings are shown in Bold with an asterisk. Enlarge/Reduce ( ) (Temporary settings) C Level1 Level2 Level3 Options Descriptions Page — — — Fit to Page You can choose the enlargement and reduction ratio.
Menu and features Copy Options ( ) (Temporary settings) C Level1 Level2 Level3 Options Descriptions Page Paper Type — — Plain Paper* Choose the paper type. 22 Choose the paper size. 22 Adjusts the density. See . You can make N in 1 or Poster copies. See .
SCAN ( ) C Level1 Level2 Level3 Options Descriptions Page Scan to E-mail — — — You can scan a black & white or a color document into your E-mail application. See Scan to Image — — — You can scan a color picture into your graphics application. Scan to OCR — — — You can have your text document converted to an editable text file. Scan to File — — — You can scan a black & white or a color document into your computer.
D Specifications D General D Note This chapter provides a summary of the machine’s specifications. For additional specifications visit http://www.brother.com/ for details. Printer Type Inkjet Print Head Black: Piezo with 94 nozzles 1 Color: Piezo with 94 nozzles 3 Memory Capacity 32 MB LCD (Liquid Crystal Display) 16 characters 1 line Power Source AC 100 to 120 V 50/60 Hz Power Consumption 1 Copying Mode: Approx. 18.5 W 2 Ready Mode: Approx. 3.5 W Sleep Mode: Approx. 1.
Dimensions 5.9 in. (150 mm) 15.4 in. (390 mm) 14.5 in. (368 mm) 14.2 in. (360 mm) 17.7 in. (450 mm) Weight 15 lb (6.8 kg) Noise Operating: 50 dB or less 1 Temperature Operating: 50 to 95 F (10 to 35 C) Best Print Quality: 68 to 91 F (20 to 33 C) Operating: 20 to 80% (without condensation) Best Print Quality: 20 to 80% (without condensation) Humidity Document Size Scanner Glass Width: Max. 8.5 in. (215.9 mm) Scanner Glass Length: Max. 11.7 in.
Specifications Print media Paper Input D Paper Tray Paper Type: Plain Paper, Inkjet Paper (coated paper), Glossy Paper 1 and Transparency 1 2 Paper Size: Letter, Legal, Executive, A4, A5, A6, Envelopes (commercial No.10, DL, C5, Monarch), Photo 4" 6", Photo 2L 5" 7" and Index Card 5" 8" 3 Width: 3.86 in. - 8.5 in. (98 mm - 215.9 mm) Length: 5.8 in. - 14 in. (148 mm - 355.6 mm) For more details, see Paper weight, thickness and capacity uu page 18.
Copy D Color/Black Yes/Yes Copy Width 1 8.26 in. (210 mm) Multiple Copies Stacks up to 99 pages Enlarge/Reduce 25% to 400% (in increments of 1%) Resolution (Black & White) Prints up to 1200 1200 dpi (Color) Prints up to 600 1200 dpi 1 58 When copying on letter size paper.
Specifications Scanner D Color/Black Yes/Yes TWAIN Compliant Yes (Windows® XP 1/Windows Vista®/Windows® 7) (Mac OS X 10.5.8, 10.6.x, 10.7.x 2) WIA Compliant Yes (Windows® XP 1/Windows Vista®/Windows® 7) ICA Compliant Yes (Mac OS X 10.6.x, 10.7.x) Color Depth 30 bit color Processing (Input) 24 bit color Processing (Output) Resolution Up to 19200 19200 dpi (interpolated) 3 Up to 1200 2400 dpi (optical) Scanning Width and Length Width: Up to 8.26 in. (210 mm) Length: Up to 11.45 in.
Printer D Resolution Up to 1200 6000 dpi Printing Width 1 8.26 in. [8.5 in. (borderless) 2] Borderless 3 Letter, A4, A6, Photo 4" 6", Index Card 5" 8", Photo 2L 5" 7" Print Speed 4 1 When printing on letter size paper. 2 When the Borderless feature is set to On. 3 See Paper type and size for each operation uu page 17. 4 For detailed specifications visit http://www.brother.com/.
Specifications Interfaces D USB 1 2 Use a USB 2.0 interface cable that is no longer than 6 feet (2 m). Wireless LAN IEEE 802.11b/g/n (Infrastructure Mode) IEEE 802.11b (Ad-hoc Mode) 1 Your machine has a USB 2.0 Hi-Speed interface. The machine can also be connected to a computer that has a USB 1.1 interface. 2 Third party USB ports are not supported. Network D Note For more information about the Network specifications, see the Network User’s Guide.
Computer requirements D SUPPORTED OPERATING SYSTEMS AND SOFTWARE FUNCTIONS Computer Platform & Operating System Version Windows® Operating System Supported PC Software Functions Windows® XP Home 1 3 Printing, Scanning Windows® XP Professional 1 3 PC Interface Processor Minimum Speed USB, Intel® Pentium® II Wireless or equivalent 802.
Specifications Consumable items D Ink The machine uses individual Black, Yellow, Cyan and Magenta ink cartridges that are separate from the print head assembly. Service Life of Ink Cartridge Starter ink cartridges are in the box. The first time you install the ink cartridges the machine will use extra ink to fill the ink delivery tubes. This is a one-time process that enables high quality printing. Afterward, replacement ink cartridges will print the specified number of pages.
E Index A E Accessories and supplies .......................... ii Apple Macintosh See Software User's Guide. Envelopes ....................................11, 17, 18 Error messages on LCD .......................... 32 B&W Print Only .................................... 32 Cannot Detect ...................................... 32 Cannot Print ......................................... 32 Clean Unable ........................................ 33 Cover is Open ......................................
M R Macintosh See Software User's Guide. Maintenance, routine replacing ink cartridges .........................26 Mode, entering SCAN ......................................................6 Resolution copy ...................................................... 58 print ...................................................... 60 scan ...................................................... 59 N Scanning See Software User's Guide. Serial Number how to find ...............
Brother International Corporation 100 Somerset Corporate Boulevard P.O. Box 6911 Bridgewater, NJ 08807-0911 USA Brother International Corporation (Canada) Ltd. 1 rue Hôtel de Ville, Dollard-des-Ormeaux, QC, Canada H9B 3H6 Visit us on the World Wide Web http://www.brother.com/ This machine is approved for use in the country of purchase only. Local Brother companies or their dealers will only support machines purchased in their own countries.