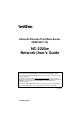
External Wireless Print/Scan Server (IEEE 802.11b) NC-2200w Network User's Guide Please read this manual thoroughly before using the Brother Printer/MFC/DCP. You can print or view this manual from the NC-2200w CD-ROM at any time, please keep the NC-2200w CD-ROM in a convenient place for quick and easy reference at all times. The Brother Solutions Center (http://solutions.brother.com) is your one stop resource for all your Brother Printer/MFC/DCP needs.
Trademarks Brother is a registered trademark of Brother Industries, Ltd. Ethernet is trademark of Xerox Corporation. Apple and Macintosh are registered trademarks of Apple Computer, Inc. LAN Server is trademark of International Business Machines Corporation. Windows and Windows NT are registered trademarks of Microsoft Corporation. NC-2200w and BRAdmin Professional utility are trademarks of Brother Industries Ltd.
IMPORTANT NOTE: For technical and operational assistance, you must call. Calls must be made from within that country. In USA 1-800-276-7746 In Canada 1-877-BROTHER (514) 685-6464 (In Montreal) If you have any comments or suggestions, please write to us at: In Europe European Technical Services 1 Tame Street Audenshaw Manchester, M34 5JE UK In USA Printer Customer Support Brother International Corporation 15 Musick Irvine CA 92618 In Canada Brother International Corporation (Canada), Ltd.
IMPORTANT INFORMATION: REGULATIONS Federal Communications Commission (FCC) Declaration of Conformity (For U.S.A. only) Responsible Party: Brother International Corporation 100 Somerset Corporate Boulevard Bridgewater, NJ 08807-0911, USA TEL: (908) 704-1700 declares, that the products Product Name: Model Number: Brother External Wireless Print/Scan Server NC-2200w complies with Part 15 of the FCC Rules.
EC Declaration of Conformity under the R & TTE Directive Manufacturer Brother Industries Ltd., 15-1, Naeshiro-cho, Mizuho-ku, Nagoya 467-8561, Japan Herewith declare that: Products description Product Name : External Wireless Print/Scan Server : NC-2200w is in conformity with provisions of the R & TTE Directive 1999/5/EC and we declare compliance with the following standards: Radio : EN301489-1:2000 EN301489-17:2000 EN300328-2 V1.1.
Table of Contents 1 2 3 4 Introduction........................................................................... 1-1 General............................................................................. 1-1 Specification and System Requirements.................... 1-1 Specification ........................................................... 1-1 System requirements for network connection and Setup ...................................................................... 1-2 Parts on NC-2200w ..............
Printing from a Macintosh® Using the Simple Network Configuration capabilities of Mac OS® X (Mac OS® X 10.2.4 - 10.3 or greater) .............................. 4-1 Overview..................................................................... 4-1 Printing from a Macintosh® Using the Simple Network Configuration capabilities of Mac OS® X (Mac OS® X 10.2.4 - 10.3 or greater).............................................. 4-2 Changing the Configuration ........................................
1 Introduction 1 General Thank you for purchasing the Brother NC-2200w External Wireless Print/Scan Server. This User’s Guide provides complete information on how to setup and use Brother NC-2200w safely. Please read this User’s Guide carefully before using the product. The NC-2200w supports the IEEE802.11b wireless network standards and can work in Infrastructure or Ad-hoc mode using common wireless authentication and security methods.
System requirements for network connection and Setup ■ Computer with a wireless LAN equipment ■ USB Interface Cable (Type A-B) ■ Brother Printer, MFC or DCP Depending on the placement of the Brother NC-2200w, a distance of up to 70 meters or 233 feet can be reached. However, distance and overall quality can vary depending on the environment itself and the types of the device used within that environment. The Network scanner function is supported on the following models.
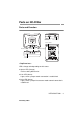
Parts on NC-2200w Parts and Function NC-2200w Port (USB Port ) Power Connector Ethernet Address Infra LED (Green) Link LED (Green) Status LED (Orange) Test Button LEDs change color depending on their status. ■ Status LED (Orange) Flashes during data transfer. ■ Link LED (Green) Lights, when a proper network connection is established. ■ Infra LED (Green) Lights, when a proper infrastructure mode network connection is established. INTRODUCTION 1 - 3 NC9100h_FM6.
■ Ethernet Address (MAC Address) The Ethernet Address of the device. An Ethernet Address is sometimes referred to as a MAC Address. ■ NC-2200w (USB Port) Connect a USB cable (Type A) here. B A (Up to 6 feet or 2 m) ■ Power Connector Connects to the AC adapter. Test Button How to Print a Network Configuration Page To print the Network Configuration Page, press the Test Button of the NC-2200w.
2 NC-2200w Wireless Setting 2 Setting up NC-2200 Wireless Setting General To connect the NC-2200w to your wireless network, follow the steps in the Quick Setup Guide. ■ If you have already used the NC-2200w on another network, re initialize the NC-2200w to its factory default settings. ■ The NC-2200w cannot be used with a USB HUB. ■ Only use the supplied AC adapter. ■ Only connect Brother Printer/MFC/DCP to the NC-2200w USB port. ■ Do not disconnect the USB cable while setting up, printing or scanning.
APIPA The NC-2200w supports the Automatic Private IP Addressing (APIPA) protocol. If a DHCP/BOOTP/RARP server is unavailable, the NC-2200w will automatically assign an IP address from the range 169.254.1.0 to 169.254.254.255. DNS client DNS (Domain Name Service) allows the NC-2200w to connect to a DNS server. For more information, refer to Chapter 5 Network Scanning from Windows®. NetBIOS/IP NetBIOS over IP basic functionality allows the NC-2200w to appear in a Windows® network neighborhood.
Web Server The Brother NC-2200w is equipped with Web server that allows you to monitor its status or change some of its configuration settings. We recommended Internet Explorer 5.0 (or higher) or Netscape Navigator 4.0 (or higher). If a different web browser is used, make sure it is compatible with HTTP 1.0 and HTML 2.0. TELNET The NC-2200w supports TELNET server for command line configuration. NC-2200W WIRELESS SETTING 2 - 3 NC9100h_FM6.
Wireless LAN terms and concepts There are two types of Wireless networks: Infrastructure mode and Ad-hoc Infrastructure Mode Infrastructure mode networks have a central Access point/Base station at the heart of the network. The Access point/Base station can also act as a bridge or a gateway to a wired network. When the Brother wireless device is set in this mode, it receives all print jobs via an access point. 2 - 4 NC-2200W WIRELESS SETTING NC9100h_FM6.
Ad-hoc Mode Ad-hoc networks (also sometimes referred to as peer-to-peer networks) do not have a central Access point. Each Wireless client communicates directly with each other. When the Brother wireless device is set in this mode, it receives all print/scan jobs directly from the computer sending the print data. Channels Wireless networks use Channels. There are up to 14 channels that can be used. However, in many countries the number of channels available are restricted.
Authentication and Encryption Most Wireless networks use some kind of security settings. These security settings define the authentication (how the device identifies itself to the network) and encryption (how the data is encrypted as it is sent on the network). If you do not correctly specify these options when you are configuring your Brother wireless device, it will not be able to connect to the Wireless network. Therefore care must be taken when configuring these options.
Network Key (WEP Key) This key is a 64-bit or 128-bit value that must be entered in an ASCII or HEXADECIMAL format. 64 (40) bit ASCII: Uses 5 text characters. e.g. "Hello" (this is case sensitive). 64 (40) bit Hexadecimal: Uses 10 digits of hexadecimal data. e.g. "71f2234aba" 128 (104) bit ASCII: Uses 13 text characters. e.g. "Wirelesscomms" (this is case sensitive). 128 (104) bit Hexadecimal: Uses 26 digits of hexadecimal data e.g.
NC-2200w Configuration Procedure What is supplied on the CD-ROM Insert the NC-2200w CD-ROM into the CD-ROM drive of your computer. The main menu (as shown below) will be launched. 1 2 3 1 Brother Solutions Center The Brother Solutions Center( http://solutions.brother.com) is a onestop resource for your Brother Printer/MFC/DCP and NC-2200w. Download the latest drivers and required utilities, read the FAQs and troubleshooting tips.
Changing your Computer’s Wireless Settings Before you can use the Brother Printer/MFC/DCP in a wireless network, the NC-2200w must be configured to match your network configuration. To configure the NC-2200w from a wireless computer on your network, you must temporarily change your current wireless settings. Before changing the current wireless settings of your computer, we recommend you make a note of your current wireless network settings.
Windows® XP Users 1 Click Start and then Control Panel. 2 Click the Network Connections icon. 3 Select and right click Wireless Network Connection. Click View Available Wireless Networks. 2 - 10 NC-2200W WIRELESS SETTING NC9100h_FM6.
4 You can see the Network name (SSID/ESSID) of the NC-2200w in the Available wireless networks box. Select SETUP and check the Allow me to connect... check box. Click the Connect button. 5 Check the wireless network connection status. It may take a few minutes to change from 0.0.0.0 to 169.254.x.x IP address to be shown on screen. (where x.x are numbers between 0 and 255).
Example for Mac OS® X 10.2.4 Users 1 Click the AirPort status icon and select Open Internet Connect.... 2 Click the Network tab to see the available wireless devices.You can see the Network name (SSID/ESSID) in the Network option. Select SETUP. 2 - 12 NC-2200W WIRELESS SETTING NC9100h_FM6.
3 Your wireless network is connected successfully. If the Network name (SSID/ESSID) you want to choose is not listed, try the following: ■ Unplug the AC adapter, plug it back in again and then wait for a few minutes. ■ Move your Brother Printer/MFC/DCP with the NC-2200w installed closer to your computer and try again. ■ Reset the NC-2200w back to its default factory settings and try again. For the information how to reset to the factory default setting see Test Button on page 1-4.
Configuring Brother NC-2200w You can configure and change the NC-2200w settings using the Wireless Setup Wizard in the NC-2200w CD-ROM or Embedded Web Management. And you can use the BRAdmin Professional utility as a convenient utility and TELNET command console for the NC-2200w setting.
4 Click Wireless Setup Wizard. 5 Review the Welcome information and when you are sure you have completed the necessary tasks, click Next. NC-2200W WIRELESS SETTING 2 - 15 NC9100h_FM6.
6 The search will display a list of found Brother Wireless Devices. Select the device you wish to configure and click Next. The Default Node name of the NC-2200w is "BRN_xxxxxx" (where "xxxxxx" is the last six digits of Ethernet address.) 7 If your network supports DHCP/BOOTP/RARP, choose Obtain an IP address automatically and the NC-2200w will automatically obtain IP address information from your network.
■ The NC-2200w supports the Automatic Private IP Addressing (APIPA) protocol. If a DHCP/BOOTP/RARP server is unavailable, the NC-2200w will automatically assign an IP address from the range 169.254.1.0 to 169.254.254.255. ■ We recommend that you contact your network administrator if you are unsure about the correct IP address settings. 8 A list of the found Wireless Networks will be displayed. Select the Access Point/Base Station you wish to associate the NC2200w with and click Next.
10 When configuring your Brother Wireless device, you must ensure that it is configured to match the Authentication and Encryption settings of your existing wireless network. If your network is configured for Authentication and Encryption, choose the Authentication Method and Encryption Mode from the pull downs in each setting box. Then enter the Network Key and click Next. 11 Click Next to submit the settings to the NC-2200w. 12 When the Setup Complete screen appears, click Next.
13 Click Exit. 14 Using the information you noted in Changing your Computer’s Wireless Settings on page 2-9, return the wireless settings of your computer back to their original settings. You can print the Network Configuration Page anytime. To learn how to print the Network Configuration Page, see Test Button on page 1-4. NC-2200W WIRELESS SETTING 2 - 19 NC9100h_FM6.
Using the Embedded Web Server to change settings If you configured the NC-2200w using the Wireless Setup Wizard, you do not need to make any additional settings. However, if you do wish to change some settings, and you do not want to use the Wireless Setup Wizard, you can use a standard Web browser to alter settings. We recommend Netscape Navigator version 4.0 or later or Microsoft Internet Explorer version 5.0 or later.
■ The IP address and node name of your NC-2200w is printed on the Network Configuration Page. To learn how to print the Network Configuration Page, see Test Button on page 1-4. ■ You will be asked for a user name and password. Enter the following. users name : admin (case sensitive) password: access (default) ■ Please be careful when you modify any settings as an incorrect setting may result in the NC-2200w losing its connection from your wireless network.
■ Please use the BRAdmin Professional utility version that was supplied on the CD-ROM of the NC-2200w. You can download the latest Brother BRAdmin Professional utility version from ( http://solutions.brother.com). This utility is only available for Windows® users. ■ You need to use the TCP/IP protocol and have a valid IP address programmed in to the NC-2200w and your computer. ■ The default BRAdmin Professional password is access. If you wish to change any NC-2200w settings you must do the following.
TELNET You can also use a TELNET console to configure the device. ■ Please be careful when you modify any settings as an incorrect setting may result in the NC-2200w losing its connection from your wireless network. ■ The TELNET console will prompt you for a user name and the password, enter the following; Login user : admin (case sensitive) Password : access (default) TELNET Login screen example Brother NC-2200w Ver1.00 TELNET Server Copyright © 2004 BrotherIndustries, Ltd.
3 Network Printing from Windows® 3 Overview A network-connected Brother Printer/MFC/DCP allows multiple computers to print one Printer/MFC/DCP. Important information For MFC-210C/420CN/410CN/620CN/5440CN/5840CN/3240C/ 3340CN/8420/8820D/8820DN/8220/8440/8840D/8840DN/ 3820CN/3420CN and DCP-120C/320CN/8020/8025D/8025DN/ 8040/8045D/8045DN users, see Chapter 5 Network Scanning from Windows®. This chapter explains how to install the printer driver for the following models.
Quick Tips: 1 Windows® 2000/XP users can print using TCP/IP using the standard Network Printing software (Standard TCP/IP port) and/ or IPP protocol software built into any Windows® 2000/XP installation. 2 Windows® 98/Me and Windows NT®4.0 users can send print job using Brother Peer to Peer Print software provided by the NC2200w CD-ROM. This software makes the Brother LPR port as the Windows® Printing port.
Windows® 98/Me/Windows NT®4.0 Peer to Peer Printing and Windows® 2000/XP Standard TCP/IP Printing STEP 1: Printer Driver Installation If you have not already installed the printer driver, do the following. Install the printer driver that was supplied on the CD-ROM of the Brother Printer/MFC/DCP. The printer driver can also be downloaded from the Brother Solutions Center at: http://solutions.brother.com. The instructions in this section are based on Windows® XP. 1 Click Start and select Printers and Faxes.
2 Un-check the Automatically detect and install my Plug and Play printer selection and then click Next. ■ Your OS may not have this screen. ■ (For Windows® 98/Me/Windows NT® 4.0 Uses) If this screen is displayed, select Local printer and then click Next. ■ NETWORK PRINTING FROM WINDOWS® 3 - 4 NC9100h_FM6.
3 Temporarily select LPT1:(Recommended Printer Port) from the pull down window for the Printer Port Selection and then click Next. 4 Click on Have Disk. 3 - 5 NETWORK PRINTING FROM WINDOWS® NC9100h_FM6.
5 (For Brother Laser Printer Users) Browse the CD-ROM and select the Driver folder and click Open, then select the Win2k_xp folder (or the folder for your OS) and click Open and then select the appropriate language and click Open. (For Brother MFC/DCP Users) Browse the CD-ROM and select the appropriate language folder and click Open, then select the WXP folder (or the folder for your OS) and click Open and finally select the Addprt folder and click Open.
7 Click OK. 8 Highlight the model you are installing from the list of Printer/ MFC/DCPs and click Next. 9 The model you are installing will be listed in the window. Select Yes or No if you want this printer to be your default printer, and then click Next. 3 - 7 NETWORK PRINTING FROM WINDOWS® NC9100h_FM6.
10 If this screen appears, select Do not share this printer and Next. 11 Select No and Next. NETWORK PRINTING FROM WINDOWS® 3 - 8 NC9100h_FM6.
12 When this screen appears, click Finish. 13 If the Windows Logo testing screen appears, click Continue Anyway. 3 - 9 NETWORK PRINTING FROM WINDOWS® NC9100h_FM6.
STEP 2: Network Print Software Installation You must now install the network print software, and configure it for the wireless network connection of the Brother Printer/MFC/DCP. Please follow the steps below. 1 Insert the NC2200w CD-ROM. 2 Click Network Print Software, and follow the on-screen instructions. 3 Select the same printer driver as the one you selected in the 8th step in the Step4 STEP 1: Printer Driver Installation on page 37.
Windows® 2000/XP IPP Printing Use the following instructions if you wish to use the IPP printing capabilities of Windows® 2000/XP. 1 Run the Add Printer Wizard and click the Next button when you see the Welcome to the Add Printer Wizard screen. 2 You are now able to select Local Printer or Network Printer. For Windows® 2000: Make sure that you select Network Printer. For Windows® XP: Make sure that you select A Network Printer, or a Printer attached to another computer.
IF THE PRINTER DRIVER HAS ALREADY BEEN INSTALLED If the appropriate printer driver is already installed on your PC, Windows® 2000/XP will automatically use that driver for use. In this case, you will simply be asked if you wish to make the driver the default driver, after which the Driver installation Wizard will complete. You are now ready to print.
Specifying a Different URL Please note that there are several possible entries that you can enter for the URL field. http://printer_ip_address:631/ipp This is the default URL and we recommend that you use this URL. You can also use the following: http://printer_ip_address:631/ipp/binary_p1 Where printer_ip_address is the IP address or node name of the NC-2200w. 3 - 13 NETWORK PRINTING FROM WINDOWS® NC9100h_FM6.
4 Network Printing from Macintosh® 4 Printing from a Macintosh® Using the Simple Network Configuration capabilities of Mac OS® X (Mac OS® X 10.2.4 - 10.3 or greater) Overview You must be using Mac OS® X 10.2.4-10.3 or greater. The Simple Network Configuration capabilities on a Macintosh® running OS® X allow the NC-2200w to automatically configure its IP address settings. However, you must still configure the NC-2200w wireless settings before you can use the NC-2200w with your Macintosh® computer.
Printing from a Maintosh® Using the Simple Network Configuration capabitlities of Mac OS® X (Mac OS® X 10.2.4 - 10.3 or greater) You need to install the printer driver before setting up your computer to work with the NC-2200w. If the printer driver is already installed, you can skip this step. The driver is on the CD-ROM included with your Printer/MFC/DCP or you can download the latest printer driver from our web site: http://solutions.brother.com Please follow the steps below to install the printer driver.
5 Open the Utilities folder. 6 (For Mac OS® X 10.2.4 users) Open the Print Center icon. (For Mac OS® X 10.3 users) Open the Printer Setup Utility. 7 Click Add button. NETWORK PRINTING FROM MACINTOSH® 4 - 3 NC9100h_FM6.
8 Select Rendezvous. 9 Select your machine’s model name, and then click Add. 4 - 4 NETWORK PRINTING FROM MACINTOSH® NC9100h_FM6.
Changing the Configuration ■ From a Macintosh®, the easiest way to change the Printer/MFC/ DCP or NC-2200w parameters is to use a web browser. ■ Simply connect to the Printer/MFC/DCP using the format: http:/ /ip_address where ip_address is the address of the NC2200w. ■ If you change NC-2200w network setting such as wireless settings IP address, etc.,the NC-2200w connection might be disconnected. NETWORK PRINTING FROM MACINTOSH® 4 - 5 NC9100h_FM6.
5 Network Scanning from Windows® 5 Overview Network scanning is only supported on models that include the Network ready version of the MFC-Pro software. Important information The following models include the appropriate Network scanning software (Network capable MFL-Pro Sute). For more details, please see the Software User’s Guide or User’s Guide on the CDROM supplied with your Brother MFC/DCP.
Network Scanning concept There are two type of network scanning. Pull scanning With Pull Scanning, each individual computer initiates the document scan via the MFL-Pro Suite software as and when the Brother MFC/ DCP is available. YES YES YES NETWORK SCANNING FROM WINDOWS® 5 - 2 NC9100h_FM6.
Push scanning With Push scanning, the MFC/DCP initiates the document scan and automatically passes the files the MFL-Pro Suite software running on the remote computer. In this case you have to configure the target computer IP address on the NC-2200w. In addition, you must select USB when you press Scan-key, since the MFC/DCP and NC-2200w are connected using a USB cable. NO YES NO 192.168.1.10 Target 192.168.1.10 5 - 3 NETWORK SCANNING FROM WINDOWS® NC9100h_FM6.
Setting up the Network Scanning Software STEP 1: Install the MFL-Pro Suite using the CD-ROM supplied with your MFC/DCP This software is included on the CD-ROM supplied with your MFC/ DCP. To install the software, follow the steps in ‘Installing the Driver & Software for Network Interface Cable Users’ section of the Quick Setup Guide included with your MFC/DCP. During the MFL-Pro Suite software installation you may see the following screens.
STEP 2 :Specifying the Scan Destination Address using the NC-2200W Home Page You must use a web browser to configure this setting. 1 Open your Web browser and enter the following in the URL field. http://NC-2200w_ip_address ■ Where NC-2200w_ip_address is the IP address or node name of your NC-2200w. ■ For more information on the IP address and the login password etc., see Using the Embedded Web Server to change settings on page 2-20. 2 Go to the General Page under the Configurations.
■ If you don’t know your computer IP address, contact the network administrator. ■ To find out your computer name, open Properties from My Computer and refer to Computer Name tab. To use a host name you have to assign DNS server address information by connecting to the embedded web server of the NC-2200w. ■ For more information on pull scanning, please refer to the Software User’s Guide or User’s Guide on the CD-ROM supplied with your Brother MFC/DCP. NETWORK SCANNING FROM WINDOWS® 5 - 6 NC9100h_FM6.
6 Troubleshooting 6 Overview This chapter describes procedures for troubleshooting problems you may encounter with the NC-2200w, it is divided into the following sections: ■ General Problems ■ Wireless Setup Problems ■ Network Print Software Installation Problems ■ Printing Problems ■ Protocol-Specific Troubleshooting General Problems CD-ROM is inserted, but does not start automatically If your computer does not support Autorun, the menu will not start automatically after inserting the CD-ROM.
Wireless Setup Problems The NC-2200w is not found while setup by the Wireless Setup Wizard Make sure that the Link LED is turned on. If the Link LED is not turned on, Brother NC-2200w may not work properly. Check the following: 1 Check if the Brother NC-2200w power is turned on. 2 Check if the Brother NC-2200w is securely connected to the Brother Printer/MFC/DCP and the Printer/MFC/DCP is powered on.
For Windows® XP users 1 Click Start and then Control Panel. 2 Click the Network Connections icon. 3 Select and right click Wireless Network Connection. Click View Available Wireless Networks. 6 - 3 TROUBLESHOOTING NC9100h_FM6.
4 Click the Advanced button. 5 Make the Preferred networks field blank by using Remove. Click Add. 6 Enter SETUP. Select Disabled. Make sure that the check box at the bottom of the screen is selected, and then click OK. TROUBLESHOOTING 6 - 4 NC9100h_FM6.
7 Click OK. 8 Check the wireless network connection status. It may take a few minutes for the IP address to be displayed. 9 You can now use the Brother Wireless Setup Wizard to configure your NC-2200w settings. 6 - 5 TROUBLESHOOTING NC9100h_FM6.
For Mac OS® X 10.2.4-10.3 or greater users 1 Click the AirPort status icon and select Open Internet Connect.... 2 Select Create Network... from the Network option. 3 Enter SETUP, select 11 from the Channel option, and then click OK. TROUBLESHOOTING 6 - 6 NC9100h_FM6.
4 Your wireless network is connected successfully. 5 You can now use the Brother Wireless Setup Wizard to configure your NC-2200w settings. Network Print Software Installation Problems The Brother NC-2200w is not found during setup of the network print software installation or from the printer driver of the Brother Printer/MFC/DCP in Windows® The Brother NC-2200w is not found using the Simple Network Configuration capabilities of Mac OS® X.
4 Print the Network configuration page of the NC-2200w and check if the settings such as wireless and IP address settings are correct for your network. The problem may be the result of mismatched wireless setting, or mismatched or duplicate IP address. Verify that the Wireless settings and the IP address are correctly loaded into the NC-2200w. And make sure that no other nodes on the network have this IP address.
Printing Problem Print Job is not printed Make sure the status and configuration of the NC-2200w and the Printer/MFC/DCP, check following: 1 Check if the Brother NC-2200w power is turned on 2 Check if the Brother NC-2200w is securely connected to the Brother Printer/MFC/DCP and the Printer/MFC/DCP is powered on. 3 Make sure the printer/MFC/DCP is on-line and ready to print.
Error during printing If you try to print while other users are printing large amounts of data (e.g. many pages or color pages with high resolution), the NC-2200w and printer is unable to accept your print job until the ongoing printing is finished. If the waiting time of your print job exceeds a certain limit, a time out situation occurs, which causes the error message. In such situations, execute the print job again after the other jobs are completed. Windows NT®4.
Windows® 2000/XP IPP Troubleshooting Want to use a different Port number other than 631 If you are using Port 631 for IPP printing, you may find that your firewall may not let the print data through. If this is the case, use a different port number (port 80), or configure your Firewall to allow Port 631 data through. To send a print job using IPP to a Printer/MFC/DCP using Port 80 (the standard HTTP port) enter the following when configuring your Windows® 2000/XP system.
A Appendix A Appendix A General Information Protocols Protocols are the standardized sets of rules for transmitting data on a network. Predetermined protocols allow the users to gain access to the network-connected resources. The NC-2200w uses TC/IP protocols to communicate and print. ■ TCP/IP This is the most popular set of protocols used for communication such as Internet and E-mail. This protocol can be used in almost all the operation systems such as Windows®, Macintosh® and Linux.
■ Subnet mask Subnet masks restrict network communication and an example of one follows... - 255.255.0.0 Here is an example of an IP address and a subnet mask. IP Address Subnet Mask 193. 255. 1. 2. 255. 0. 3 0 0 means this part of the address is not limited for communication. Example) PC1 can talk to PC2 PC1 IP Address Subnet Mask 193. 255. 1. 2. 255. 0. 3 0 PC2 IP Address Subnet Mask 193. 255. 1. 3. 255. 0.
Appendix B Reloading firmware using BRAdmin Professional Utility General The firmware on the NC-2200w is stored in flash memory. This means that you can upgrade the firmware by downloading the appropriate update file. To get the latest firmware update, visit the Brother Solutions web site at http://solutions.brother.com/ Some software versions that we provide will automatically factory reset your print server parameters. We try to avoid doing this.
Appendix C NC-2200w Print/Scan server Specifications Model name NC-2200w Network types IEEE802.11b wireless Frequency 2412-2472 MHz RF channels US/Canada 1-11 Europe/Oceania 1-13 Japan 1-14 Communication mode Ad-hoc 802.11, Infrastructure Data rates 802.11b Link distance 70 m (233ft.) at lowest data rate (The distance rate will vary upon miscellaneous items.
Electromagnetic Emission USA FCC Part 15 Class B Canada ICES-003 (B) Europe EN55022B/EN55024 Australia/ New Zealand AS/NZA 3548 Japan VCCI Class B APPENDIX A - 5 NC9100h_FM6.
I L INDEX A Ad-hoc mode ...................... 2-5 APIPA ................................. 2-2 Authentication ..................... 2-6 Authentication methods ...... 2-6 B BOOTP ............................... 2-1 BRAdmin Professional utility ................................. 2-21, A-3 Brother LPR port ................ 3-2 Brother Peer to Peer Print .. 3-2 Browser ............................ 2-20 C LED ..................................... 1-3 LPR/LPD ............................. 2-2 M mDNS .......