
Server User Manual

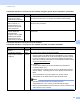
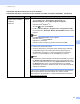
Table Of Contents
- Network User’s Guide
- Applicable models
- Definitions of notes
- IMPORTANT NOTE
- Table of Contents
- Section I: Network Operation
- 1 Introduction
- 2 Changing your machine’s network settings
- 3 Configuring your machine for a wireless network (For HL-5470DW(T) and HL-6180DW(T))
- Overview
- Confirm your network environment
- Wireless configuration temporarily using a USB cable (Recommended for Windows®)
- Configuration using the machine’s control panel Setup Wizard
- One push configuration using WPS (Wi-Fi Protected Setup) or AOSS™
- Configuration using the PIN Method of WPS (Wi-Fi Protected Setup)
- Configuration in Ad-hoc mode (For IEEE 802.11b)
- 4 Control panel setup
- Overview
- Network menu (For HL-5470DW(T) and HL-6180DW(T))
- Reset the network settings to the factory default
- Printing the Printer Settings Page (For HL-5450DN(T))
- Printing the Network Configuration Report (For HL-5470DW(T) and HL-6180DW(T))
- Printing the WLAN report (For HL-5470DW(T) and HL-6180DW(T))
- Function table and default factory settings
- 5 Web Based Management
- 6 Security features
- Overview
- Managing your network machine securely using SSL/TLS
- Secure Management using BRAdmin Professional 3 (Windows®)
- Printing documents securely using SSL/TLS
- Sending an E-mail securely
- Using IEEE 802.1x authentication
- Using Certificates for device security
- Managing multiple certificates
- 7 Troubleshooting
- Section II: Network Glossary
- 8 Types of network connections and protocols
- 9 Configuring your machine for a network
- 10 Wireless network terms and concepts (For HL-5470DW(T) and HL-6180DW(T))
- 11 Additional network settings from Windows®
- Types of additional network settings
- Installing drivers used for printing via Web Services (Windows Vista® and Windows® 7)
- Uninstalling drivers used for printing via Web Services (Windows Vista® and Windows® 7)
- Network printing installation for Infrastructure mode when using Vertical Pairing (Windows® 7)
- 12 Security terms and concepts
- Section III: Appendixes
- Index

76
Security features
6
How to export the self-signed certificate, the certificate issued by a CA, and the private key 6
a Click Export shown with Certificate List on the Certificate page.
b Enter the password if you want to encrypt the file.
Note
If a blank password is used, the output is not encrypted.
c Enter the password again for confirmation, and then click Submit.
d Specify the location where you want to save the file.
e Now the certificate and private key are exported to your computer.
Note
You can import the file that you exported.
Managing multiple certificates 6
This multiple certificate feature allows you to manage each certificate that you have installed using Web
Based Management. After installing certificates, you can view what certificates are installed from the
Certificate page and then view each certificate's content, delete or export the certificate. For information on
how to access the Certificate page, see Configure certificate using Web Based Management uu page 68.
The Brother machine allows you to store up to three self-signed certificates or up to three certificates issued
by a CA. You can use the stored certificates for using the HTTPS/IPPS protocol or IEEE 802.1x
authentication.
You can also store up to four CA certificates for using IEEE 802.1x authentication and SSL for SMTP/POP3.
We recommend you store one certificate less and keep the last free to deal with certificate expiration. For
example, if you want to store a CA certificate, store three certificates and leave one storage as a backup. In
the case of re-issuing the certificate, such as when the certificate is expired, you can import a new certificate
to the backup and then you can delete the expired certificate, to avoid configuration failure.
Note
When you use HTTPS/IPPS protocol or IEEE 802.1x, you must choose which certificate you are using.