
Server User Manual


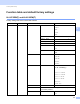
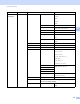
Table Of Contents
- Network User’s Guide
- Applicable models
- Definitions of notes
- IMPORTANT NOTE
- Table of Contents
- Section I: Network Operation
- 1 Introduction
- 2 Changing your machine’s network settings
- 3 Configuring your machine for a wireless network (For HL-5470DW(T) and HL-6180DW(T))
- Overview
- Confirm your network environment
- Wireless configuration temporarily using a USB cable (Recommended for Windows®)
- Configuration using the machine’s control panel Setup Wizard
- One push configuration using WPS (Wi-Fi Protected Setup) or AOSS™
- Configuration using the PIN Method of WPS (Wi-Fi Protected Setup)
- Configuration in Ad-hoc mode (For IEEE 802.11b)
- 4 Control panel setup
- Overview
- Network menu (For HL-5470DW(T) and HL-6180DW(T))
- Reset the network settings to the factory default
- Printing the Printer Settings Page (For HL-5450DN(T))
- Printing the Network Configuration Report (For HL-5470DW(T) and HL-6180DW(T))
- Printing the WLAN report (For HL-5470DW(T) and HL-6180DW(T))
- Function table and default factory settings
- 5 Web Based Management
- 6 Security features
- Overview
- Managing your network machine securely using SSL/TLS
- Secure Management using BRAdmin Professional 3 (Windows®)
- Printing documents securely using SSL/TLS
- Sending an E-mail securely
- Using IEEE 802.1x authentication
- Using Certificates for device security
- Managing multiple certificates
- 7 Troubleshooting
- Section II: Network Glossary
- 8 Types of network connections and protocols
- 9 Configuring your machine for a network
- 10 Wireless network terms and concepts (For HL-5470DW(T) and HL-6180DW(T))
- 11 Additional network settings from Windows®
- Types of additional network settings
- Installing drivers used for printing via Web Services (Windows Vista® and Windows® 7)
- Uninstalling drivers used for printing via Web Services (Windows Vista® and Windows® 7)
- Network printing installation for Infrastructure mode when using Vertical Pairing (Windows® 7)
- 12 Security terms and concepts
- Section III: Appendixes
- Index

36
Control panel setup
4
Network menu (For HL-5470DW(T) and HL-6180DW(T)) 4
The Network menu selections of the control panel allow you to set up the Brother machine for your network
configuration. (For more information on how to use the control panel: uu User's Guide.) Press any of the
Menu keys (a, b, OK or Back) to display the main menu. Then press a or b to choose Network. Proceed to
the menu selection you wish to configure. (For additional information on the menu, see Function table and
default factory settings uu page 43.)
Please note that the machine is supplied with the BRAdmin Light utility
1
or Web Based Management
applications, which also can be used to configure many aspects of the network. (See Other Management
Utilities uu page 7.)
1
For Macintosh users, you can download Brother's latest BRAdmin Light utility from http://solutions.brother.com/.
TCP/IP 4
If you connect the machine with a network cable to your network, use the Wired LAN menu selections. If
you connect the machine to a wireless Ethernet network, use the WLAN menu selections.
Boot Method 4
This selection controls how the machine obtains an IP address.
Auto mode 4
In this mode, the machine will scan the network for a DHCP server. If it can find one, and if the DHCP server
is configured to allocate an IP address to the machine, then the IP address supplied by the DHCP server will
be used. If no DHCP server is available, the IP Address is set using the APIPA protocol. After the machine is
initially powered ON, it may take a few minutes for the machine to scan the network for a server.
Static mode 4
In this mode the machine’s IP address must be manually assigned. Once entered the IP address is locked to
the assigned address.
Note
If you do not want your print server configured via DHCP, BOOTP or RARP, you must set the
Boot Method to Static so that the print server has a static IP address. This will prevent the print server
from trying to obtain an IP address from any of these systems. To change the Boot Method, use the
machine’s control panel, BRAdmin Light utility or Web Based Management.
IP Address 4
This field displays the current IP address of the machine. If you have chosen a Boot Method of Static,
enter the IP address that you wish to assign to the machine (check with your network administrator for the IP
address to use). If you have chosen a method other than Static, the machine will attempt to determine its
IP address using the DHCP or BOOTP protocols. The default IP address of your machine will probably be
incompatible with the IP address numbering scheme of your network. We recommend that you contact your
network administrator for an IP address for the network the unit will be connected on.