
Software User's Guide

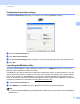

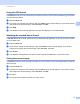
Table Of Contents
- SOFTWARE USER’S GUIDE
- Table of Contents
- Windows®
- 1 Printing
- Using the Brother printer driver
- Features
- Choosing the right type of paper
- Simultaneous printing, scanning and faxing
- Clearing data from the memory
- Status Monitor
- Printer driver settings
- Accessing the printer driver settings
- Basic tab
- Advanced tab
- Print Profiles tab
- Support
- Using FaceFilter Studio for photo printing by REALLUSION
- 2 Scanning
- Scanning a document using the TWAIN driver
- Scanning a document using the WIA driver (Windows® XP/Windows Vista®/Windows® 7)
- Scanning a document using the WIA driver (Windows® Photo Gallery and Windows® Fax and Scan users)
- Using ScanSoft™ PaperPort™12SE with OCR by NUANCE™
- 3 ControlCenter4
- 4 Remote Setup
- 5 Brother PC-FAX Software
- 6 PhotoCapture Center™
- 7 Firewall settings (For Network users)
- 1 Printing
- Apple Macintosh
- 8 Printing and Faxing
- 9 Scanning
- 10 ControlCenter2
- 11 Remote Setup & PhotoCapture Center™
- Using the Scan key
- Index
- brother USA

ControlCenter4
65
3
Sending a scanned image 3
The Send Scanned Image button lets you scan a page or document and automatically send the image as a
fax from the PC using the Brother PC-FAX software.
a Select the PC-FAX tab.
b Click Send Scanned Image.
c Configure the settings in the PC Scan setting area.
d Click Scan.
e Confirm and edit (if necessary) the scanned image in the image viewer.
f Click Send.
g The PC-FAX sending dialog will appear. Enter a fax number and then click Start.
Viewing and printing received PC-FAX data 3
The Received PC-FAX button lets you view and print received fax data using the Brother PC-FAX software.
Before you use the PC-FAX Receive function, you must select the PC-FAX Receive option from the
control panel menu of the Brother machine. (See Enabling the PC-FAX Receiving software on your
machine on page 99.)
a Select the PC-FAX tab.
b Click Received PC-FAX.
c The PC-FAX receiving function is activated and starts to receive fax data from your machine. The
received data will appear. To view the data, click View.
d If you want to print the received data, select the data and then click Print.
e Configure the print settings and then click Start Printing.