
Software User's Guide

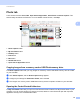
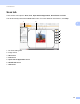
Table Of Contents
- SOFTWARE USER’S GUIDE
- Table of Contents
- Windows®
- 1 Printing
- Using the Brother printer driver
- Features
- Choosing the right type of paper
- Simultaneous printing, scanning and faxing
- Clearing data from the memory
- Status Monitor
- Printer driver settings
- Accessing the printer driver settings
- Basic tab
- Advanced tab
- Print Profiles tab
- Support
- Using FaceFilter Studio for photo printing by REALLUSION
- 2 Scanning
- Scanning a document using the TWAIN driver
- Scanning a document using the WIA driver (Windows® XP/Windows Vista®/Windows® 7)
- Scanning a document using the WIA driver (Windows® Photo Gallery and Windows® Fax and Scan users)
- Using ScanSoft™ PaperPort™12SE with OCR by NUANCE™
- 3 ControlCenter4
- 4 Remote Setup
- 5 Brother PC-FAX Software
- 6 PhotoCapture Center™
- 7 Firewall settings (For Network users)
- 1 Printing
- Apple Macintosh
- 8 Printing and Faxing
- 9 Scanning
- 10 ControlCenter2
- 11 Remote Setup & PhotoCapture Center™
- Using the Scan key
- Index
- brother USA

ControlCenter4
61
3
File types 3
You can choose from the following list of file types when saving to a folder.
Windows
®
Bitmap (*.bmp)
JPEG (*.jpg)
TIFF (*.tif)
TIFF Multi-Page (*.tif)
Portable Network Graphics (*.png)
PDF (*.pdf)
Secure PDF (*.pdf)
XML Paper Specification (*.xps)
Note
• The XML Paper Specification is available for Windows Vista
®
, Windows
®
7 or when using applications
which support XML Paper Specification files.
• If you set the file type to TIFF or TIFF Multi-Page, you can choose “Uncompressed” or “Compressed”.
• Secure PDF is available for the Save and Send E-mail selections.
Document Size 3
You can choose the document size from the pull-down list. If you choose a 1 to 2 document size, such as
1to2(A4), the scanned image will be divided into two A5 size documents.
Saving the scanned image 3
The Save button lets you scan an image to a folder on your hard disk in one of the file types shown in the file
attachment list.
a Configure the settings in the PC Scan setting area.
b Click Scan.
c Confirm and edit (if necessary) the scanned image in the image viewer.
d Click Save.
e The Save dialog will appear. Select your Destination Folder and other settings. Click OK.
f The image will be saved in the folder you have chosen.