
Software User's Guide
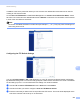
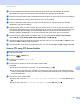
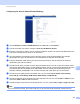
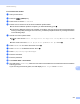

Table Of Contents
- SOFTWARE USER’S GUIDE
- Table of Contents
- Windows®
- 1 Printing
- Using the Brother printer driver
- Features
- Choosing the right type of paper
- Simultaneous printing, scanning and faxing
- Clearing data from the memory
- Status Monitor
- Printer driver settings
- Accessing the printer driver settings
- Basic tab
- Advanced tab
- Print Profiles tab
- Support
- Using FaceFilter Studio for photo printing by REALLUSION
- 2 Scanning
- Scanning a document using the TWAIN driver
- Scanning a document using the WIA driver (Windows® XP/Windows Vista®/Windows® 7)
- Scanning a document using the WIA driver (Windows® Photo Gallery and Windows® Fax and Scan users)
- Using ScanSoft™ PaperPort™12SE with OCR by NUANCE™
- 3 ControlCenter4
- 4 Remote Setup
- 5 Brother PC-FAX Software
- 6 PhotoCapture Center™
- 7 Firewall settings (For Network users)
- 1 Printing
- Apple Macintosh
- 8 Printing and Faxing
- 9 Scanning
- 10 ControlCenter2
- 11 Remote Setup & PhotoCapture Center™
- Using the Scan key
- Index
- brother USA

Network Scanning
211
13
j If you want to protect the profile, choose On from Use PIN for authentication and enter a 4-digit PIN
number in PIN Code.
k Enter the Username that has been registered with the CIFS server for the machine (up to 96 characters).
l Enter the Password for access to the CIFS server (up to 32 characters).
Scan to Network using Scan to Network Profiles 13
a Load your document.
b Press the (SCAN) key.
c Press a or b to choose Scan to Network.
Press OK.
d Press a or b to choose one of the Scan to Network profiles listed.
Press OK.
If the Scan to Network profile is complete, you will automatically go to k.
If the Scan to Network profile is not complete, for instance, the login account name and password are
missing or the quality or file type are not chosen, you will be prompted to enter any missing information
in the following steps.
e Choose one of the options below:
Press a or b to choose Color 100, Color 200, Color 300 or Color 600. Press OK and go to
f.
Press a or b to choose B/W 100, B/ W 200 or B/W 300. Press OK and go to g.
f Press a or b to choose PDF or JPEG for color documents. Press OK and go to i.
g Press a or b to choose PDF or TIFF for B/W documents. Press OK and go to i.
h Press a or b to choose Letter, Legal, Ledger, A4 or A3.
Press OK.
i Enter the username. Press OK.
j Enter the password. Press OK.
k Press Black Start or Color Start.
l The LCD shows Co nnecting. When the connection to the Network is successful the machine starts the
scanning process.
If you are using the scanner glass, the LCD displays Next Page?. Press 1 for Yes or press 2 for No.