
Software User's Guide
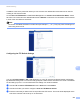
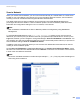
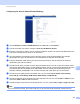
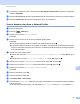

Table Of Contents
- SOFTWARE USER’S GUIDE
- Table of Contents
- Windows®
- 1 Printing
- Using the Brother printer driver
- Features
- Choosing the right type of paper
- Simultaneous printing, scanning and faxing
- Clearing data from the memory
- Status Monitor
- Printer driver settings
- Accessing the printer driver settings
- Basic tab
- Advanced tab
- Print Profiles tab
- Support
- Using FaceFilter Studio for photo printing by REALLUSION
- 2 Scanning
- Scanning a document using the TWAIN driver
- Scanning a document using the WIA driver (Windows® XP/Windows Vista®/Windows® 7)
- Scanning a document using the WIA driver (Windows® Photo Gallery and Windows® Fax and Scan users)
- Using ScanSoft™ PaperPort™12SE with OCR by NUANCE™
- 3 ControlCenter4
- 4 Remote Setup
- 5 Brother PC-FAX Software
- 6 PhotoCapture Center™
- 7 Firewall settings (For Network users)
- 1 Printing
- Apple Macintosh
- 8 Printing and Faxing
- 9 Scanning
- 10 ControlCenter2
- 11 Remote Setup & PhotoCapture Center™
- Using the Scan key
- Index
- brother USA

Network Scanning
209
13
Scan to Network 13
When you choose Scan to Network, you can scan documents directly to a shared folder on a CIFS server
located on your local network or the internet. (For more information about CIFS severs, see the Network
Glossary.) The Scan to Network feature supports NTLMv2 authentication.
The details required to use Scan to Network can be entered by using Web Based Management to
preconfigure and store the details in a Scan to Network profile. The Scan to Network profile stores user
information and configuration settings for use on a network, or the internet.
Note
Scan to Network is available when Scan to Network profiles are configured by using Web Based
Management.
To use Web Based Management, type http://xxx.xxx.xxx.xxx (where xxx.xxx.xxx.xxx is the IP
address of your machine) into your browser and enter your password (the default value is “access”) in the
Login field, and then you can configure or change the settings in Scan to FTP/Network in the Scan tab. You
can configure up to five Scan to Network profiles and you can choose what profile numbers (1 to 5) to use for
Scan to Network settings in Scan to FTP/Network Profile.
In addition to the seven preset file names you can store two user defined file names that can be used for
creating an Scan to Network profile.
Choose Scan to FTP/Network in Web Based Management. In Create a User Defined File Name, enter a
file name in one of the two user defined fields and click Submit. A maximum of 15 characters can be entered
in each of the user defined name fields.
Note
Do not use unsuitable characters in the file name (for example ?, /, \, or *). They may cause a sending error
when using Scan to Network.