
Network User's Guide


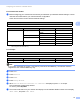


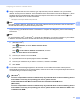


Table Of Contents
- NETWORK USER’S GUIDE
- Definitions of notes
- Compilation and publication notice
- IMPORTANT NOTE
- Table of Contents
- 1 Introduction
- 2 Changing your machine’s network settings
- 3 Configuring your machine for a wireless network
- Overview
- Step by step chart for wireless network configuration
- Confirm your network environment
- Confirm your wireless network setup method
- Configuration using the WPS/AOSS™ control panel menu (Infrastructure mode only) (Recommended)
- Configuration using the machine’s control panel Setup Wizard to configure your wireless network machine
- Configuration using the Brother installer application on the installation CD-ROM to configure your wireless network machine
- Configuration using the PIN Method of Wi-Fi Protected Setup (Infrastructure mode only)
- Configuring your machine for a wireless network (for Infrastructure mode and Ad-hoc mode)
- Using WPS or AOSS™ from the control panel menu to configure your machine for a wireless network
- Using the Setup Wizard from the control panel
- Configuring your machine when the SSID is not broadcast
- Using the Brother automatic installer application on the installation CD-ROM to configure your machine for a wireless network
- Using the PIN Method of Wi-Fi Protected Setup
- 4 Wireless configuration using the Brother installer application
- 5 Control panel setup
- Network menu
- Restoring the network settings to factory default
- Printing the Network Configuration List
- Printing the WLAN Report
- Function table and default factory settings
- 6 Web Based Management
- Overview
- How to configure the machine settings using Web Based Management (web browser)
- Secure Function Lock 2.0
- Changing the Scan to FTP configuration using a web browser
- Changing the Scan to Network configuration using a web browser
- Changing the LDAP configuration using a web browser (MFC-J6910DW only)
- 7 LDAP operation (MFC-J6910DW only)
- 8 Internet fax
- 9 Security features
- 10 Troubleshooting
- Appendix A
- Index

Wireless configuration using the Brother installer application
25
4
Configure the wireless settings 4
a Before configuring your machine we recommend you write down the SSID and Network Key (if required)
for your wireless network. You will need this information before you continue with the configuration.
b Turn on your computer.
c Start the Brother installer application.
Windows
®
1 Put the supplied installation CD-ROM into your CD-ROM drive. The opening screen will appear
automatically. If the model name screen appears, choose your machine. If the language screen
appears, choose your language.
2 The CD-ROM main menu will appear. Click Initial Installation.
Note
• If the Brother screen does not appear automatically, go to My Computer (Computer), double-click the
CD-ROM icon, and then double-click start.exe.
• The screen on your machine may vary depending on your region.
3 Click Wireless LAN Setup Wizard.
Macintosh
1 Put the supplied installation CD-ROM into your CD-ROM drive. Double-click the
MFL_PRO Suite icon on your desktop.
2 Double-click Utilities.
3 Double-click the Wireless Device Setup Wizard.
d Choose Yes, my Access Point supports WPS or AOSS and I want to use them. or No and then
click Next.
When you choose No, you have the ability to configure the wireless setting in four different ways.
Using a USB cable temporarily
Using an Ethernet (LAN) cable temporarily
Configuring through the control panel manually
Using Ad-hoc mode
Item Record the current wireless network settings
SSID (Network Name):
Network Key