
Network User's Guide


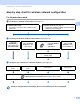


Table Of Contents
- NETWORK USER’S GUIDE
- Definitions of notes
- Compilation and publication notice
- IMPORTANT NOTE
- Table of Contents
- 1 Introduction
- 2 Changing your machine’s network settings
- 3 Configuring your machine for a wireless network
- Overview
- Step by step chart for wireless network configuration
- Confirm your network environment
- Confirm your wireless network setup method
- Configuration using the WPS/AOSS™ control panel menu (Infrastructure mode only) (Recommended)
- Configuration using the machine’s control panel Setup Wizard to configure your wireless network machine
- Configuration using the Brother installer application on the installation CD-ROM to configure your wireless network machine
- Configuration using the PIN Method of Wi-Fi Protected Setup (Infrastructure mode only)
- Configuring your machine for a wireless network (for Infrastructure mode and Ad-hoc mode)
- Using WPS or AOSS™ from the control panel menu to configure your machine for a wireless network
- Using the Setup Wizard from the control panel
- Configuring your machine when the SSID is not broadcast
- Using the Brother automatic installer application on the installation CD-ROM to configure your machine for a wireless network
- Using the PIN Method of Wi-Fi Protected Setup
- 4 Wireless configuration using the Brother installer application
- 5 Control panel setup
- Network menu
- Restoring the network settings to factory default
- Printing the Network Configuration List
- Printing the WLAN Report
- Function table and default factory settings
- 6 Web Based Management
- Overview
- How to configure the machine settings using Web Based Management (web browser)
- Secure Function Lock 2.0
- Changing the Scan to FTP configuration using a web browser
- Changing the Scan to Network configuration using a web browser
- Changing the LDAP configuration using a web browser (MFC-J6910DW only)
- 7 LDAP operation (MFC-J6910DW only)
- 8 Internet fax
- 9 Security features
- 10 Troubleshooting
- Appendix A
- Index

8
3
3
Overview 3
To connect your machine to your wireless network, we recommend you to follow the steps in the Quick Setup
Guide using or WPS or AOSS™ from the control panel menu. By using this method, you can easily connect
your machine to your wireless network.
Please read this chapter for more details on how to configure the wireless network settings. For information
on TCP/IP settings, see How to change your machine’s network settings (IP address, Subnet mask and
Gateway) on page 4.
Note
• To achieve optimum results with normal every day document printing, place the Brother machine as close
to the WLAN access point/router as possible with minimal obstructions. Large objects and walls between
the two devices as well as interference from other electronic devices can affect the data transfer speed of
your documents.
Due to these factors, wireless may not be the best method of connection for all types of documents and
applications. If you are printing large files, such as multi-page documents with mixed text and large
graphics, you may want to consider choosing wired Ethernet for a faster data transfer, or USB for the
fastest throughput speed.
• Although the Brother machine can be used in both a wired and wireless network, only one connection
method can be used at a time.
• Before configuring wireless settings, you will need to know your SSID and Network Key.
Configuring your machine for a wireless
network
3