
User Manual
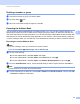


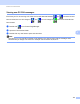
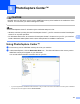
Table Of Contents
- SOFTWARE USER’S GUIDE
- Table of Contents
- Windows®
- 1 Printing
- Using the Brother printer driver
- Features
- Choosing the right type of paper
- Simultaneous printing, scanning and faxing
- Clearing data from the memory
- Status Monitor
- Printer driver settings
- Accessing the printer driver settings
- Basic tab
- Advanced tab
- Print Profiles tab
- Support
- Using FaceFilter Studio for photo printing by REALLUSION
- 2 Scanning
- 3 ControlCenter4
- 4 Remote Setup
- 5 Brother PC-FAX Software
- 6 PhotoCapture Center™
- 7 Firewall settings (For Network users)
- 1 Printing
- Apple Macintosh
- 8 Printing and Faxing
- 9 Scanning
- 10 ControlCenter2
- 11 Remote Setup & PhotoCapture Center™
- Using the Scan key
- Index
- brother CHN-ENG

Brother PC-FAX Software
99
5
For Touchscreen models 5
a Press MENU.
b Press a or b to choose Fax.
c Press a or b to choose Setup Receive.
d Press a or b to choose Memory Receive.
e Press a or b to choose PC Fax Receive.
Press OK.
f Press a or b to choose <USB> or your PC name if connected on a network.
Press OK.
g Press Backup Print:On or Backup Print:Off.
h Press Stop/Exit.
Note
If you select Backup Print:On, the machine will print the fax, so you will have a copy if there is a power
failure before it is sent to the PC. The fax messages are automatically erased from your machine’s memory
when they have been successfully printed and sent to your PC. When you select Backup Print:Off
your fax messages are automatically erased from your machine’s memory when they have been
successfully sent to your PC.
Running the PC-FAX Receiving software on your PC 5
Click Start, All Programs, Brother, MFC-XXXX, PC-FAX Receiving and Receive.
The PC-Fax Receiving dialog box appears. Confirm the message and click OK.
The PC-FAX icon appears in your PC tasktray.