
User Manual

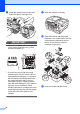


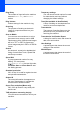


Table Of Contents
- ADVANCED USER’S GUIDE MFC-J6910DW
- User's Guides and where do I find it?
- Table of Contents
- 1 General setup
- 2 Security features
- 3 Sending a fax
- Additional sending options
- Additional sending operations
- Sending a duplex (2-sided) fax from the ADF
- Sending a fax manually
- Sending a fax at the end of a conversation
- Dual Access (Monochrome only)
- Broadcasting (Monochrome only)
- Real Time Transmission
- Overseas Mode
- Delayed Faxing (Monochrome only)
- Delayed Batch Transmission (Monochrome only)
- Checking and cancelling waiting jobs
- Polling overview
- 4 Receiving a fax
- 5 Dialling and storing numbers
- 6 Printing reports
- 7 Making copies
- Copy settings
- 8 Printing photos from a memory card or USB Flash memory drive
- 9 Printing photos from a camera
- A Routine maintenance
- B Glossary
- Index
- brother ARL/ASA/NZ

Routine maintenance
65
A
Packing and shipping
the machine
A
When you transport the machine, use the
packing materials that came with your
machine. Follow the instructions below to
correctly pack your machine. Damage
caused to your machine during transit may
not be covered by your warranty.
IMPORTANT
It is important to allow the machine to
“park” the print head after a print job.
Listen carefully to the machine before
unplugging it to make sure that all
mechanical noise has stopped. Not
allowing the machine to finish this parking
process may lead to print problems and
possible damage to the print head.
a Unplug the machine from the telephone
wall socket and take the telephone line
cord out of the machine.
b Unplug the machine from the electrical
socket.
c Using both hands, use the finger holds
on each side of the machine to lift the
scanner cover into the open position.
Then unplug the interface cable from the
machine, if it is connected.
d Remove the orange protective part from
the inside right corner of the machine.
e Gently close the scanner cover using
the finger holds on each side.
WARNING
Be careful not to trap your fingers under the
scanner cover.
Always use the finger holds provided on
each side of the scanner cover when
opening and closing it.
f Open the ink cartridge cover.
g Remove all four ink cartridges. Press
the ink release lever above each
cartridge to release it. (See Replacing
the ink cartridges in appendix A of the
Basic User’s Guide.)