
User Manual


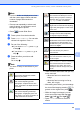


Table Of Contents
- ADVANCED USER’S GUIDE MFC-J6910DW
- User's Guides and where do I find it?
- Table of Contents
- 1 General setup
- 2 Security features
- 3 Sending a fax
- Additional sending options
- Additional sending operations
- Sending a duplex (2-sided) fax from the ADF
- Sending a fax manually
- Sending a fax at the end of a conversation
- Dual Access (Monochrome only)
- Broadcasting (Monochrome only)
- Real Time Transmission
- Overseas Mode
- Delayed Faxing (Monochrome only)
- Delayed Batch Transmission (Monochrome only)
- Checking and cancelling waiting jobs
- Polling overview
- 4 Receiving a fax
- 5 Dialling and storing numbers
- 6 Printing reports
- 7 Making copies
- Copy settings
- 8 Printing photos from a memory card or USB Flash memory drive
- 9 Printing photos from a camera
- A Routine maintenance
- B Glossary
- Index
- brother ARL/ASA/NZ

Chapter 8
50
g Adjust the red frame around your photo.
The part inside of the red frame will be
printed.
Press + or - to enlarge or reduce the
frame size.
Press a, b, d or c to move the
position of the frame.
Press to rotate the frame.
Press OK when you have finished
adjusting the frame setting.
Press OK to confirm.
Note
If your photo is very small or of irregular
proportions you may not be able to trim
the photo. The LCD will display
Image Too Small. or
Image Too Long.
h Enter the number of copies you want
either by pressing the number box
directly and enter the number you want
or pressing + or -.
Press OK.
i Do one of the following.
Press Print Setting and change
the print settings. (See page 51.)
If you do not want to change any
settings, press Colour Start to print.
DPOF printing 8
DPOF stands for Digital Print Order Format.
Major digital camera manufacturers (Canon
Inc., Eastman Kodak Company, FUJIFILM
Corporation, Panasonic Corporation and
Sony Corporation) created this standard to
make it easier to print images from a digital
camera.
If your digital camera supports DPOF
printing, you will be able to choose on the
digital camera display the images and
number of copies you want to print.
When a memory card containing DPOF
information is put into your machine, you can
print the chosen image easily.
a Make sure you have put the memory
card in the correct slot.
Press (PHOTO CAPTURE).
The machine will ask you if you want to
use DPOF settings.
The DPOF file on the memory card must
be in a valid DPOF format.
b Press Yes.
c Do one of the following:
Press Print Setting to change
the print settings. (See page 51.)
If you do not want to change any
settings, press Colour Start to print.
Note
A DPOF File error can occur if the print
order that was created on the camera has
been corrupted. Delete and recreate the
print order using your camera to correct
this problem. For instructions on how to
delete or recreate the print order, refer to
your camera manufacturer's support
website or accompanying documentation.