
User Manual


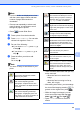


Table Of Contents
- ADVANCED USER’S GUIDE MFC-J6910DW
- User's Guides and where do I find it?
- Table of Contents
- 1 General setup
- 2 Security features
- 3 Sending a fax
- Additional sending options
- Additional sending operations
- Sending a duplex (2-sided) fax from the ADF
- Sending a fax manually
- Sending a fax at the end of a conversation
- Dual Access (Monochrome only)
- Broadcasting (Monochrome only)
- Real Time Transmission
- Overseas Mode
- Delayed Faxing (Monochrome only)
- Delayed Batch Transmission (Monochrome only)
- Checking and cancelling waiting jobs
- Polling overview
- 4 Receiving a fax
- 5 Dialling and storing numbers
- 6 Printing reports
- 7 Making copies
- Copy settings
- 8 Printing photos from a memory card or USB Flash memory drive
- 9 Printing photos from a camera
- A Routine maintenance
- B Glossary
- Index
- brother ARL/ASA/NZ

Chapter 8
48
d Do one of the following:
Press Print Setting to change
the paper type or the paper size you
are using.
If you do not want to change the
paper settings, go to g.
e Press Paper Type.
Choose the paper type you are using,
Plain Paper, Inkjet Paper,
Brother BP71, Brother BP61 or
Other Glossy.
f Press Paper Size.
Choose the paper size you are using, A4
or Letter.
g Press Colour Start to print.
Printing Photos 8
Before you can print an individual image, you
have to know the image number.
a Make sure you have put the memory
card or USB Flash memory drive in the
correct slot.
Press (PHOTO CAPTURE).
b Print the Index. (See Print Index
(Thumbnails) on page 47.)
c Press Index Print.
d Press Print Photos.
e Enter the image number that you want to
print from the thumbnails printed on the
Index page.
After you have chosen the image
numbers, press OK.
Note
• You can enter the numbers at one time by
using a comma or a hyphen. For example,
Enter 1,3,6 to print images No.1, No.3 and
No.6. Enter 1-5 to print images No.1 to
No.5.
• You can enter up to 12 characters
(including commas) for the image
numbers you want to print.
f Enter the number of copies you want
either by pressing the number box
directly and enter the number you want
or pressing + or -.
g Do one of the following:
Press Print Setting to change
the print settings. (See page 51.)
If you do not want to change any
settings, press Colour Start to print.
Enhance Photos 8
You can edit and add effects to your photos
and view them on the LCD before printing.
Note
The Enhance Photo feature is
supported by technology from Reallusion,
Inc.
a Make sure you have put a memory card
or USB Flash memory drive in the
correct slot.
Press (PHOTO CAPTURE).
b Press Enhance Photo.