
User Manual


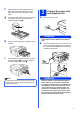


Table Of Contents
- Quick Setup Guide MFC-J6910DW
- Start Here
- 1 Unpack the machine and check the components
- 2 Load plain A4 paper
- 3 Connect the power cord and telephone line
- 4 Install the ink cartridges
- 5 Check the print quality
- 6 Set the paper settings
- 7 Choose your language (if needed)
- 8 Choose a Receive Mode
- 9 Set the date and time
- 10 Enter personal information (Station ID)
- 11 Fax Transmission Report
- 12 Set Tone or Pulse dialling mode
- 13 Set the telephone line compatibility
- 14 Manual Feed Slot
- 15 Choose your connection type
- For USB interface users (Windows® 2000 Professional/XP Home/XP Professional/Windows Vista®/Windows® 7)
- For USB interface users (Mac OS X 10.4.11, 10.5.x, 10.6.x)
- For wired network interface users (Windows® 2000 Professional/XP Home/XP Professional/Windows Vista®/Windows® 7)
- For wired network interface users (Mac OS X 10.4.11, 10.5.x, 10.6.x)
- For wireless network interface users
- 16 Before you begin
- 17 Confirm your network environment (Infrastructure Mode)
- 18 Configure the wireless settings (typical Wireless Setup in infrastructure mode)
- 18 Configure the wireless settings using the automatic wireless (one- push) method
- Troubleshooting
- Install the drivers & software (Windows® 2000 Professional/XP Home/XP Professional/Windows Vista®/Windows® 7)
- Install the drivers & software (Mac OS X 10.4.11, 10.5.x, 10.6.x)
- Install Optional Applications
- For Network Users
- Consumables
- Brother CHN-ENG
- Start Here

2
2
Load plain A4 paper
a Pull paper tray #1, the upper tray a completely
out of the machine.
b Open the output paper tray cover a.
c With both hands, gently press and slide the
paper length guide a and then the paper side
guides b to fit the paper size.
Make sure that the triangular marks c on the
paper length guide a and paper side guides b
line up with the mark for the paper size you are
using.
d Fan the stack of paper well to avoid paper jams
and misfeeds.
e Gently put the paper into paper tray #1 print
side down and top edge first.
Note
• Save all packing materials and the box in case
for any reason you must ship your machine.
• For a network connection you will need to
purchase a network interface cable. Please
use the supplied USB cable for a USB
connection.
USB cable
It is recommended to use a USB 2.0 cable (Type
A/B) that is no more than 2 metres long.
Network cable
Use a straight-through Category5 (or greater)
twisted-pair cable for 10BASE-T or 100BASE-TX
Fast Ethernet Network.
1
1
Note
DO NOT push the paper in too far.
LT R
EXE
B5
JIS
A4
B5JIS
EXE
Photo 2LL
4×6in
10×15cm
A4 B4JIS
LT R
LGL
LGR
1
3
2
3