
Quick Setup Guide

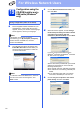


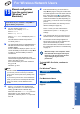


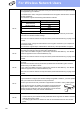


Table Of Contents
- Quick Setup Guide MFC-J280W MFC-J625DW
- Start Here
- 1 Unpack the machine and check the components
- 2 Load plain Letter/A4 paper
- 3 Connect the power cord and telephone line
- 4 Install the ink cartridges
- 5 Check the print quality
- 6 Choose your language (if needed)
- 7 Choose the correct Receive Mode
- 8 Set the LCD contrast (if needed)
- 9 Set the date and time
- 10 Set your Station ID
- 11 Fax Transmission Report
- 12 Set Tone or Pulse dialing mode (Canada only)
- 13 Set the telephone line compatibility (VoIP)
- 14 Automatic Daylight Savings Time
- 15 Send in the Product Registration Sheet (USA only)
- 16 Choose your connection type
- For USB interface users (Windows® XP Home/XP Professional/Windows Vista®/Windows® 7)
- For USB interface users (Mac OS X 10.4.11, 10.5.x, 10.6.x)
- For wireless network interface users
- 17 Before you begin
- 18 Choose your wireless install method
- 19 Configuration using the CD-ROM installer and a USB cable (Windows® only)
- 19 Manual configuration from the control panel (Windows® and Macintosh)
- 19 One-push configuration using WPS or AOSS™ (Windows® and Macintosh)
- Troubleshooting
- Install the drivers & software (Windows® XP Home/XP Professional/Windows Vista®/Windows® 7)
- Install the drivers & software (Mac OS X 10.4.11, 10.5.x, 10.6.x)
- Install Optional Applications Windows®
- For Network Users
- Consumables
- brother USA/CAN
- Start Here

24
For Wireless Network Users
j Enter the Network Key you wrote down in
step 18-a on page 20 and then enter the key
again in Confirm Network Key, then click
Next.
k Click Next. The settings will be sent to your
machine.
l Disconnect the USB cable between the
computer and the machine.
m Click Next to continue to install MFL-Pro Suite.
Wireless setup is now complete. A four
level indicator at the upper left of your
machine’s LCD will show the wireless
signal strength of your access
point/router.
To install MFL-Pro Suite, continue to
step 21-e on page 30.
Now go to
Page 30
Note
If your network is not configured for
Authentication and Encryption, the following
screen will appear. To continue configuration,
click OK and go to k.
Note
• The settings will remain unchanged if you click
Cancel.
• If you want to manually enter the IP address
settings of your machine, click Change IP
Address and enter the necessary IP address
settings for your network.
• If the wireless setup failure screen appears,
click Retry.