
Quick Setup Guide

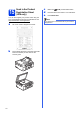

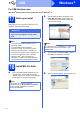

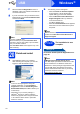


Table Of Contents
- Quick Setup Guide MFC-J280W MFC-J625DW
- Start Here
- 1 Unpack the machine and check the components
- 2 Load plain Letter/A4 paper
- 3 Connect the power cord and telephone line
- 4 Install the ink cartridges
- 5 Check the print quality
- 6 Choose your language (if needed)
- 7 Choose the correct Receive Mode
- 8 Set the LCD contrast (if needed)
- 9 Set the date and time
- 10 Set your Station ID
- 11 Fax Transmission Report
- 12 Set Tone or Pulse dialing mode (Canada only)
- 13 Set the telephone line compatibility (VoIP)
- 14 Automatic Daylight Savings Time
- 15 Send in the Product Registration Sheet (USA only)
- 16 Choose your connection type
- For USB interface users (Windows® XP Home/XP Professional/Windows Vista®/Windows® 7)
- For USB interface users (Mac OS X 10.4.11, 10.5.x, 10.6.x)
- For wireless network interface users
- 17 Before you begin
- 18 Choose your wireless install method
- 19 Configuration using the CD-ROM installer and a USB cable (Windows® only)
- 19 Manual configuration from the control panel (Windows® and Macintosh)
- 19 One-push configuration using WPS or AOSS™ (Windows® and Macintosh)
- Troubleshooting
- Install the drivers & software (Windows® XP Home/XP Professional/Windows Vista®/Windows® 7)
- Install the drivers & software (Mac OS X 10.4.11, 10.5.x, 10.6.x)
- Install Optional Applications Windows®
- For Network Users
- Consumables
- brother USA/CAN
- Start Here

11
11
Fax Transmission Report
Your Brother machine is equipped with a
Transmission Verification Report that can be used as
confirmation that you sent a fax. This report lists the
name or fax number of the receiving party, the date,
time, and duration of the transmission, the number of
pages transmitted, and whether or not the
transmission was successful. If you want to use the
Fax Transmission Report feature, see Transmission
Verification Report in chapter 4 of the Basic User’s
Guide.
12
Set Tone or Pulse dialing
mode
(Canada only)
Your machine comes set for Tone dialing service. If
you have Pulse dialing service (rotary), you need to
change the dialing mode.
a Press Menu.
b Press s or t to display Initial Setup.
c Press Initial Setup .
d Press s or t to display Tone/Pulse.
e Press Tone/Pulse.
f Press Pulse (or Tone).
g Press Stop/Exit.
13
Set the telephone line
compatibility (VoIP)
If you are connecting the machine to a VoIP service
(over the Internet) you need to change the
compatibility setting.
a Press Menu.
b Press s or t to display Initial Setup.
c Press Initial Setup.
d Press s or t to display Compatibility.
e Press Compatibility.
f Press Basic(for VoIP).
g Press Stop/Exit.
14
Automatic Daylight
Savings Time
You can set the machine to change automatically for
daylight savings time. It will reset itself forward one
hour in the spring and backward one hour in the fall.
a Press Menu.
b Press General Setup.
c Press s or t to display Auto Daylight.
d Press Auto Daylight.
e Press On (or Off).
f Press Stop/Exit.
Note
If you are using an analog telephone line you can
skip this step.