
User Manual
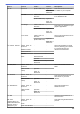

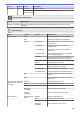


Table Of Contents
- Online User's Guide MFC-J5945DW
- Table of Contents
- Before You Use Your Brother Machine
- Introduction to Your Brother Machine
- Paper Handling
- Print
- Print from Your Computer (Windows)
- Print a Photo (Windows)
- Print a Document (Windows)
- Cancel a Print Job (Windows)
- Print More Than One Page on a Single Sheet of Paper (N in 1) (Windows)
- Print as a Poster (Windows)
- Print on Both Sides of the Paper Automatically (Automatic 2-sided Printing) (Windows)
- Print as a Booklet Automatically (Windows)
- Secure Print (Windows)
- Print a Colour Document in Greyscale (Windows)
- Prevent Smudged Printouts and Paper Jams (Windows)
- Use a Preset Print Profile (Windows)
- Change the Default Print Settings (Windows)
- Print Settings (Windows)
- Print from Your Computer (Mac)
- Print a Photo (Mac)
- Print a Document (Mac)
- Print on Both Sides of the Paper Automatically (Automatic 2-sided Printing) (Mac)
- Print More Than One Page on a Single Sheet of Paper (N in 1) (Mac)
- Secure Print (Mac)
- Print a Colour Document in Greyscale (Mac)
- Prevent Smudged Printouts and Paper Jams (Mac)
- Print Options (Mac)
- Print Data Directly from a USB Flash Drive
- Print from Your Computer (Windows)
- Scan
- Scan Using the Scan Button on Your Brother Machine
- Scan Photos and Graphics
- Save Scanned Data to a Folder as a PDF File
- Save Scanned Data to a USB Flash Drive
- Scan Multiple Business Cards and Photos (Auto Crop)
- Scan to an Editable Text File Using OCR
- Scan to Email Attachment
- Send Scanned Data to an Email Server
- Scan to FTP
- Scan to SSH FTP (SFTP)
- Scan to Network (Windows)
- Scan to SharePoint
- Web Services for Scanning on Your Network (Windows 7, Windows 8 and Windows 10)
- Change Scan Button Settings from ControlCenter4 (Windows)
- Change Scan Button Settings from Brother iPrint&Scan (Mac)
- Scan from Your Computer (Windows)
- Scan Using ControlCenter4 Home Mode (Windows)
- Scan Using ControlCenter4 Home Mode (Windows)
- Select Document Type Using ControlCenter4 Home Mode (Windows)
- Change Scan Size Using ControlCenter4 Home Mode (Windows)
- Crop a Scanned Image Using ControlCenter4 Home Mode (Windows)
- Print Scanned Data Using ControlCenter4 Home Mode (Windows)
- Open with an Application Using ControlCenter4 Home Mode (Windows)
- Save Scanned Data to a Folder as a PDF File Using ControlCenter4 Home Mode (Windows)
- Scan Both Sides of a Document Automatically Using ControlCenter4 Home Mode (Windows)
- Scan Settings for ControlCenter4 Home Mode (Windows)
- Scan Using ControlCenter4 Home Mode (Windows)
- Scan Using ControlCenter4 Advanced Mode (Windows)
- Scan Photos and Graphics Using ControlCenter4 Advanced Mode (Windows)
- Save Scanned Data to a Folder as a PDF File Using ControlCenter4 Advanced Mode (Windows)
- Scan Both Sides of a Document Automatically Using ControlCenter4 Advanced Mode (Windows)
- Scan Both Sides of an ID Card Using ControlCenter4 Advanced Mode (Windows)
- Scan to Email Attachment Using ControlCenter4 Advanced Mode (Windows)
- Scan to an Editable Text File (OCR) Using ControlCenter4 Advanced Mode (Windows)
- Scan to an Office File Using ControlCenter4 Advanced Mode (Windows)
- Scan Settings for ControlCenter4 Advanced Mode (Windows)
- Scan Using Nuance™ PaperPort™ 14SE or Other Windows Applications
- Scan Using Windows Fax and Scan
- Install BookScan Enhancer and Whiteboard Enhancer (Windows)
- Scan Using ControlCenter4 Home Mode (Windows)
- Scan from Your Computer (Mac)
- Configure Scan Settings Using Web Based Management
- Scan Using the Scan Button on Your Brother Machine
- Copy
- Fax
- Send a Fax
- Send a Fax from Your Brother Machine
- Send a 2-sided Fax from the ADF
- Send a Fax Manually
- Send a Fax at the End of a Conversation
- Send the Same Fax to More than One Recipient (Broadcasting)
- Send a Fax in Real Time
- Send a Fax at a Specified Time (Delayed Fax)
- Change the Fax Auto Redial Setting
- Cancel a Fax in Progress
- Check and Cancel a Pending Fax
- Fax Options
- Receive a Fax
- Voice Operations and Fax Numbers
- Telephone Services and External Devices
- Fax Reports
- PC-FAX
- PC-FAX for Windows
- PC-FAX Overview (Windows)
- Configure PC-FAX (Windows)
- Configure your PC-Fax Address Book (Windows)
- Add a Member to your PC-FAX Address Book (Windows)
- Create a Group in your PC-FAX Address Book (Windows)
- Edit Member or Group Information in your PC-FAX Address Book (Windows)
- Delete a Member or Group in your PC-FAX Address Book (Windows)
- Export your PC-FAX Address Book (Windows)
- Import Information to your PC-FAX Address Book (Windows)
- Send a Fax Using PC-FAX (Windows)
- Receive Faxes on Your Computer (Windows)
- PC-FAX Overview (Windows)
- PC-FAX for Mac
- PC-FAX for Windows
- Send a Fax
- Network
- Configure Network Details Using the Control Panel
- Supported Basic Network Features
- Learn about Network Management Software and Utilities
- Additional Methods of Configuring Your Brother Machine for a Wireless Network
- Before Configuring Your Brother Machine for a Wireless Network
- Configure Your Machine for a Wireless Network Using the One Push Method of Wi-Fi Protected Setup™ (WPS)
- Configure Your Machine for a Wireless Network Using the PIN Method of Wi-Fi Protected Setup™ (WPS)
- Configure Your Machine for a Wireless Network When the SSID is Not Broadcast
- Configure Your Machine for an Enterprise Wireless Network
- Use Wi-Fi Direct®
- Print or Scan from Your Mobile Device Using Wi-Fi Direct
- Configure Your Wi-Fi Direct Network
- Wi-Fi Direct Network Configuration Overview
- Configure Your Wi-Fi Direct Network Using the One-Push Method
- Configure Your Wi-Fi Direct Network Using the One-Push Method of Wi-Fi Protected Setup™ (WPS)
- Configure Your Wi-Fi Direct Network Using the PIN Method
- Configure Your Wi-Fi Direct Network Using the PIN Method of Wi-Fi Protected Setup™ (WPS)
- Configure Your Wi-Fi Direct Network Manually
- Advanced Network Features
- Print the Network Configuration Report
- Fax Using the Internet (I-Fax)
- Configure and Operate LDAP Search
- Synchronize Time with the SNTP Server Using Web Based Management
- Technical Information for Advanced Users
- Security
- Before Using Network Security Features
- Secure Function Lock 3.0
- Before Using Secure Function Lock 3.0
- Configure Secure Function Lock 3.0 Using Web Based Management
- Scan Using Secure Function Lock 3.0
- Configure Public Mode for Secure Function Lock 3.0
- Additional Secure Function Lock 3.0 Features
- Register a new IC Card Using Machine's Control Panel
- Register an External IC Card Reader
- Use Active Directory Authentication
- Use LDAP Authentication
- Manage Your Network Machine Securely Using SSL/TLS
- Certificates and Web Based Management
- Supported Security Certificate Features
- Create and Install a Certificate
- Manage Multiple Certificates
- Certificates and Web Based Management
- Manage Your Network Machine Securely Using IPsec
- Send or Receive an Email Securely
- Use IEEE 802.1x Authentication for a Wired or a Wireless Network
- Mobile/Web Connect
- Brother Web Connect
- Brother Web Connect Overview
- Online Services Used with Brother Web Connect
- Conditions for Using Brother Web Connect
- Set Up Brother Web Connect
- Scan and Upload Documents Using Brother Web Connect
- Upload a Document from an External Memory Device Using Brother Web Connect
- Download and Print Documents Using Brother Web Connect
- Download and Save a Document to an External Memory Device Using Brother Web Connect
- FaxForward to Cloud or E-mail
- Google Cloud Print
- AirPrint
- Mobile Printing for Windows
- Mopria® Print Service
- Brother iPrint&Scan for Mobile Devices
- Near-Field Communication (NFC)
- Brother Web Connect
- ControlCenter
- Brother iPrint&Scan for Windows and Mac
- Troubleshooting
- Error and Maintenance Messages
- Document Jams
- Printer Jam or Paper Jam
- If You Are Having Difficulty with Your Machine
- Paper Handling and Printing Problems
- Telephone and Fax Problems
- Other Problems
- Network Problems
- Google Cloud Print Problems
- AirPrint Problems
- Check the Machine Information
- Reset Your Brother Machine
- Routine Maintenance
- Replace the Ink Cartridges
- Clean Your Brother Machine
- Clean the Scanner
- Clean the Print Head from Your Brother Machine
- Clean the Print Head from Your Computer (Windows)
- Clean the Print Head from Your Computer (Mac)
- Clean the Machine's LCD
- Clean the Outside of the Machine
- Clean the Machine's Printer Platen
- Clean the Paper Feed Rollers
- Clean the Base Pad
- Clean the Paper Pick-up Rollers
- Clean the Paper Pick-up Rollers for Paper Tray #2
- Check Your Brother Machine
- Check the Print Quality
- Check the Print Alignment from Your Brother Machine
- Check the Print Alignment from Your Computer (Windows)
- Check the Print Alignment from Your Computer (Mac)
- Check the Ink Volume (Page Gauge)
- Monitor Machine Status from Your Computer (Windows)
- Monitor Machine Status from Your Computer (Mac)
- Correct the Paper Feed to Clear Vertical Lines
- Change the Print Setting Options When Having Printing Problems
- Pack and Ship Your Brother Machine
- Machine Settings
- Change Machine Settings from the Control Panel
- In the Event of Power Failure (Memory Storage)
- General Settings
- Adjust the Machine Volume
- Change for Daylight Saving Time Automatically
- Set Sleep Mode Countdown
- Set the Machine to Power Off Automatically
- Set the Date and Time
- Set the Time Zone
- Adjust the LCD Backlight Brightness
- Change How Long the LCD Backlight Stays On
- Set Your Station ID
- Set Tone or Pulse Dialling Mode
- Prevent Dialling a Wrong Number (Dial Restriction)
- Reduce Printing Noise
- Change the Language Displayed on the LCD
- Save Your Favourite Settings as a Shortcut
- Print Reports
- Settings and Features Tables
- Change Machine Settings from Your Computer
- Change Machine Settings from the Control Panel
- Appendix

Level 1 Level 2 Level 3 Descriptions
A4 Centre Options Density
Adjust the density.
Auto Deskew
(Using the ADF)
Set the machine to correct a skewed copy.
[Download Software]
Level 1 Descriptions
Download Software
Displays information about downloading and installing software for mobile devices and
computers.
[Shortcuts]
Level 1
Level 2 Level 3 Descriptions
Add Shortcut Copy
- Change the settings in the Copy Options.
Fax
- Change the settings in the Fax Options.
Scan to PC(File)
Scan a monochrome or a colour document to
your computer.
to PC(OCR)
Convert your scanned document to an
editable text file.
to PC(Image)
Scan a colour picture into your graphics
application.
to PC(E-mail)
Scan a monochrome or a colour document
into your email application.
to Media
Scan documents and save them directly to a
USB flash drive without using a computer.
to E-mail
Server
Scan a monochrome or a colour document to
the email address you want.
to Network
Send scanned data to a CIFS server on your
local network or on the Internet.
to FTP/SFTP
Send scanned data via FTP/SFTP.
to SharePoint
Send scanned data via a SharePoint server.
Web
- Connect the Brother machine to an Internet
service.
Apps
- Connect the Brother machine to the Brother
Apps service.
This list appears when each
Shortcut icon is pressed for
2 seconds.
Rename
- Change the shortcut name.
Edit
- Change the shortcut settings.
Delete
- Delete the shortcut.
Register
Card/NFC
- Assign a Shortcut to an IC card.
Delete
Card/NFC
- Remove a Shortcut from an IC card.
Edit/ Delete
(Select Shortcut
button.)
Rename
Change the shortcut name.
Edit
Change the shortcut settings.
Delete
Delete the shortcut.
Register
Card/NFC
Assign a Shortcut to an IC card.
655