
User Manual
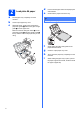
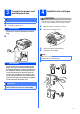
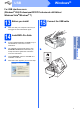
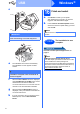
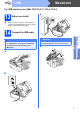

Table Of Contents
- Quick Setup Guide MFC-J220 MFC-J410
- Start Here
- 1 Unpack the machine and check the components
- 2 Load plain A4 paper
- 3 Connect the power cord and telephone line
- 4 Install the ink cartridges
- 5 Check the print quality
- 6 Choose your language
- 7 Choose a Receive Mode
- 8 Set the date and time
- 9 Enter personal information (Station ID)
- 10 Set Tone or Pulse dialling mode
- 11 Set the telephone line type
- 12 Set the phone line compatibility
- For USB interface users (Windows® 2000 Professional/XP/XP Professional x64 Edition/ Windows Vista®/Windows® 7)
- For USB interface users (Mac OS X 10.4.11, 10.5.x, 10.6.x)
- Install Optional Applications Windows®
- brother CEE-ENG
- Start Here

2
2
Load plain A4 paper
a Pull the paper tray completely out of the
machine.
b Lift the output paper tray cover.
c With both hands, gently press and slide the
paper side guides a and then the paper length
guide b to fit the paper size.
Make sure that the triangular marks c on the
paper side guides a and paper length guide b
line up with the mark for the paper size you are
using.
d Fan the stack of paper well to avoid paper jams
and misfeeds.
e Check that the paper is flat in the tray.
f Gently adjust the paper side guides to the
paper with both hands.
g Close the output paper tray cover.
h Slowly push the paper tray completely into the
machine.
i While holding the paper tray in place, pull out
the paper support until it clicks, and then unfold
the paper support flap.
3
2
3
1
IMPORTANT
DO NOT push the paper in too far.