
Printer/Fax/Scanner/Copier Quick Setup Guide
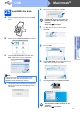
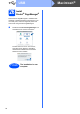
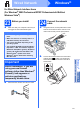
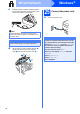


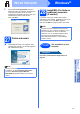
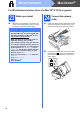
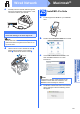
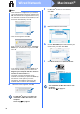
Table Of Contents
- Quick Setup Guide MFC-790CW MFC-990CW
- Start Here
- 1 Unpack the machine and check the components
- 2 Connect the handset (MFC-790CW only)
- 3 Load plain Letter/A4 paper
- 4 Connect the power cord and telephone line
- 5 Install the ink cartridges
- 6 Check the print quality
- 7 Choose your language (If needed)
- 8 Choose the correct Receive Mode
- 9 Setting up the Message Center
- 10 Set the LCD contrast (If needed)
- 11 Set the date and time
- 12 Set your station ID
- 13 Set tone or pulse dialing mode
- 14 Automatic Daylight Savings Time
- 15 Send in the Product Registration and Test Sheet (USA only)
- Set up the cordless handset (MFC-990CW only)
- For USB Interface Users (For Windows® 2000 Professional/XP/XP Professional x64 Edition/ Windows Vista®)
- For USB Interface Users (For Mac OS® X 10.2.4 or greater)
- For Wired Network Interface Users (For Windows® 2000 Professional/XP/XP Professional x64 Edition/ Windows Vista®)
- For Wired Network Interface Users (For Mac OS® X 10.2.4 or greater)
- For Wireless Network Interface Users
- 23 Before you begin
- 24 Confirm your network environment (Infrastructure Mode)
- Connecting the Brother machine to the wireless network
- Install the Drivers & Software (For Windows® 2000 Professional/XP/XP Professional x64 Edition/ Windows Vista®)
- Install the Drivers & Software (For Mac OS® X 10.2.4 or greater)
- Install Optional Applications Windows®
- For Network Users
- Consumables
- brother USA/CAN
- Start Here

26
Windows
®
Wired Network
f Choose Wired Network Connection, and
then click Next.
g For Windows
®
XP SP2/Windows Vista
®
users,
when this screen appears, choose Change the
Firewall port settings to enable network
connection and continue with the
installation. (Recommended) and click Next.
If you are using a firewall other than Windows
®
Firewall or Windows
®
Firewall is off, this screen
may appear.
See the instructions provided with your firewall
software for information on how to add the
following network ports.
For network scanning, add UDP port 54925.
For network PC-Fax receiving, add UDP port
54926.
If you still have trouble with your network
connection, add UDP port 137.
h The installation of the Brother drivers will
automatically start. The installation screens
appear one after another.
Note
• If the machine is configured for your network,
choose the machine from the list, and then click
Next.
This window will not appear if there is only one
machine connected on the network, it will be
chosen automatically.
If your machine shows APIPA in the IP
Address field, click Configure IP Address
and enter an IP address for your machine that
is suitable for your network.
• If the machine is not yet configured for use on
your network, the following screen appears.
Click OK.
The Configure IP Address window will
appear. Enter an IP address for your machine
that is suitable for your network by following the
on-screen instructions.
Important
DO NOT cancel any of the screens during the
installation. It may take a few seconds for all
screens to appear.
Note
For Windows Vista
®
, when this screen appears,
click the check box and click Install to complete
the installation correctly.