
User Manual
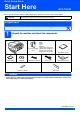
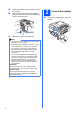
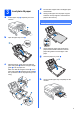
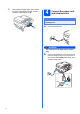
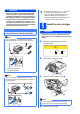
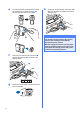
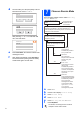
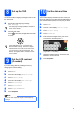
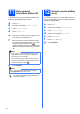
Table Of Contents
- Quick Setup Guide MFC-790CW
- Start Here
- 1 Unpack the machine and check the components
- 2 Connect the handset
- 3 Load plain A4 paper
- 4 Connect the power cord and telephone line
- 5 Install the ink cartridges
- 6 Check the print quality
- 7 Choose a Receive Mode
- 8 Set up the TAD
- 9 Set the LCD contrast (If needed)
- 10 Set the date and time
- 11 Enter personal information (station ID)
- 12 Set tone or pulse dialling mode
- 13 Choose your connection type
- For USB Interface Users (For Windows® 2000 Professional/XP/XP Professional x64 Edition/ Windows Vista®)
- For USB Interface Users (For Mac OS® X 10.2.4 or greater)
- For Wired Network Interface Users (For Windows® 2000 Professional/XP/XP Professional x64 Edition/ Windows Vista®)
- For Wired Network Interface Users (For Mac OS® X 10.2.4 or greater)
- For Wireless Network Interface Users
- 14 Before you begin
- 15 Confirm your network environment (Infrastructure Mode)
- Connecting the Brother machine to the wireless network
- Install the Drivers & Software (For Windows® 2000 Professional/XP/XP Professional x64 Edition/ Windows Vista®)
- Install the Drivers & Software (For Mac OS® X 10.2.4 or greater)
- Install Optional Applications Windows®
- For Network Users
- Consumables
- brother CHN-ENG
- Start Here

10
11
Enter personal
information (station ID)
You should store your name and fax number to be
printed on all fax pages that you send.
a Press MENU.
b Press a or b to display Initial Setup.
c Press Initial Setup.
d Press Station ID.
e Enter your fax number (up to 20 digits) on the
Touchscreen, and then press OK.
f Enter your name (up to 20 characters) using
the Touchscreen, and then press OK.To enter
numbers or special letters, press
repeatedly until the character you want to enter
appears, then press the character you want to
use.
g Press Stop/Exit.
12
Set tone or pulse dialling
mode
Your machine comes set for Tone dialling service. If
you have Pulse dialling service (rotary), you need to
change the dialling mode.
a Press MENU.
b Press a or b to display Initial Setup.
c Press Initial Setup.
d Press a or b to display Tone/Pulse.
e Press Tone/Pulse.
f Press Pulse (or Tone).
g Press Stop/Exit.
Note
• If you need to enter a character that is on the
same button as the last character, press c to
move the cursor to the right.
• If you entered a letter incorrectly and want to
change it, press d or c to move the cursor to the
incorrect character, press .
Note
If you make a mistake and want to start again,
press Stop/Exit and go back to a.
For details, see Entering Text in Appendix C
of the User's Guide.