
User Manual
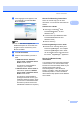
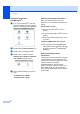

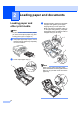

Table Of Contents
- USER’S GUIDE MFC-790CW
- Approval Information and Compilation and Publication Notice
- Table of Contents
- Section I General
- 1 General Information
- 2 Loading paper and documents
- 3 General setup
- 4 Security features
- Section II Fax
- 5 Sending a Fax
- Entering Fax mode
- Broadcasting (Monochrome only)
- Additional sending operations
- Sending faxes using multiple settings
- Contrast
- Changing fax resolution
- Dual access (Monochrome only)
- Real time transmission
- Overseas Mode
- Delayed Faxing (Monochrome only)
- Delayed Batch Transmission (Monochrome only)
- Checking and cancelling waiting jobs
- Setting your changes as a new default
- Restoring all settings to the factory settings
- Sending a fax manually
- Sending a fax at the end of a conversation
- Out of Memory message
- 6 Receiving a Fax
- 7 Telephone and External devices
- 8 Dialling and storing numbers
- 9 Digital TAD
- 10 Printing Reports
- 11 Polling
- 5 Sending a Fax
- Section III Copy
- Section IV Direct Photo Printing
- Section V Software
- Section VI Appendixes
- A Safety and Legal
- B Troubleshooting and Routine Maintenance
- Troubleshooting
- Error and Maintenance messages
- Routine maintenance
- Replacing the ink cartridges
- Cleaning the outside of the machine
- Cleaning the scanner glass
- Cleaning the machine’s printer platen
- Cleaning the paper pick-up roller
- Cleaning the print head
- Checking the print quality
- Checking the print alignment
- Checking the ink volume
- Uninstalling and installing the handset and handset cradle
- Machine Information
- Packing and shipping the machine
- C Menu and Features
- D Specifications
- E Glossary
- Index
- brother CHN-ENG

10
2
Loading paper and
other print media 2
Note
To print on 10 x 15 cm or Photo L paper,
you must use the photo paper tray. (See
Loading photo paper on page 14.)
a If the paper support flap is open, close it,
and then pull the paper tray completely
out of the machine.
b Lift the output paper tray (1).
c With both hands, gently press and slide
the paper side guides (1) and paper
length guide (2) to fit the paper size.
Make sure that the triangular marks (3)
on the paper side guides (1) and paper
length guide (2) line up with the mark for
the paper size you are using.
Note
When you are using Legal size paper,
press and hold the universal guide release
button (1) as you slide out the front of the
paper tray.
Loading paper and documents 2
1
2
3
3
1
1