
User Manual
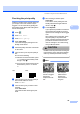

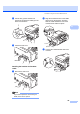

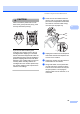
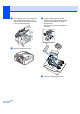
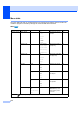
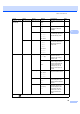
Table Of Contents
- USER’S GUIDE MFC-790CW
- Approval Information and Compilation and Publication Notice
- Table of Contents
- Section I General
- 1 General Information
- 2 Loading paper and documents
- 3 General setup
- 4 Security features
- Section II Fax
- 5 Sending a Fax
- Entering Fax mode
- Broadcasting (Monochrome only)
- Additional sending operations
- Sending faxes using multiple settings
- Contrast
- Changing fax resolution
- Dual access (Monochrome only)
- Real time transmission
- Overseas Mode
- Delayed Faxing (Monochrome only)
- Delayed Batch Transmission (Monochrome only)
- Checking and cancelling waiting jobs
- Setting your changes as a new default
- Restoring all settings to the factory settings
- Sending a fax manually
- Sending a fax at the end of a conversation
- Out of Memory message
- 6 Receiving a Fax
- 7 Telephone and External devices
- 8 Dialling and storing numbers
- 9 Digital TAD
- 10 Printing Reports
- 11 Polling
- 5 Sending a Fax
- Section III Copy
- Section IV Direct Photo Printing
- Section V Software
- Section VI Appendixes
- A Safety and Legal
- B Troubleshooting and Routine Maintenance
- Troubleshooting
- Error and Maintenance messages
- Routine maintenance
- Replacing the ink cartridges
- Cleaning the outside of the machine
- Cleaning the scanner glass
- Cleaning the machine’s printer platen
- Cleaning the paper pick-up roller
- Cleaning the print head
- Checking the print quality
- Checking the print alignment
- Checking the ink volume
- Uninstalling and installing the handset and handset cradle
- Machine Information
- Packing and shipping the machine
- C Menu and Features
- D Specifications
- E Glossary
- Index
- brother CHN-ENG

154
Checking the print alignment B
You may need to adjust the print alignment
after transporting the machine, if your printed
text becomes blurred or images become
faded.
a Press .
b Press Test Print.
c Press Alignment.
d Press Mono Start or Color Start.
The machine starts printing the
Alignment Check Sheet.
e Check the 600 dpi and 1200 dpi test
prints to see if number 5 most closely
matches number 0.
f Do one of the following:
If the number 5 samples of both the
600 dpi and 1200 dpi test prints are
the best matches, press Yes to finish
the Alignment Check and go to
step i.
If another test print number is a
better match for either 600 dpi or
1200 dpi, press No to choose it.
g For 600 dpi, press the number of the test
print that most closely matches the
number 0 sample (1-8).
h For 1200 dpi, press the number of the
test print that most closely matches the
number 0 sample (1-8).
i Press Stop/Exit.
Checking the ink volume B
Although an ink volume icon appears on the
LCD, you can use the ink menu to see a large
graph showing the ink that is left in each
cartridge.
a Press .
b Press Ink Volume.
The LCD shows the ink volume.
c Press Stop/Exit.
Note
You can check the ink volume from your
computer. (See Printing for Windows
®
or
Printing and Faxing for Macintosh
®
in the
Software User’s Guide on the CD-ROM.)
Uninstalling and installing the
handset and handset cradle B
If you do not use the handset you can remove
the handset and handset cradle.
Uninstalling the handset and handset
cradle
B
a Unplug the curled handset cord from the
machine.