
User Manual

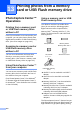

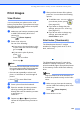

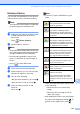


Table Of Contents
- USER’S GUIDE MFC-790CW MFC-990CW
- Approval Information and Compilation and Publication Notice
- Table of Contents
- Section I: General
- 1 General Information
- 2 Loading paper and documents
- 3 General setup
- 4 Security features
- Section II: Fax
- 5 Sending a Fax
- Entering Fax mode
- Broadcasting (Monochrome only)
- Additional sending operations
- Sending faxes using multiple settings
- Contrast
- Changing fax resolution
- Dual access (Monochrome only)
- Real time transmission
- Overseas Mode
- Delayed Faxing (Monochrome only)
- Delayed Batch Transmission (Monochrome only)
- Checking and cancelling waiting jobs
- Setting your changes as a new default
- Restoring all settings to the factory settings
- Sending a fax manually
- Sending a fax at the end of a conversation
- Out of Memory message
- 6 Receiving a Fax
- 7 Telephone and External devices
- Voice operations
- Telephone Service for Australia
- Telephone Service for New Zealand
- Telephone Service for Some Countries
- Connecting an external TAD (telephone answering device)
- External and extension telephones
- 8 Dialling and storing numbers
- 9 Digital TAD
- 10 Printing Reports
- 11 Polling
- 5 Sending a Fax
- Section III: Copy
- Section IV: Direct Photo Printing
- 13 Printing photos from a memory card or USB Flash memory drive
- 14 Printing photos from a camera
- 15 Wireless photo printing (MFC-990CW only)
- Section V: Software
- Section VI: Appendixes
- A Safety and Legal
- B Troubleshooting and Routine Maintenance
- Troubleshooting
- Error and Maintenance messages
- Routine maintenance
- Replacing the ink cartridges
- Cleaning the outside of the machine
- Cleaning the scanner glass
- Cleaning the machine’s printer platen
- Cleaning the paper pick-up roller
- Cleaning the print head
- Checking the print quality
- Checking the print alignment
- Checking the ink volume
- Uninstalling and installing the handset and handset cradle (MFC-790CW only)
- Machine Information
- Packing and shipping the machine
- C Menu and Features
- D Specifications
- E Glossary
- Index
- brother ARL/ASA/NZ

Chapter 13
102
Getting started 13
Firmly put a memory card or USB Flash
memory drive into the correct slot.
1 USB Flash memory drive
2 CompactFlash
®
3 SD, SDHC
4Memory Stick
®
, Memory Stick Pro™
5 xD-Picture Card™
CAUTION
The USB direct interface supports only a
USB Flash memory drive, a PictBridge
compatible camera, or a digital camera that
uses the USB mass storage standard. Any
other USB devices are not supported.
Photo Capture key indications:
Photo Capture light is on, the memory
card or USB Flash memory drive is
correctly inserted.
Photo Capture light is off, the memory
card or USB Flash memory drive is not
correctly inserted.
Photo Capture light is blinking, memory
card or USB Flash memory drive is being
read or written to.
CAUTION
DO NOT unplug the power cord or remove
the media from the media drive (slot) or
USB direct interface while the machine is
reading or writing to the media (the
Photo Capture key is blinking). You will
lose your data or damage the card.
The machine can only read one device at a
time.
Entering PhotoCapture mode13
After you insert the memory card or USB
Flash memory drive, press the
(Photo Capture) key to illuminate it in
blue and the LCD displays the PhotoCapture
options.
The LCD shows:
Press View Photos if you want to
quickly view and print your photos. See
View Photos on page 103.
Press Enhance Photos if you want to
add special effects to your photos. See
Enhance Photos on page 105.
Press Index Print if you want to print
an Index page (Thumbnails). You can also
print photos using the image numbers of
the Index page (Thumbnails). See Print
Index (Thumbnails) on page 103.
Note
If your digital camera supports DPOF
printing, see DPOF printing on page 106.
Press the option you want to set.
1 2 3
54
View
Photos
Enhance
Photos
Index
Print
PhotoCapture
PhotoCapture