
Owner`s manual
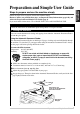


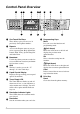

Table Of Contents
- ZleFB MFC-9880
- APPROVAL INFORMATION
- Using This Manual
- User-Friendly Programming
- Table of Contents
- Preparation and Simple User Guide
- 1 Setup
- 2 Sending a Fax
- 3 Receiving a Fax
- 4 Telephone (Voice) Operation
- 5 Printing Reports
- 6 Advanced Sending
- 7 Advanced Receiving
- 8 Polling
- 9 Remote Fax Options
- 10 Making Copies
- 11 Using the machine as a Printer
- 12 Printer Driver Settings (For Windows® Only)
- Using the Brother MFC-9880 Printer Driver
- Basic Tab
- Advanced Tab
- Accessories Tab
- Support Tab
- General Tab
- Layout Tab
- Paper/Quality Tab
- Advanced Options
- Device Settings Tab
- 13 Using the Windows®-Based Brother Control Centre (For Windows® Only)
- 14 Using ScanSoft™ PaperPort® for Brother and ScanSoft™ TextBridge®
- Viewing Items in ScanSoft™ PaperPort® for Brother
- Organizing Your Items in Folders
- Links to Many Other Applications
- Using ScanSoft™ TextBridge® OCR (Converting Image Text to Text You Can Edit)
- Importing Items from Other Applications
- Exporting Items in Other Formats
- Accessing the Scanner
- Scanning a Document into your PC
- Settings in the Scanner Window
- PreScanning an Image
- 15 Setting Up and Using PC-FAX (For Windows® Only)
- Introduction
- MFC Remote Setup
- PC-FAX Sending (For Windows® Only)
- Setting Up User Information
- Setting Up Sending
- Setting Up Speed Dial
- The Address Book
- Setting Up a Member in the Address Book
- Setting Up a Group for Broadcasting
- Editing Member Information
- Deleting a Member or Group
- Exporting the Address Book
- Importing to the Address Book
- Setting Up Cover Page
- Sending a File as a PC-FAX Using the Simple Style
- Sending a File as a PC-FAX using the Facsimile Style
- PC-FAX Receiving
- 16 Using the Brother MFC with a New Power Macintosh® G3, G4 or iMac™/iBook™
- 17 For DOS User
- 18 Troubleshooting and Maintenance
- 19 Important Safety Information
- 20 Optional Accessories
- 21 Specifications
- Glossary
- Index
10
Menu Mode
After pressing Menu key the following options are available.
Then press 1 for General Setup Menu—OR—press 2 for Fax Menu—OR—press 3 for Copy Menu
—OR—press 4 for Printer Menu.
When you enter the Menu Mode, the machine displays a list of Level One Menus from which you
can choose. These menu options appear one after the other on the display. Select an option by
pressing Set when the option appears on the LCD.
You can “scroll” more quickly through options by pressing . When the screen displays your
selection, press Set. (Use to scroll backward if you passed your choice or to save key strokes.
Both arrow keys show all options, in the opposite order.)
When you finish selection, the screen displays ACCEPTED.
* The factory setting (option) is shown in bold
If you want to exit the Menu Mode, press Stop/Exit.
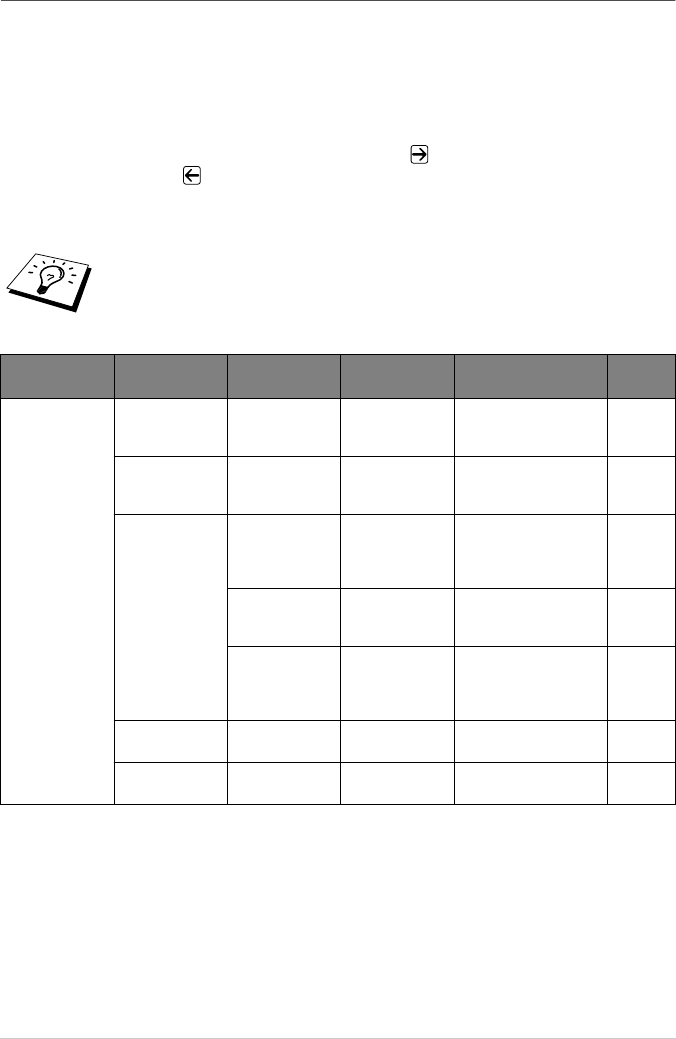
Main Menu Submenu
Menu
Selections
Options Descriptions Page
1. GENERAL
SETUP
1. DATE/TIME
——
Enter date and time for
LCD display and to print
on transmissions.
14
2. STATION ID
——
Program the name and
fax number to appear on
each transmitted page.
14
3. VOLUME 1. RING HIGH
MED
LOW
OFF
Adjusts ring volume.
15
2. BEEPER HIGH
LOW
OFF
Adjusts beeper volume.
15
3.
SPEAKER
HIGH
MED
LOW
OFF
Adjusts speaker volume.
15
4. TONER
SAVE
—
ON
OFF
Increase life of toner
cartridge.
15
5. POWER
SAVE
—
ON
OFF
Power save mode.
16