
Owner`s manual
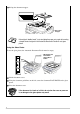
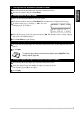

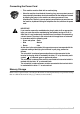

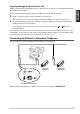

Table Of Contents
- ZleFB MFC-9880
- APPROVAL INFORMATION
- Using This Manual
- User-Friendly Programming
- Table of Contents
- Preparation and Simple User Guide
- 1 Setup
- 2 Sending a Fax
- 3 Receiving a Fax
- 4 Telephone (Voice) Operation
- 5 Printing Reports
- 6 Advanced Sending
- 7 Advanced Receiving
- 8 Polling
- 9 Remote Fax Options
- 10 Making Copies
- 11 Using the machine as a Printer
- 12 Printer Driver Settings (For Windows® Only)
- Using the Brother MFC-9880 Printer Driver
- Basic Tab
- Advanced Tab
- Accessories Tab
- Support Tab
- General Tab
- Layout Tab
- Paper/Quality Tab
- Advanced Options
- Device Settings Tab
- 13 Using the Windows®-Based Brother Control Centre (For Windows® Only)
- 14 Using ScanSoft™ PaperPort® for Brother and ScanSoft™ TextBridge®
- Viewing Items in ScanSoft™ PaperPort® for Brother
- Organizing Your Items in Folders
- Links to Many Other Applications
- Using ScanSoft™ TextBridge® OCR (Converting Image Text to Text You Can Edit)
- Importing Items from Other Applications
- Exporting Items in Other Formats
- Accessing the Scanner
- Scanning a Document into your PC
- Settings in the Scanner Window
- PreScanning an Image
- 15 Setting Up and Using PC-FAX (For Windows® Only)
- Introduction
- MFC Remote Setup
- PC-FAX Sending (For Windows® Only)
- Setting Up User Information
- Setting Up Sending
- Setting Up Speed Dial
- The Address Book
- Setting Up a Member in the Address Book
- Setting Up a Group for Broadcasting
- Editing Member Information
- Deleting a Member or Group
- Exporting the Address Book
- Importing to the Address Book
- Setting Up Cover Page
- Sending a File as a PC-FAX Using the Simple Style
- Sending a File as a PC-FAX using the Facsimile Style
- PC-FAX Receiving
- 16 Using the Brother MFC with a New Power Macintosh® G3, G4 or iMac™/iBook™
- 17 For DOS User
- 18 Troubleshooting and Maintenance
- 19 Important Safety Information
- 20 Optional Accessories
- 21 Specifications
- Glossary
- Index

Preparation and Simple User Guide 5
PREPARATION
AND SIMPLE USE
Connecting the Power Cord
Memory Storage
In the event of a power failure, all settings in the menus are stored permanently except for the settings
that are valid for the next fax only (e.g. contrast, overseas mode).
• This machine must be fitted with an earthed plug.
• Since the machine is earthed via the mains plug, you can protect yourself
from potentially hazardous electrical conditions on the telephone network
by keeping the power to the machine on when you connect it to a
telephone line. Similarly, you can protect yourself when you want to move
the machine, by disconnecting the telephone line first, and then the power
cord.
IMPORTANT:
If you need to remove the moulded mains plug in order to fit an appropriate
type, you must discard the moulded plug immediately having cut it off, in
order that it is not inadvertently inserted into a live socket, thus presenting
a shock hazard. The wires in the mains lead of this appliance are coloured
in accordance with the following code.
• Green-and-yellow : Earth
• Blue : Neutral
• Brown : Live
As the wires in the mains lead of this apparatus may not correspond with the
coloured markings identifying the terminals in your plug, proceed as
follows:
The wire which is coloured green-and-yellow must be connected to the
terminal in the plug which is marked by the letter “E” or by the safety earth
symbol or coloured green or green-and-yellow.
The wire which is coloured blue must be connected to the terminal which is
marked with the letter “N” or coloured black.
The wire which is coloured brown must be connected to the terminal which
is marked with the letter “L” or coloured red.