
Owner`s manual
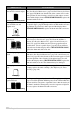


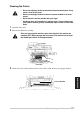
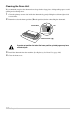
Table Of Contents
- ZleFB MFC-9880
- APPROVAL INFORMATION
- Using This Manual
- User-Friendly Programming
- Table of Contents
- Preparation and Simple User Guide
- 1 Setup
- 2 Sending a Fax
- 3 Receiving a Fax
- 4 Telephone (Voice) Operation
- 5 Printing Reports
- 6 Advanced Sending
- 7 Advanced Receiving
- 8 Polling
- 9 Remote Fax Options
- 10 Making Copies
- 11 Using the machine as a Printer
- 12 Printer Driver Settings (For Windows® Only)
- Using the Brother MFC-9880 Printer Driver
- Basic Tab
- Advanced Tab
- Accessories Tab
- Support Tab
- General Tab
- Layout Tab
- Paper/Quality Tab
- Advanced Options
- Device Settings Tab
- 13 Using the Windows®-Based Brother Control Centre (For Windows® Only)
- 14 Using ScanSoft™ PaperPort® for Brother and ScanSoft™ TextBridge®
- Viewing Items in ScanSoft™ PaperPort® for Brother
- Organizing Your Items in Folders
- Links to Many Other Applications
- Using ScanSoft™ TextBridge® OCR (Converting Image Text to Text You Can Edit)
- Importing Items from Other Applications
- Exporting Items in Other Formats
- Accessing the Scanner
- Scanning a Document into your PC
- Settings in the Scanner Window
- PreScanning an Image
- 15 Setting Up and Using PC-FAX (For Windows® Only)
- Introduction
- MFC Remote Setup
- PC-FAX Sending (For Windows® Only)
- Setting Up User Information
- Setting Up Sending
- Setting Up Speed Dial
- The Address Book
- Setting Up a Member in the Address Book
- Setting Up a Group for Broadcasting
- Editing Member Information
- Deleting a Member or Group
- Exporting the Address Book
- Importing to the Address Book
- Setting Up Cover Page
- Sending a File as a PC-FAX Using the Simple Style
- Sending a File as a PC-FAX using the Facsimile Style
- PC-FAX Receiving
- 16 Using the Brother MFC with a New Power Macintosh® G3, G4 or iMac™/iBook™
- 17 For DOS User
- 18 Troubleshooting and Maintenance
- 19 Important Safety Information
- 20 Optional Accessories
- 21 Specifications
- Glossary
- Index
Troubleshooting and Maintenance 135
MAINTENANCE
Printed pages are blurred at
the centre or at either edge.
Blurred Page
Certain environmental conditions such as humidity, high
temperatures, etc. may cause this condition to occur. Make sure the
machine is placed on a flat, horizontal surface. Remove the drum
unit with the toner cartridge installed. Try rocking them from side
to side. You may clear a blurred page by wiping the scanner window
with a clean soft cloth. (See Regular Maintenance, page 138) If a
blurred page occurs after cleaning and the display shows CHANGE
DRUM SOON, replace the drum unit with a new one.
Ghost images appear on
printed page.
Ghost Images
Adjust the print conditions by changing the Print Density setting.
(See Setting the Print Density, page 28)—OR—Rough surfaces or
thick media can cause a ghost image. Make sure you select the Paper
Type that suits the paper in your paper type. (See Paper Type, page
57 and 58 and Media Type, page 68)
The drum unit is a consumable and it is necessary to replace it periodically.
DIFFICULTY SUGGESTIONS