
Owner`s manual
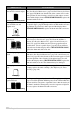


Table Of Contents
- ZleFB MFC-9880
- APPROVAL INFORMATION
- Using This Manual
- User-Friendly Programming
- Table of Contents
- Preparation and Simple User Guide
- 1 Setup
- 2 Sending a Fax
- 3 Receiving a Fax
- 4 Telephone (Voice) Operation
- 5 Printing Reports
- 6 Advanced Sending
- 7 Advanced Receiving
- 8 Polling
- 9 Remote Fax Options
- 10 Making Copies
- 11 Using the machine as a Printer
- 12 Printer Driver Settings (For Windows® Only)
- Using the Brother MFC-9880 Printer Driver
- Basic Tab
- Advanced Tab
- Accessories Tab
- Support Tab
- General Tab
- Layout Tab
- Paper/Quality Tab
- Advanced Options
- Device Settings Tab
- 13 Using the Windows®-Based Brother Control Centre (For Windows® Only)
- 14 Using ScanSoft™ PaperPort® for Brother and ScanSoft™ TextBridge®
- Viewing Items in ScanSoft™ PaperPort® for Brother
- Organizing Your Items in Folders
- Links to Many Other Applications
- Using ScanSoft™ TextBridge® OCR (Converting Image Text to Text You Can Edit)
- Importing Items from Other Applications
- Exporting Items in Other Formats
- Accessing the Scanner
- Scanning a Document into your PC
- Settings in the Scanner Window
- PreScanning an Image
- 15 Setting Up and Using PC-FAX (For Windows® Only)
- Introduction
- MFC Remote Setup
- PC-FAX Sending (For Windows® Only)
- Setting Up User Information
- Setting Up Sending
- Setting Up Speed Dial
- The Address Book
- Setting Up a Member in the Address Book
- Setting Up a Group for Broadcasting
- Editing Member Information
- Deleting a Member or Group
- Exporting the Address Book
- Importing to the Address Book
- Setting Up Cover Page
- Sending a File as a PC-FAX Using the Simple Style
- Sending a File as a PC-FAX using the Facsimile Style
- PC-FAX Receiving
- 16 Using the Brother MFC with a New Power Macintosh® G3, G4 or iMac™/iBook™
- 17 For DOS User
- 18 Troubleshooting and Maintenance
- 19 Important Safety Information
- 20 Optional Accessories
- 21 Specifications
- Glossary
- Index

134 Chapter 18
Printed pages are stained with
toner or have vertical stripes.
Dark Stripes or Toner Stains
Clean the machine’s interior and the primary corona wire of drum
unit. (See Regular Maintenance, page 138 and Cleaning the Drum
Unit, page 140) Make sure that the tab of the corona wire is at the
home position. If after cleaning, you still see dark stripes or toner
stains and the display shows CHANGE DRUM SOON, replace the
drum unit with a new one.
Printed pages have white
spots in black text and
graphic areas.
White Spots
Make sure that you use paper that meets the specifications. (See
Acceptable Paper, page 65) Rough surface or thick media can cause
the problem. If you still see white spots and the display shows
CHANGE DRUM SOON, replace the drum unit with a new one.
Toner scatters and stains the
printed page.
Scattering Toner
Adjust the print conditions by setting the Print Density function.
(See Setting the Print Density, page 28) Clean the machine’s
interior. (See Regular Maintenance, page 138 and Cleaning the
Drum Unit, page 140) Make sure that you use paper that meets
specifications. (See Acceptable Paper, page 65) If you still have
scattered toner and the display shows CHANGE DRUM SOON,
replace the drum unit with a new one.
The whole page is printed
black.
Black Page
Clean the machine’s interior and the primary corona wire of the
drum unit. (See Regular Maintenance, page 138 and Cleaning the
Drum Unit, page 140) Also, do not use heat-sensitive paper as it will
cause this problem. After cleaning, if the printed pages are still
black or the display shows CHANGE DRUM SOON, replace the
drum unit with a new one. The drum unit may be damaged.
Nothing is printed on the
page.
White page
Make sure that the toner cartridge is not empty. If the toner cartridge
is empty, replace the toner cartridge. (See Replacing the Toner
Cartridge, page 141)
Printed pages are marked
regular intervals.
Example of Regular Marking
Markings may disappear by themselves. Try copying at multiple
pages to clear this problem. Markings may occur if the machine has
not been used for a long time. A possible cause is that the surface of
the drum is marked or damaged by excessive exposure to light. In
this case, replace the drum unit with a new one.
DIFFICULTY SUGGESTIONS