
Owner`s manual


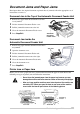
Table Of Contents
- ZleFB MFC-9880
- APPROVAL INFORMATION
- Using This Manual
- User-Friendly Programming
- Table of Contents
- Preparation and Simple User Guide
- 1 Setup
- 2 Sending a Fax
- 3 Receiving a Fax
- 4 Telephone (Voice) Operation
- 5 Printing Reports
- 6 Advanced Sending
- 7 Advanced Receiving
- 8 Polling
- 9 Remote Fax Options
- 10 Making Copies
- 11 Using the machine as a Printer
- 12 Printer Driver Settings (For Windows® Only)
- Using the Brother MFC-9880 Printer Driver
- Basic Tab
- Advanced Tab
- Accessories Tab
- Support Tab
- General Tab
- Layout Tab
- Paper/Quality Tab
- Advanced Options
- Device Settings Tab
- 13 Using the Windows®-Based Brother Control Centre (For Windows® Only)
- 14 Using ScanSoft™ PaperPort® for Brother and ScanSoft™ TextBridge®
- Viewing Items in ScanSoft™ PaperPort® for Brother
- Organizing Your Items in Folders
- Links to Many Other Applications
- Using ScanSoft™ TextBridge® OCR (Converting Image Text to Text You Can Edit)
- Importing Items from Other Applications
- Exporting Items in Other Formats
- Accessing the Scanner
- Scanning a Document into your PC
- Settings in the Scanner Window
- PreScanning an Image
- 15 Setting Up and Using PC-FAX (For Windows® Only)
- Introduction
- MFC Remote Setup
- PC-FAX Sending (For Windows® Only)
- Setting Up User Information
- Setting Up Sending
- Setting Up Speed Dial
- The Address Book
- Setting Up a Member in the Address Book
- Setting Up a Group for Broadcasting
- Editing Member Information
- Deleting a Member or Group
- Exporting the Address Book
- Importing to the Address Book
- Setting Up Cover Page
- Sending a File as a PC-FAX Using the Simple Style
- Sending a File as a PC-FAX using the Facsimile Style
- PC-FAX Receiving
- 16 Using the Brother MFC with a New Power Macintosh® G3, G4 or iMac™/iBook™
- 17 For DOS User
- 18 Troubleshooting and Maintenance
- 19 Important Safety Information
- 20 Optional Accessories
- 21 Specifications
- Glossary
- Index
Using the Brother MFC with a New Power Macintosh
®
G3, G4 or iMac
™
/iBook
™
123
PRINTER/SCANNER
Contrast
The contrast setting is adjustable only when you have selected one of the grey scale or colour
settings, but it is not available when Black & White is selected as the Colour Type.
Increasing the contrast level (by dragging the slidebar to the right) emphasizes dark and light areas
of the Image, while decreasing the contrast level (by dragging the slidebar to the left) reveals more
detail in grey areas. Instead of using the slidebar, you can type a value in the box to set the contrast.
Click OK.
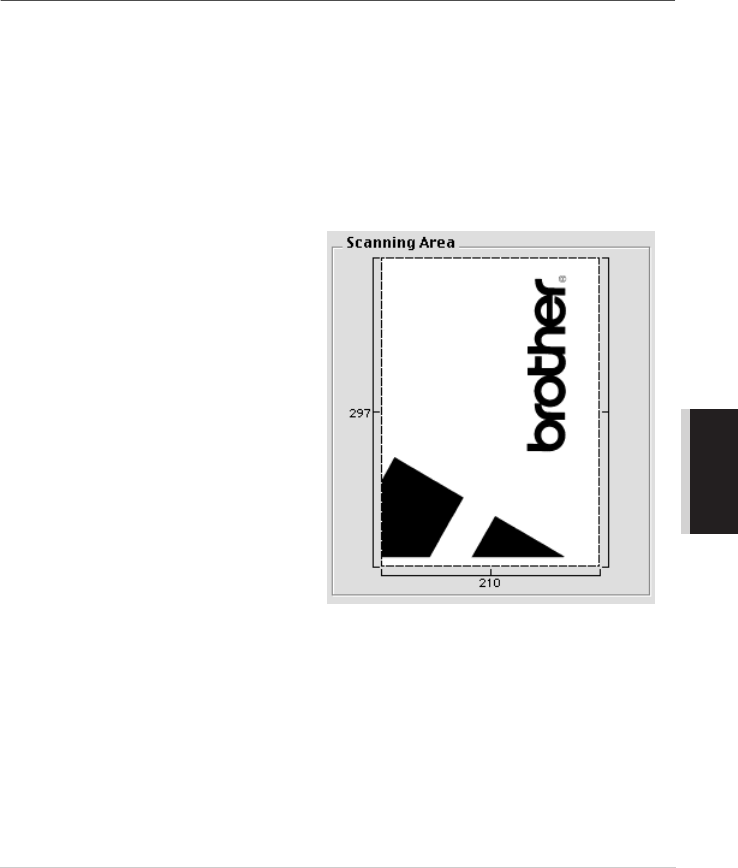
PreScanning an Image
PreScanning allows you to scan an image quickly at a low resolution. A thumbnail version will
appear in the Scanning Area. This is only a preview of the image, so you can see how it will look.
The PreScan button is used to preview an image for cropping any unwanted portions from the
image. When you are satisfied with the preview, click Start to scan the image.
1
Insert the document face up in the Automatic Document Feeder, or face down on the glass
platen.
2
Click PreScan.
The entire document will be scanned into your Macintosh will appear in the Scanning Area of
the Scanner dialog box:
3
To scan a portion of the prescanned
image, click and drag the mouse to crop
it.
4
Insert document face up in the Automatic Document Feeder again, if you use the Automatic
Document Feeder in Step 1.
5
Adjust the settings for Resolution, Colour Type, Brightness, Contrast, and Size in the
Scanner Setup dialog box, as needed.
6
Click Start.
This time only the selected area of the document will appear in the Scanning Area.
7
Use your application, software for editing and refining the image as usual.