
Owner`s manual


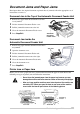
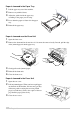
Table Of Contents
- ZleFB MFC-9880
- APPROVAL INFORMATION
- Using This Manual
- User-Friendly Programming
- Table of Contents
- Preparation and Simple User Guide
- 1 Setup
- 2 Sending a Fax
- 3 Receiving a Fax
- 4 Telephone (Voice) Operation
- 5 Printing Reports
- 6 Advanced Sending
- 7 Advanced Receiving
- 8 Polling
- 9 Remote Fax Options
- 10 Making Copies
- 11 Using the machine as a Printer
- 12 Printer Driver Settings (For Windows® Only)
- Using the Brother MFC-9880 Printer Driver
- Basic Tab
- Advanced Tab
- Accessories Tab
- Support Tab
- General Tab
- Layout Tab
- Paper/Quality Tab
- Advanced Options
- Device Settings Tab
- 13 Using the Windows®-Based Brother Control Centre (For Windows® Only)
- 14 Using ScanSoft™ PaperPort® for Brother and ScanSoft™ TextBridge®
- Viewing Items in ScanSoft™ PaperPort® for Brother
- Organizing Your Items in Folders
- Links to Many Other Applications
- Using ScanSoft™ TextBridge® OCR (Converting Image Text to Text You Can Edit)
- Importing Items from Other Applications
- Exporting Items in Other Formats
- Accessing the Scanner
- Scanning a Document into your PC
- Settings in the Scanner Window
- PreScanning an Image
- 15 Setting Up and Using PC-FAX (For Windows® Only)
- Introduction
- MFC Remote Setup
- PC-FAX Sending (For Windows® Only)
- Setting Up User Information
- Setting Up Sending
- Setting Up Speed Dial
- The Address Book
- Setting Up a Member in the Address Book
- Setting Up a Group for Broadcasting
- Editing Member Information
- Deleting a Member or Group
- Exporting the Address Book
- Importing to the Address Book
- Setting Up Cover Page
- Sending a File as a PC-FAX Using the Simple Style
- Sending a File as a PC-FAX using the Facsimile Style
- PC-FAX Receiving
- 16 Using the Brother MFC with a New Power Macintosh® G3, G4 or iMac™/iBook™
- 17 For DOS User
- 18 Troubleshooting and Maintenance
- 19 Important Safety Information
- 20 Optional Accessories
- 21 Specifications
- Glossary
- Index
Using the Brother MFC with a New Power Macintosh
®
G3, G4 or iMac
™
/iBook
™
121
PRINTER/SCANNER
Settings in the Scanner Window
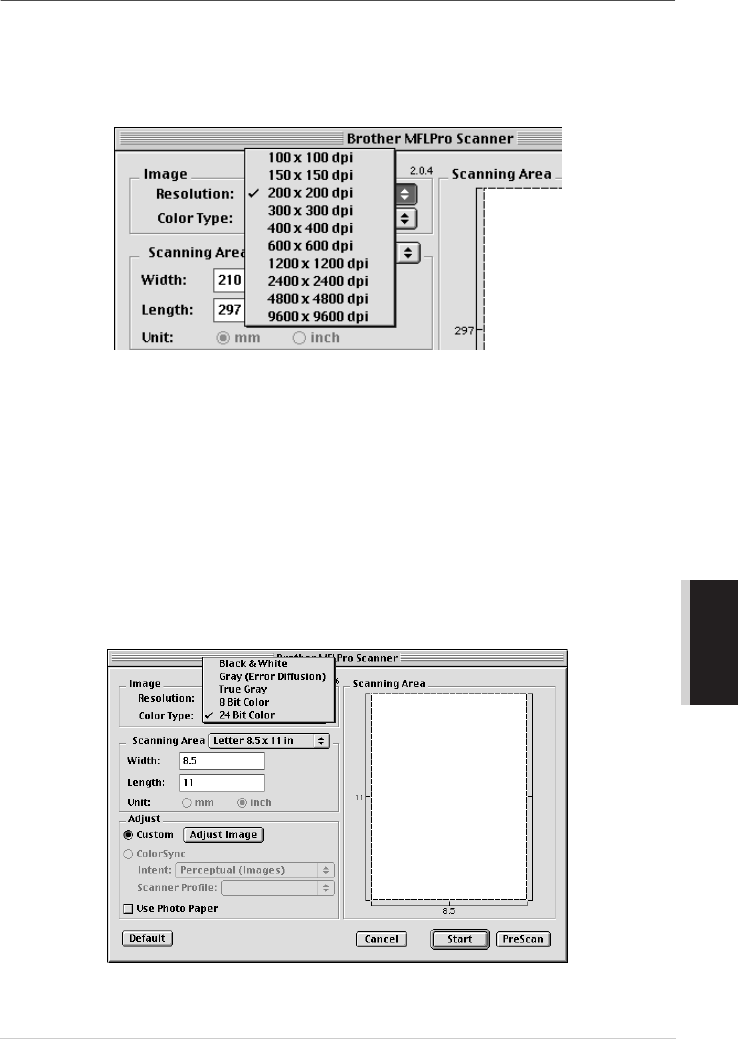
Image
Resolution
Choose the scanning resolution from the Resolution pop-up menu. Higher resolutions take more
memory and transfer time, but can achieve a finer scanned image.
Colour Type
Black & White—Set the Colour Type to Black & White for text or line art. For photographic images,
set the Colour Type to Grey (Error diffusion) or True Grey.
Grey (Error Diffusion)—is used for documents that contain photographic images or graphics. (Error
Diffusion is a method for creating simulated grey images by placing black dots in a specific matrix
instead of true grey dots.)
True Grey—also is used for documents containing photographic images or graphics. This mode is
more exact because it uses up to 256 shades of grey. It requires the most memory and longest transfer
time.
Colours: Choose either 8 Bit Colour, which scans up to 256 colours or 24 Bit Colour which scans
up to 16.8 million colours. Although using 24 Bit Colour creates an image with the most accurate
colours, the image file will be approximately three times larger than a file created with 8 Bit Colour.