
Owner`s manual


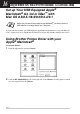
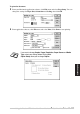

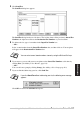
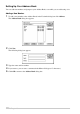
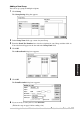
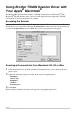
Table Of Contents
- ZleFB MFC-9880
- APPROVAL INFORMATION
- Using This Manual
- User-Friendly Programming
- Table of Contents
- Preparation and Simple User Guide
- 1 Setup
- 2 Sending a Fax
- 3 Receiving a Fax
- 4 Telephone (Voice) Operation
- 5 Printing Reports
- 6 Advanced Sending
- 7 Advanced Receiving
- 8 Polling
- 9 Remote Fax Options
- 10 Making Copies
- 11 Using the machine as a Printer
- 12 Printer Driver Settings (For Windows® Only)
- Using the Brother MFC-9880 Printer Driver
- Basic Tab
- Advanced Tab
- Accessories Tab
- Support Tab
- General Tab
- Layout Tab
- Paper/Quality Tab
- Advanced Options
- Device Settings Tab
- 13 Using the Windows®-Based Brother Control Centre (For Windows® Only)
- 14 Using ScanSoft™ PaperPort® for Brother and ScanSoft™ TextBridge®
- Viewing Items in ScanSoft™ PaperPort® for Brother
- Organizing Your Items in Folders
- Links to Many Other Applications
- Using ScanSoft™ TextBridge® OCR (Converting Image Text to Text You Can Edit)
- Importing Items from Other Applications
- Exporting Items in Other Formats
- Accessing the Scanner
- Scanning a Document into your PC
- Settings in the Scanner Window
- PreScanning an Image
- 15 Setting Up and Using PC-FAX (For Windows® Only)
- Introduction
- MFC Remote Setup
- PC-FAX Sending (For Windows® Only)
- Setting Up User Information
- Setting Up Sending
- Setting Up Speed Dial
- The Address Book
- Setting Up a Member in the Address Book
- Setting Up a Group for Broadcasting
- Editing Member Information
- Deleting a Member or Group
- Exporting the Address Book
- Importing to the Address Book
- Setting Up Cover Page
- Sending a File as a PC-FAX Using the Simple Style
- Sending a File as a PC-FAX using the Facsimile Style
- PC-FAX Receiving
- 16 Using the Brother MFC with a New Power Macintosh® G3, G4 or iMac™/iBook™
- 17 For DOS User
- 18 Troubleshooting and Maintenance
- 19 Important Safety Information
- 20 Optional Accessories
- 21 Specifications
- Glossary
- Index

Using the Brother MFC with a New Power Macintosh
®
G3, G4 or iMac
™
/iBook
™
117
PRINTER/SCANNER
4
Click Send Fax.
The Send Fax dialog box appears:
The Send Fax dialog box has two list boxes. The left box shows all the previously Stored Fax
Numbers; the right box will show the Destination Fax Numbers as you select them.
5
To address the fax, type a fax number in the Input Fax Number box.
—OR—
Select a name/number from the Stored Fax Numbers box, and then click >>. Your recipient
will appear in the Destination Fax Numbers box.
6
If you want to, you can add your new recipients to the Stored Fax Numbers at this time by
clicking New. (See Adding a New Member, page 118)
—OR—
You can add a new group by clicking Group. (See Adding a New Group, page 119)
7
If you are finished addressing your fax, click Send Fax.
Click OK to return to the Send Fax dialog box.
You can select several stored numbers at once by using the Shift and Ctrl keys.
If you click Send Fax without addressing your fax, the following error message
appears: