
Owner`s manual


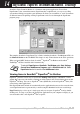


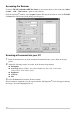


Table Of Contents
- ZleFB MFC-9880
- APPROVAL INFORMATION
- Using This Manual
- User-Friendly Programming
- Table of Contents
- Preparation and Simple User Guide
- 1 Setup
- 2 Sending a Fax
- 3 Receiving a Fax
- 4 Telephone (Voice) Operation
- 5 Printing Reports
- 6 Advanced Sending
- 7 Advanced Receiving
- 8 Polling
- 9 Remote Fax Options
- 10 Making Copies
- 11 Using the machine as a Printer
- 12 Printer Driver Settings (For Windows® Only)
- Using the Brother MFC-9880 Printer Driver
- Basic Tab
- Advanced Tab
- Accessories Tab
- Support Tab
- General Tab
- Layout Tab
- Paper/Quality Tab
- Advanced Options
- Device Settings Tab
- 13 Using the Windows®-Based Brother Control Centre (For Windows® Only)
- 14 Using ScanSoft™ PaperPort® for Brother and ScanSoft™ TextBridge®
- Viewing Items in ScanSoft™ PaperPort® for Brother
- Organizing Your Items in Folders
- Links to Many Other Applications
- Using ScanSoft™ TextBridge® OCR (Converting Image Text to Text You Can Edit)
- Importing Items from Other Applications
- Exporting Items in Other Formats
- Accessing the Scanner
- Scanning a Document into your PC
- Settings in the Scanner Window
- PreScanning an Image
- 15 Setting Up and Using PC-FAX (For Windows® Only)
- Introduction
- MFC Remote Setup
- PC-FAX Sending (For Windows® Only)
- Setting Up User Information
- Setting Up Sending
- Setting Up Speed Dial
- The Address Book
- Setting Up a Member in the Address Book
- Setting Up a Group for Broadcasting
- Editing Member Information
- Deleting a Member or Group
- Exporting the Address Book
- Importing to the Address Book
- Setting Up Cover Page
- Sending a File as a PC-FAX Using the Simple Style
- Sending a File as a PC-FAX using the Facsimile Style
- PC-FAX Receiving
- 16 Using the Brother MFC with a New Power Macintosh® G3, G4 or iMac™/iBook™
- 17 For DOS User
- 18 Troubleshooting and Maintenance
- 19 Important Safety Information
- 20 Optional Accessories
- 21 Specifications
- Glossary
- Index

98 Chapter 14
Accessing the Scanner
To choose TWAIN_32 Brother MFL Pro Colour as your scanner driver, select it under the “Select
scanner”—OR—“Select source” option in your software.
From the PaperPort
®
window, select Acquire from the File drop-down menu or select the TWAIN
or Scan button. The Scanner Setup dialog box will appear:
Scanning a Document into your PC
1
Insert the document face up in the Automatic Document Feeder, or face down on the glass
platen.
2
Adjust the following settings, if needed, in the Scanner Setup window:
◆ Resolution
◆ Scan Type (Black & White, Gray [Error Diffusion], True Gray, 256 Colour,
24 bit Colour, 24 bit Colour (fast))
◆ Brightness
◆ Contrast
◆ Size
3
Select the Start button from the Scanner window.
When scanning is completed, close the scanner window. The PaperPort
®
screen will appear showing
the image you scanned highlighted in red.