Internet Fax and Fax to Server features NETWORK USER’S GUIDE MFC-9460CDN MFC-9465CDN MFC-9560CDW To find basic information about network and advanced network features of your Brother machine, see the Network User's Guide and Network Glossary. To download the latest manual, please visit the Brother Solutions Center at (http://solutions.brother.com/).
Definitions of notes We use the following icons throughout this User’s Guide: Note Notes tell you how you should respond to a situation that may arise or give tips about how the operation works with other features. IMPORTANT NOTE This product is approved for use in the country of purchase only. Do not use this product outside the country of purchase as it may violate the wireless telecommunication and power regulations of that country.
Table of Contents 1 Internet fax 1 Internet fax Overview.................................................................................................................................1 Important information on Internet fax...................................................................................................2 How to Internet fax.....................................................................................................................................3 Sending an Internet fax ......
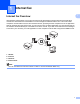
1 Internet fax 1 1 Internet fax Overview 1 Internet faxing (IFAX) allows you to send and receive fax documents using the Internet as the transport mechanism. Documents are transmitted in E-mail messages as attached TIFF-F files. This means that computers are also able to receive and send documents, providing that the computer has as an application that can generate and view TIFF-F files, you can use any TIFF-F viewer application.
Internet fax Forwarding received E-mail and fax messages You can forward received E-mail or standard fax messages to another E-mail address or fax machine. For more information see Forwarding received E-mail and fax messages on page 6. 1 Relay broadcast If you want to fax the document long distance (such as abroad), the "relay broadcast" function allows you to save the communication fee.
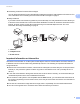
Internet fax How to Internet fax 1 1 Before using Internet fax you must configure your Brother machine to communicate with your network and mail server. You must ensure the following items are configured on your machine. You can configure these items from the control panel, Web Based Management, Remote Setup or BRAdmin Professional 3. If you are unsure of any of these items, please contact your systems administrator.
Internet fax After the document is scanned, it is transmitted to the recipient Internet fax machine automatically via your SMTP server. You can cancel the send operation by pressing the Stop/Exit key during scanning. After the transmission is finished, the machine will return to standby mode. 1 Note Some E-mail servers do not allow you to send large E-mail documents (the System Administrator will often place a limit on the maximum E-mail size).
Internet fax Note • If your machine is out of paper when receiving data, the received data will be held in the machine’s memory. This data will be printed automatically after paper is re-inserted into the machine. 1 • If the received mail is not in a plain text format or an attached file is not in the TIFF-F format, the following error message will be printed: “ATTACHED FILE FORMAT NOT SUPPORTED. FILE NAME:XXXXXX.
Internet fax Additional Internet Fax options 1 1 Forwarding received E-mail and fax messages 1 You can forward received E-mail or standard fax messages to another E-mail address or fax machine. Received messages can be forwarded via E-mail to a computer or Internet fax. They can also be forwarded via standard phone lines to another machine. The setting can be enabled using a web browser or through the control panel of the machine.
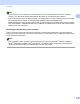
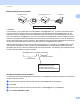
Internet fax Relay broadcast from a machine 1 FAX@brother.com UKFAX@brother.co.uk 123456789 1 1 UKFAX@brother.co.uk(fax#123456789) 1 Internet In this example, your machine has an E-mail address of FAX@brother.com, you wish to send a document from this machine to another machine in England with an E-mail address of UKFAX@brother.co.uk, this machine will then forward the document to a standard fax machine using a conventional telephone line. If your E-mail address is FAX@brother.
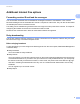
Internet fax Relay broadcast from a computer 1 UKFAX@brother.co.uk 1 123456789 1 UKFAX@brother.co.uk(fax#123456789) 1 Internet You can also send E-mail from your computer and have it relayed to a conventional fax machine. The method of entering the phone number of the conventional fax machine that will receive the relayed E-mail will vary depending on the mail application you are using.
Internet fax TX Verification Mail 1 1 Transmission Verification Mail supports two separate functions. Verification Mail for sending allows you to request notification from the receiving station that the Internet Fax or E-mail was received and processed. Verification Mail for receiving allows you to transmit a default report back to the sending station after successfully receiving and processing an Internet Fax or E-mail.
Internet fax Error mail 1 If there is a mail delivery error while sending an Internet fax, the mail server will send an error message back to the machine and the error message will be printed. If there is an error while receiving mail, an error message will be printed (Example: “The message being sent to the machine was not in a TIFF-F format.”). To receive the error mail properly, you must switch Header in the Setup Mail RX to All or Subject+From+To.
2 Storing numbers and E-mail addresses 2 You can follow instructions in the Basic User's Guide and Advanced User's Guide for how to use your machine as a fax after installing the internet fax software. This chapter explains some operations which are unique for the internet fax capable machine. Using One Touch or Speed Dial 2 2 You can set up your machine to do the following types of easy dialing: One Touch, Speed Dial and Groups for Broadcasting faxes and I-faxes.
Storing numbers and E-mail addresses One Touch and Speed Dial Storage Options 2 The following chart shows the settings that are available for each One Touch or Speed Dial number. When you store a number or E-mail address, the LCD instructs you to choose from the options shown in the following steps.
Storing numbers and E-mail addresses Storing One Touch Dial numbers 2 Your machine has 8 One Touch keys where you can store 16 fax/telephone numbers or E-mail addresses for automatic dialing. To access numbers 9 to 16, hold down Shift as you press the One Touch key. 2 a Press the One Touch key where you want to store the number or E-mail address. If a number or E-mail address is not stored there, the LCD shows Register Now?. Press 1 to choose Yes.
Storing numbers and E-mail addresses e Do one of the following: If you want to save a fax/scan resolution along with the number or E-mail address, go to the appropriate step as shown in the following table: If you don't want to change the default resolution, press OK, then go to step l.
Storing numbers and E-mail addresses j Press a or b to select Res: 200dpi or Res: 200x100dpi. Press OK. If you chose Email B&W PDF, go to step k. If you chose Email B&W TIFF, go to step l. k 2 Press a or b to select PDF TYPE: PDF, PDF TYPE: PDF/A, PDF TYPE: SPDF or PDF TYPE: SiPDF. Press OK and then go to step l. Note If you choose Secure PDF (PDF TYPE: SPDF), the machine will ask you to enter a 4 digit password using numbers 0-9 before it starts scanning. l Press Stop/Exit.
Storing numbers and E-mail addresses Storing Speed Dial numbers 2 You can store your frequently used numbers and E-mail addresses as Speed Dial numbers, so that when you dial you will only have to press a few keys (a Speed Dial, the three-digit number and Black Start/Mono Start or Color Start/Colour Start). The machine can store 300 Speed Dial numbers (001-300). a Press a Speed Dial and enter a three-digit Speed Dial location number (001-300).
Storing numbers and E-mail addresses e Do one of the following: If you want to save a fax/scan resolution along with the number or E-mail address, go to the appropriate step as shown in the following table: If you don't want to change the default resolution, press OK, then go to step l.
Storing numbers and E-mail addresses j Press a or b to select Res: 200dpi or Res: 200x100dpi. Press OK. If you chose Email B&W PDF, go to step k. If you chose Email B&W TIFF, go to step l. k 2 Press a or b to select PDF TYPE: PDF, PDF TYPE: PDF/A, PDF TYPE: SPDF or PDF TYPE: SiPDF. Press OK and then go to step l. Note If you choose Secure PDF (PDF TYPE: SPDF), the machine will ask you to enter a 4 digit password using numbers 0-9 before it starts scanning. l Press Stop/Exit.
Storing numbers and E-mail addresses Changing or Deleting One Touch and Speed Dial numbers 2 You can change or delete a One Touch or Speed Dial number that has already been stored. The LCD will show the name, number or E-mail address, and if the number has a scheduled job, such as a delayed fax or a fax forwarding number, it will display a message. a Do one of the following: To change or delete a stored One Touch number, press Menu, 2, 3, 1. Press the One Touch key number you want to change.
Storing numbers and E-mail addresses g Press a or b to select Fax Res:Std, Fax Res:Fine, Fax Res:S.Fine or Fax Res:Photo. Press OK and go to step m. h Press a or b to select Fax Res:Std, Fax Res:Fine or Fax Res:Photo. Press OK and then go to step m. i Press a or b to select Res: 100dpi, Res: 200dpi, Res: 300dpi or Res: 600dpi. Press OK. 2 If you chose Email Color PDF, go to step l. If you chose Email Color JPG or Email Color XPS, go to step m.
Storing numbers and E-mail addresses Additional ways to store numbers 2 Setting up Groups for Broadcasting 2 2 If you often want to send the same message to many fax numbers or E-mail addresses you can set up a group. Groups are stored on a One Touch key or a Speed Dial number. Each group uses up a One Touch key or a Speed Dial location.
Storing numbers and E-mail addresses g Do one of the following: Enter the name using the dial pad (up to 15 characters). (For information how to enter text, see the Basic User's Guide.) Press OK. 2 Press OK to store the group without a name. h Set the resolution along with the group by the next step as shown in the following table.
Storing numbers and E-mail addresses l Press a or b to select Res: 200dpi or Res: 200x100dpi. Press OK. If you chose Email B&W PDF, go to step m. If you chose Email B&W TIFF, go to step n. m 2 Press a or b to select PDF TYPE: PDF, PDF TYPE: PDF/A, PDF TYPE: SPDF or PDF TYPE: SiPDF. Press OK and then go to step n. Note If you choose Secure PDF (PDF TYPE: SPDF), the machine will ask you to enter a 4 digit password using numbers 0-9 before it starts scanning. n Press Stop/Exit.
Storing numbers and E-mail addresses Broadcasting (black & white only) 2 Broadcasting lets you send the same message to more than one fax number or E-mail address. You can include Groups, One Touch, Speed Dial numbers and up to 50 manually dialed numbers in the same broadcast. You can broadcast up to 366 different numbers or E-mail addresses. This will depend on how many groups, access codes or credit card numbers you have stored, and on how many delayed or stored faxes in memory.
3 Control panel setup 3 E-mail/IFAX menu 3 The E-mail/IFAX menu selections of the control panel allow you to set up the Brother machine for your network configuration. (For more information on how to use the control panel, see the Basic User's Guide.) Press Menu then press a or b to choose Network. Press a or b to choose E-mail/IFAX. Proceed to the menu selection you wish to configure. (For additional information on the menu, see Function table and default factory settings on page 34.
Control panel setup SMTP SSL/TLS You can choose the encryption method between the machine and the SMTP server. Verify Cert. You can enable or disable to use the security certificate between the machine and the SMTP server. Note For more information on the security certificate, see Security Features in the Network User's Guide. 3 3 POP3 POP3 Server This field displays the node name or IP address of the POP3 server (incoming E-mail server) used by the Brother machine.
Control panel setup 3 Poll Frequency Sets the interval for checking for new messages on the POP3 server (default is 10Min). 3 Header This selection allows the contents of the mail header to be printed when the received message is printed. 3 3 Del Error Mail When set to On, the machine automatically deletes error mails that the machine cannot receive from the POP3 server.
Control panel setup Setup Relay 3 Relay Broadcast This function allows the machine to receive a document over the Internet, and then relay it to other fax machines through conventional analog landlines. 3 Relay Domain You can register the Domain Names (Max. 10) that are allowed to request a Relay Broadcast. 3 Relay Report A Relay Broadcast Report can be printed at the machine that will act as a Relay Station for all Relay Broadcasts.
Control panel setup Scan to E-mail (E-mail Server) 3 When you choose Scan to E-mail (E-mail Server) you can scan a black and white or color document and send it directly to an E-mail address from the machine. You can choose PDF, PDF/A, Secure PDF, Signed PDF or TIFF for Black and White and PDF, PDF/A, Secure PDF, Signed PDF, XPS or JPEG for color or gray. Note Scan to E-mail (E-mail Server) requires SMTP/POP3 mail server support. a b c Load your document.
Control panel setup Note • PDF/A is a PDF file format intended for long-term archiving. This format contains all the necessary information to be able to reproduce the document after long-term storage. • If you choose Secure PDF, the machine will ask you to enter a 4 digit password using numbers 0-9 before it starts scanning. • If you choose Signed PDF, you must install a certificate to your machine using Web Based Management.
Control panel setup How to set a new default for the file size (For Scan to E-mail (E-mail server)) 3 You can set your own default setting for the file size. For a higher quality scan, choose the large file size. For a smaller file size, choose the small file size. a b c d e f Press Menu, 1. 3 Press a or b to choose Document Scan. Press OK. Press a or b to choose File Size. Press OK. Press a or b to choose 1.Color or 2.Gray. Press OK. Press a or b to choose Small, Middle or Large. Press OK.
Control panel setup Fax to Server 3 The Fax to Server feature allows the machine to scan a document and send it over the network to a separate fax server. The document will then be sent from the server as fax data to the destination fax number over standard phone lines. When the Fax to Server feature is set to On all automatic fax transmissions from the machine will be sent to the fax server for fax transmission. You can continue to send a fax directly from the machine using the manual fax feature.
Control panel setup Setting Fax to Server to On 3 You can store the prefix/suffix address for the fax server in the machine. a b Press Menu. c Press a or b to choose Fax to Server. Press OK. d Press a or b to choose On. Press OK. e Press a or b to choose Prefix. Press OK. f g h Enter the prefix using the dial pad. i j k Enter the suffix using the dial pad. Press a or b to choose Network. Press OK. 3 Press OK. Press a or b to choose Suffix. Press OK. Press OK. Press Stop/Exit.
Control panel setup Function table and default factory settings 3 The factory settings are shown in Bold with an asterisk. Main menu Submenu Menu selections 2.Fax 3.Address Book 1.One Touch Dial — 2.Speed Dial Options — 3.Setup Groups — Stores up to 16 One Touch Dial numbers. Stores up to 300 Speed Dial numbers. Sets up to 20 Group numbers for Broadcasting.
Control panel setup Main menu Submenu Menu selections Options 7.Network 5.E-mail/IFAX 1.Mail Address — — (MFC-9460CDN and MFC-9465CDN) 2.Setup Server 1.SMTP 1.SMTP Server Name (Up to 64 characters) Name (Up to 60 characters) 3.E-mail/IFAX IP Address (MFC-9560CDW) [000-255].[000-255].[000-255].[000-255] 2.SMTP Port 00025* [00001-65535] 3.Auth. for SMTP None* SMTP-AUTH POP bef.SMTP 4.SMTP SSL/TLS None*/SSL/TLS 5.Verify Cert. On/Off* 2.POP3 1.
Control panel setup Main menu Submenu Menu selections Options 7.Network 5.E-mail/IFAX 3.Setup Mail RX 1.Auto Polling (Continued) (MFC-9460CDN and MFC-9465CDN) On* Off 2.Poll Frequency 10Min* (01Min to 60Min) 3.E-mail/IFAX 3.Header (MFC-9560CDW) All 3 Subject+From+To (Continued) None* 4.Del Error Mail On* Off 5.Notification On MDN Off* 4.Setup Mail TX 1.Sender Subject 2.Size Limit (Up to 40 characters) On Off* 3.Notification On Off* 5.Setup Relay 1.Rly Broadcast On Off* 2.
Control panel setup Main menu Submenu 7.Network 6.Scan To E-mail — Color 100 dpi* (Continued) (MFC-9460CDN and MFC-9465CDN) Color 200 dpi 4.
Control panel setup Main menu Submenu Menu selections Options 7.Network 7.Scan To FTP — Color 100 dpi* (Continued) (MFC-9460CDN and MFC-9465CDN) 5.
Control panel setup Main menu Submenu Menu selections Options 7.Network 8.ScanTo Network — Color 100 dpi* (Continued) (MFC-9460CDN and MFC-9465CDN) Color 200 dpi Color 300 dpi Color 600 dpi 6.
A Index B Broadcasting ............................................................. 24 setting up groups for .............................................. 21 D Dialing groups (broadcasting) ............................................ 24 A F Fax to Server ............................................................ 32 Fax, stand-alone sending broadcasting ....................................................... 24 G Groups for broadcasting ...........................................