
User`s guide

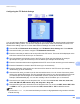
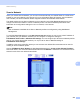
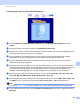

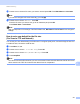
Table Of Contents
- SOFTWARE USER'S GUIDE
- Trademarks
- Table of Contents
- Windows®
- 1 Printing
- Using the Brother printer driver
- Printing a document
- Duplex printing
- Simultaneous scanning, printing and faxing
- Printer operation keys
- Status Monitor
- Printer driver settings
- Features in the Windows® printer driver
- Basic tab
- Advanced tab
- Tray Settings tab
- Support
- Features in the BR-Script (PostScript® 3™ language emulation) printer driver
- 2 Scanning
- Scanning a document using the TWAIN driver
- Scanning a document using the WIA driver (Windows® XP/Windows Vista®/Windows® 7)
- Scanning a document using the WIA driver (Windows Photo Gallery and Windows Fax and Scan)
- Using ScanSoft™ PaperPort™ 11SE with OCR by NUANCE™
- 3 ControlCenter3
- 4 Remote Setup
- 5 Brother PC-FAX Software
- 6 Firewall settings (For Network users)
- 1 Printing
- Apple Macintosh
- 7 Printing and Faxing
- 8 Scanning
- 9 ControlCenter2
- 10 Remote Setup
- Using The Scan key
- Index

Network Scanning
204
12
Scan to File 12
When you choose Scan to File, you can scan a black & white or color document and send it directly to a
computer you designate on your network. The file will be saved in the folder and file format that you have
configured in ControlCenter3 or ControlCenter2. You can change the Scan configuration. (For Windows
®
,
see E-mail on page 65. For Macintosh, see SCAN on page 170.)
a Load your document.
b Press (SCAN).
c Press a or b to choose Scan to PC.
Press OK.
d Press a or b to choose File.
Press OK.
e Press a or b to choose the destination computer you want to send to.
Press OK.
If the LCD prompts you to enter a PIN number, enter the 4-digit PIN number for the destination computer
on the control panel.
Press OK.
f Press Black Start or Color Start.
The machine starts the scanning process.
Note
• Scan type depends on the settings of the Device Button tab, Black Start or Color Start do not change the
settings.
• If you want the scanned data in color, choose color in scan type on the Device Button tab of the
ControlCenter3 or ControlCenter2 configuration. If you want the scanned data in black and white, choose
black and white in scan type on the Device Button tab of the ControlCenter3 or ControlCenter2
configuration.
• If you would like to change the file name of scanned documents, enter the file name in the File Name
section on the Device Button tab of the ControlCenter3 or ControlCenter2 configuration. To change the
machine’s SCAN key settings for Control Center3, right-click each ControlCenter button, click
ControlCenter Configuration and click the Device Button tab. To configure the Software button in
ControlCenter2, choose the Software Button tab (click each of the ControlCenter buttons while holding
down the Ctrl key and choose Software Button) in the configuration menu for each of the SCAN buttons.
• If you want to change the default file size, choose your preferred rate by moving the scroll bar on the
Device Button tab of the ControlCenter3 or ControlCenter2 configuration.