
User Manual


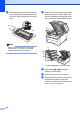
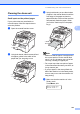
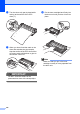
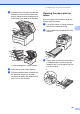
Table Of Contents
- USER’S GUIDE MFC-9125CN MFC-9325CW
- Approval Information and Compilation and Publication Notice
- Table of Contents
- Section I: General
- 1 General information
- Using the documentation
- Accessing the Software User’s Guide and Network User’s Guide
- Viewing documentation
- Viewing documentation (Windows®)
- How to find scanning instructions
- Software User’s Guide:
- ScanSoft™ PaperPort™ 11SE with OCR How-to-Guides:
- How to find Network setup instructions
- Viewing documentation (Macintosh)
- How to find scanning instructions
- Software User’s Guide:
- Presto! PageManager User’s Guide:
- How to find Network setup instructions
- Viewing the Mobile Print/Scan Guide documentation
- Viewing documentation
- Accessing Brother Support (For Windows®)
- Control panel overview
- 2 Loading paper and documents
- 3 General Setup
- 4 Security features
- 1 General information
- Section II: Fax
- 5 Sending a fax
- How to fax
- Broadcasting (black & white only)
- Additional sending operations
- Sending faxes using multiple settings
- Electronic cover page (black & white only)
- Contrast
- Changing Fax Resolution
- Dual access (black & white only)
- Real Time Transmission
- Overseas Mode
- Delayed Fax (black & white only)
- Delayed batch transmission (black & white only)
- Checking and cancelling waiting jobs
- Sending a fax manually
- Out of memory message
- 6 Receiving a fax
- 7 Telephone and external devices
- Telephone line services
- Telephone Service for Australia
- Telephone Service for New Zealand
- Telephone Service for Some Countries
- Connecting an external TAD
- External and extension telephones
- 8 Dialling and storing numbers
- 9 Remote Fax Options (black & white only)
- 10 Polling
- 11 Printing reports
- 5 Sending a fax
- Section III: Copy
- Section IV: Direct printing
- Section V: Software
- Section VI: Appendixes
- A Safety and legal
- B Options
- C Troubleshooting and routine maintenance
- Troubleshooting
- Error and maintenance messages
- Routine maintenance
- Replacing the consumable items
- Replacing periodic maintenance parts
- Machine Information
- Packing and shipping the machine
- D Menu and features
- E Specifications
- F Glossary
- Index

168
d Wipe the two pick-up rollers (1) inside of
the machine to remove dust.
e Put the paper tray back in the machine.
f Plug the machine’s power cord back into
the electrical socket. Turn on the
machine.
Calibration C
The output density for each colour may vary
depending on the environment the machine is
in such as temperature and humidity.
Calibration helps you to improve the colour
density.
a Press Menu, 4, 5.
b Press a or b to select Calibrate.
c Press OK.
d Press 1 to select Yes.
e Press Stop/Exit.
You can reset the calibration parameters
back to those set at the factory.
a Press Menu, 4, 5.
b Press a or b to Reset.
c Press OK.
d Press 1 to select Yes.
e Press Stop/Exit.
Note
• If an error message is displayed, press
Stop/Exit and try again. For more
information, see Error and maintenance
messages on page 145.
• If you print using Windows
®
printer driver,
you need to perform the calibration from
the Windows
®
printer driver. See
Advanced tab in the Software User's
Guide on the CD-ROM.
• If you print using the Macintosh printer
driver, you need to perform the calibration
using the status monitor. See Status
Monitor in the Software User's Guide on
the CD-ROM. When the Status Monitor
is open, choose Control / Color
Calibration from the menu bar.
1