
User Manual
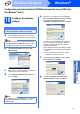

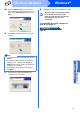
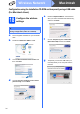
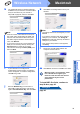
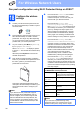
Table Of Contents
- Quick Setup Guide MFC-9325CW
- Start Here
- 1 Unpack the machine and check the components
- 2 Remove the packing material from the machine
- 3 Install the drum unit and toner cartridge assemblies
- 4 Load paper in the paper tray
- 5 Connect the power cord and telephone line
- 6 Set your country (for Australia/New Zealand customer only)
- 7 Choose a Receive Mode
- 8 Set the LCD contrast (if needed)
- 9 Set the date and time
- 10 Enter personal information (station ID)
- 11 Fax Transmission Report
- 12 Set tone or pulse dialling mode (not available for New Zealand)
- 13 Dial Prefix
- 14 Automatic Daylight Savings Time
- 15 Choose your connection type
- For USB Interface Users (Windows® XP/XP Professional x64 Edition/Windows Vista®/ Windows® 7)
- For USB Interface Users(Mac OS X 10.4.11 - 10.6.x)
- For Wired Network Interface Users(Windows® XP/XP Professional x64 Edition/Windows Vista®/Windows® 7)
- For Wired Network Interface Users(Mac OS X 10.4.11 - 10.6.x)
- For Wireless Network Interface Users
- 16 Before you begin
- 17 Choose your wireless install method
- Configuration using the Installation CD-ROM and temporarily using a USB cable (For Windows® Users)
- Configuration using the Installation CD-ROM and temporarily using a USB cable (For Macintosh Users)
- Manual configuration from the control panel
- One push configuration using Wi-Fi Protected Setup or AOSS™
- Install the Drivers & Software (Windows® XP/XP Professional x64 Edition/Windows Vista®/ Windows® 7)
- Install the Drivers & Software (Mac OS X 10.4.11 - 10.6.x)
- For Network Users
- Options and Consumables
- Start Here

35
Macintosh
Wireless Network
Wireless Network
Windows
®
Macintosh
h The wizard will search for wireless networks
available from your machine. Choose the SSID
that you wrote down for your network in
step 17-a on page 28, and then click Next.
i If your network is not configured for
Authentication and Encryption, the following
screen will appear. To continue configuration,
click OK and go to k.
j
Enter the
Network Key
you wrote down in
step 17-a
on page 28 and then enter the key
again in
Confirm Network Key
, then click
Next
.
k Click Next. The settings will be sent to your
machine.
l Disconnect the USB cable between the
computer and the machine.
m Click Next to continue to install MFL-Pro Suite.
To install MFL-Pro Suite, continue to
step 20-d on page 42.
Now go to
page 42
Note
• If the list is blank, check that the access point
has power and is broadcasting the SSID, and
then see if the machine and the access point
are within range for wireless communication.
Then, click Refresh.
• If your access point is set to not broadcast the
SSID you can manually add it by clicking the
Advanced button. Follow the on-screen
instructions for entering the Name (SSID), and
then click Next.
Note
• The settings will remain unchanged if you click
Cancel.
• If you want to manually enter the IP address
settings of your machine, click Change IP
Address and enter the necessary IP address
settings for your network.
• If the wireless setup failure screen appears,
click Retry.
Wireless setup is now complete. A four
level indicator at the right of your
machine's LCD will show the wireless
signal strength of your access
point/router.