
User Manual

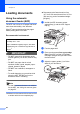

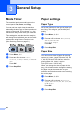


Table Of Contents
- USER’S GUIDE MFC-9120CN MFC-9320CW
- Approval Information and Compilation and Publication Notice
- Table of Contents
- Section I: General
- Section II: Fax
- Sending a fax
- How to fax
- Broadcasting (black & white only)
- Additional sending operations
- Sending faxes using multiple settings
- Electronic cover page (black & white only)
- Contrast
- Changing Fax Resolution
- Dual access (black & white only)
- Real Time Transmission
- Overseas Mode
- Delayed Fax (black & white only)
- Delayed batch transmission (black & white only)
- Checking and cancelling waiting jobs
- Sending a fax manually
- Out of memory message
- Receiving a fax
- Telephone and external devices
- Dialling and storing numbers
- Remote Fax Options (black & white only)
- Polling
- Printing reports
- Sending a fax
- Section III: Copy
- Section IV: Direct printing
- Section V: Software
- Section VI: Appendixes
- Index
- brother CHN_ENG

General Setup
27
3
Setting the Fax Logic
(sending and receiving
sequence)
3
You can change the process of manual fax
send or receive.
If you often send or receive a fax manually
to/from the other party at the end of a
conversation, set the Fax Mode to
Easy Mode.
If you set to Easy Mode:
You can send or receive a fax manually just
simply press Start.
Make sure the other party's machine is ready
to send or receive a fax.
If you are a caller, press Start to send a fax.
If you are a receiver, press Start to receive a
fax.
If you set to Advanced Mode:
No matter you are a caller or receiver, you
can choose you will send or receive a fax
manually. When you perss Start, the
machine will ask you to choose 1.Send or
2.Receive.
If you want to send a fax, press 1 to send a
fax.
If you want to receive a fax, press 2 to receive
a fax.
Note
Even if you set either Easy Mode or
Advanced Mode and if there is a
document in the ADF, the document in the
ADF will be sent by pressing Start.
a Press Menu, 2, 0, 2.
b Press a or b to choose Easy Mode or
Advanced Mode.
Press OK.
c Press Stop/Exit.
Dial prefix 3
The dial prefix setting will automatically dial a
predefined number before every fax number
you dial. For example: If your telephone
system requires a 9 to dial an outside number
use this setting to automatically dial 9 for
every fax you send.
Setting up the prefix number 3
a Press Menu, 0, 6.
b Enter the prefix number (up to 5 digits)
on the dial pad.
Press OK.
Note
You can use the numbers 0 to 9, #, l and
!. (Press Hook to display “!”.)
You cannot use ! with any other numbers
or characters.
If your telephone system requires a timed
break recall (hookflash), press Hook to
enter the break.
c Press Stop/Exit.
Changing the prefix number 3
a Press Menu, 0, 6.
b Do one of the following:
To change the prefix number,
press 1.
To exit without making a change,
press 2 and go to d.
c Enter a new prefix number using the dial
pad (up to 5 digits).
Press OK.
d Press Stop/Exit.