
User Manual

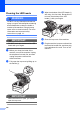
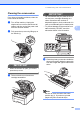
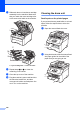
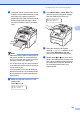


Table Of Contents
- USER’S GUIDE MFC-9120CN MFC-9320CW
- Approval Information and Compilation and Publication Notice
- Table of Contents
- Section I: General
- Section II: Fax
- Sending a fax
- How to fax
- Broadcasting (black & white only)
- Additional sending operations
- Sending faxes using multiple settings
- Electronic cover page (black & white only)
- Contrast
- Changing Fax Resolution
- Dual access (black & white only)
- Real Time Transmission
- Overseas Mode
- Delayed Fax (black & white only)
- Delayed batch transmission (black & white only)
- Checking and cancelling waiting jobs
- Sending a fax manually
- Out of memory message
- Receiving a fax
- Telephone and external devices
- Dialling and storing numbers
- Remote Fax Options (black & white only)
- Polling
- Printing reports
- Sending a fax
- Section III: Copy
- Section IV: Direct printing
- Section V: Software
- Section VI: Appendixes
- Index
- brother CHN_ENG

160
e Press Stop/Exit.
Note
• If an error message is displayed, press
Stop/Exit and try again. For more
information, see Error and maintenance
messages on page 137.
• If you print using Windows
®
printer driver,
you need to perform the calibration from
the Windows
®
printer driver. See
Advanced tab in the Software User's
Guide on the CD-ROM.
• If you print using the Macintosh printer
driver, you need to perform the calibration
using the status monitor. See Status
Monitor in the Software User's Guide on
the CD-ROM. When the Status Monitor
is open, choose Control / Color
Calibration from the menu bar.
Auto Registration C
Registration C
If solid areas of color or images have cyan,
magenta or yellow fringes, you can use the
auto-registration feature to correct the
problem.
a Press Menu, 4, 6, 1.
b To start, press 1.
To exit, press 2.
c Press Stop/Exit.
Frequency C
You can set the machine to carry out auto
registration regularly, and also how often it
occurs.
a Press Menu, 4, 6, 2.
b Press a or b to choose Low, Medium,
High or Off.
Press OK.
c Press Stop/Exit.
Manual Registration C
If color still appears incorrectly after auto-
registration, you will need to perform manual
registration.
a Press Menu, 4, 7, 1.
b Press Mono Start or Color Start to
start printing the color registration chart.
c When the machine has finished printing
the registration sheet, press 2
(Set Regist.) to correct the color
manually.
d Starting at 1 (Magenta) on the chart,
check which colored bar has the most
uniform print density and enter its
number into the machine using the a
and b keys.
Press OK.
Repeat for 2 (Cyan), 3 (Yellow), 4, 5, 6
to 9.
e Press Stop/Exit.