
User Manual
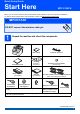
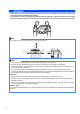
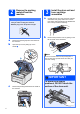
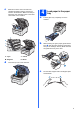
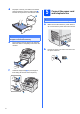
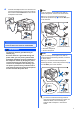
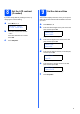
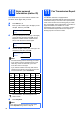
Table Of Contents
- Quick Setup Guide MFC-9120CN
- Start Here
- 1 Unpack the machine and check the components
- 2 Remove the packing material from the machine
- 3 Install the drum unit and toner cartridge assemblies
- 4 Load paper in the paper tray
- 5 Connect the power cord and telephone line
- 6 Set your country (for Australia/New Zealand customer only)
- 7 Choose a Receive Mode
- 8 Set the LCD contrast (if needed)
- 9 Set the date and time
- 10 Enter personal information (station ID)
- 11 Fax Transmission Report
- 12 Set tone or pulse dialling mode (not available for New Zealand)
- 13 Dial Prefix
- 14 Automatic Daylight Savings Time
- 15 Choose your connection type
- For USB Interface Users (Windows® 2000 Professional/XP/XP Professional x64 Edition/ Windows Vista®)
- For USB Interface Users (Mac OS X 10.3.9 or greater)
- For Wired Network Interface Users (Windows® 2000 Professional/XP/XP Professional x64 Edition/ Windows Vista®)
- For Wired Network Interface Users (Mac OS X 10.3.9 or greater)
- For Network Users
- Options and Consumables
- brother ARL/ASA/NZ
- Start Here

4
2
Remove the packing
material from the
machine
a Remove the packing tape from the outside of
the machine.
b Open the top cover by lifting up on the
handle a.
c Remove the packing material from the inside of
the machine.
3
Install the drum unit and
toner cartridge
assemblies
a Unpack the four drum unit and toner cartridge
assemblies and gently shake each of them
from side to side several times to distribute the
toner evenly inside the assembly.
b Remove the protective cover by pulling on the
tab as shown in the illustration.
IMPORTANT
• Save all packing material and the carton in
case you have to ship your machine.
• DO NOT plug in the AC power cord yet.
1
Note
Do not touch the surface of the packing film. It
may contain toner powder which can stain your
skin and clothing.
IMPORTANT
To avoid print quality
problems, DO NOT touch the
surface of the drum unit.