
User Manual
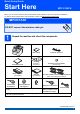
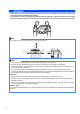
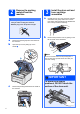
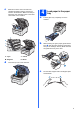
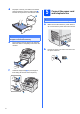
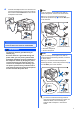
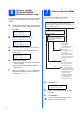
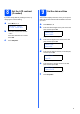
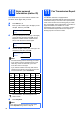
Table Of Contents
- Quick Setup Guide MFC-9120CN
- Start Here
- 1 Unpack the machine and check the components
- 2 Remove the packing material from the machine
- 3 Install the drum unit and toner cartridge assemblies
- 4 Load paper in the paper tray
- 5 Connect the power cord and telephone line
- 6 Set your country (for Australia/New Zealand customer only)
- 7 Choose a Receive Mode
- 8 Set the LCD contrast (if needed)
- 9 Set the date and time
- 10 Enter personal information (station ID)
- 11 Fax Transmission Report
- 12 Set tone or pulse dialling mode (not available for New Zealand)
- 13 Dial Prefix
- 14 Automatic Daylight Savings Time
- 15 Choose your connection type
- For USB Interface Users (Windows® 2000 Professional/XP/XP Professional x64 Edition/ Windows Vista®)
- For USB Interface Users (Mac OS X 10.3.9 or greater)
- For Wired Network Interface Users (Windows® 2000 Professional/XP/XP Professional x64 Edition/ Windows Vista®)
- For Wired Network Interface Users (Mac OS X 10.3.9 or greater)
- For Network Users
- Options and Consumables
- brother ARL/ASA/NZ
- Start Here

2
WARNING
• Plastic bags are used in the packaging of your machine. To avoid danger of suffocation, please keep
these bags away from babies and children.
• This machine is heavy and weighs approximately 22.9 kg. (50.5 lb). To prevent injuries use at least two
people to lift the machine. Be careful not to pinch your fingers when you put the machine back down.
Note
Keep a minimum gap around the machine as shown in the illustration.
400 mm
100 mm
100 mm
120 mm
Note
• The components included in the box may differ depending on your country.
• Save all packing materials and the box in case for any reason you must ship your machine.
• The interface cable is not a standard accessory. Buy the appropriate interface cable for the interface you
want to use (USB or Network).
• To ensure safe operation the supplied plug must be inserted only into a standard power outlet that is
properly grounded through the standard electrical wiring. Non grounded equipment may cause an electrical
shock hazard, and may cause excessive electrical noise radiation.
USB cable
• Please make sure you use a USB 2.0 cable (Type A/B) that is no longer than 2 metres.
• DO NOT connect the interface cable at this time. Connecting the interface cable is done during MFL-Pro
installation process.
• When you use a USB cable, make sure you connect it to the USB port of your computer and not to a USB
port on a keyboard or non-powered USB hub.
Network cable
Use a straight-through Category 5 (or greater) twisted-pair cable for 10BASE-T or 100BASE-TX Fast Ethernet
Network.