
User Manual
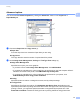
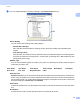

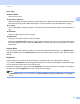
Table Of Contents
- SOFTWARE USER'S GUIDE DCP-9010CN MFC-9120CN MFC-9320CW
- Trademarks
- Table of Contents
- Windows®
- 1 Printing
- Using the Brother printer driver
- Printing a document
- Duplex printing
- Simultaneous scanning, printing and faxing
- Printer operation keys
- Status Monitor
- Printer driver settings
- Features in the Windows® printer driver
- Basic tab
- Advanced tab
- Tray Settings tab
- Support
- Features in the BR-Script (PostScript® 3™ language emulation) printer driver
- 2 Scanning
- Scanning a document using the TWAIN driver
- Scanning a document using the WIA driver (Windows® XP/Windows Vista®/Windows® 7)
- Scanning a document using the WIA driver (Windows Photo Gallery and Windows Fax and Scan)
- Using ScanSoft™ PaperPort™ 11SE with OCR by NUANCE™
- 3 ControlCenter3
- 4 Remote Setup (MFC-9120CN and MFC-9320CW only)
- 5 Brother PC-FAX Software (MFC-9120CN and MFC-9320CW only)
- 6 Firewall settings (For Network users)
- 1 Printing
- Apple Macintosh
- 7 Printing and Faxing
- Printer operation key
- Status Monitor
- Features in the printer driver (Macintosh)
- Removing the Printer driver for Macintosh
- Using the BR-Script3 Driver (PostScript® 3™ language emulation printer driver)
- Features in the BR-Script 3 (PostScript® 3™ language emulation) printer driver
- Sending a fax (MFC-9120CN and MFC-9320CW only)
- 8 Scanning
- 9 ControlCenter2
- 10 Remote Setup
- 7 Printing and Faxing
- Using The Scan key
- 11 Scanning (For USB cable users)
- 12 Network Scanning
- Index

Scanning
41
2
Scan Type 2
Black & White
Use for text or line art.
Grey (Error Diffusion)
Use for photographic images or graphics. (Error Diffusion is a method for creating simulated grey images
without using true grey dots. Black dots are put in a specific pattern to give the appearance of grey.)
True Grey
Use for photographic images or graphics. This mode is more exact because it uses up to 256 shades of
grey.
256 Colour
Uses up to 256 colours to scan the image.
24bit Colour
Uses up to 16.8 million colours to scan the image.
Although using 24bit Colour creates an image with the most accurate colour, the image file will be about
three times larger than a file created with 256 Colour. It requires the most memory and has the longest
transfer time.
Reduce Noise 2
You can improve and enhance the quality of your scanned images with this selection. The Reduce Noise
setting is available when using 24bit Colour and scan resolutions of 300 × 300 dpi, 400 × 400 dpi or 600 ×
600 dpi.
Brightness 2
Adjust the setting (-50 to 50) to get the best image. The default value is 0, representing an average.
You can set the Brightness level by dragging the slide bar to the right or left to lighten or darken the image.
You can also enter a value in the box to set the level.
If the scanned image is too light, set a lower Brightness level and scan the document again. If the image is
too dark, set a higher Brightness level and scan the document again.
Note
The Brightness setting is only available when Black & White, Grey (Error Diffusion) or True Grey is
chosen.