
User Manual


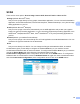
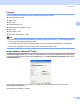
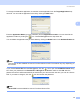
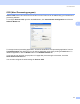
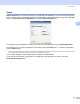
Table Of Contents
- SOFTWARE USER’S GUIDE DCP-9010CN MFC-9120CN MFC-9320CW
- Trademarks
- Table of Contents
- Windows®
- 1 Printing
- Using the Brother printer driver
- Printing a document
- Duplex printing
- Simultaneous scanning, printing and faxing
- Printer operation keys
- Status Monitor
- Printer driver settings
- Features in the Windows® printer driver
- Basic tab
- Advanced tab
- Tray Settings tab
- Support
- Features in the BR-Script (PostScript® 3™ language emulation) printer driver
- 2 Scanning
- 3 ControlCenter3
- 4 Remote Setup (MFC-9120CN and MFC-9320CW only)
- 5 Brother PC-FAX Software (MFC-9120CN and MFC-9320CW only)
- 6 Firewall settings (For Network users)
- 1 Printing
- Apple Macintosh
- 7 Printing and Faxing
- Printer operation key
- Status Monitor
- Features in the printer driver (Macintosh)
- Removing the Printer driver for Macintosh
- Using the BR-Script3 Driver (PostScript® 3™ language emulation printer driver)
- Features in the BR-Script 3 (PostScript® 3™ language emulation) printer driver
- Sending a fax (MFC-9120CN and MFC-9320CW only)
- 8 Scanning
- 9 ControlCenter2
- 10 Remote Setup
- 7 Printing and Faxing
- Using The Scan key
- 11 Scanning (For USB cable users)
- 12 Network Scanning
- Index

ControlCenter3
59
3
File type 3
You can choose from the following list of file types when saving to a folder.
Windows Bitmap (*.bmp)
JPEG (*.jpg)
TIFF (*.tif)
TIFF Multi-Page (*.tif)
Portable Network Graphics (*.png)
PDF (*.pdf)
Secure PDF (*.pdf)
XML Paper Specification (*.xps)
Note
• The XML Paper Specification is available for Windows Vista
®
and Windows
®
7, or when using applications
which support XML Paper Specification files.
• If you set the file type to TIFF or TIFF Multi-Page, you can choose “Uncompressed” or “Compressed”.
• Secure PDF is available for Scan to Image, Scan to E-mail and Scan to File.
Image (example: Microsoft
®
Paint) 3
The Scan to Image feature lets you scan an image directly into your graphics application for image editing.
To change the default settings, right-click the Image button, click ControlCenter Configuration and click the
Software Button tab.
If you want to scan and then crop a portion of a page after pre-scanning the document, check the
Show Scanner Interface box.
Change the other settings, if needed.