
User Manual


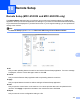

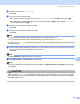


Table Of Contents
- SOFTWARE USER’S GUIDE DCP-9010CN MFC-9120CN MFC-9320CW
- Trademarks
- Table of Contents
- Windows®
- 1 Printing
- Using the Brother printer driver
- Printing a document
- Duplex printing
- Simultaneous scanning, printing and faxing
- Printer operation keys
- Status Monitor
- Printer driver settings
- Features in the Windows® printer driver
- Basic tab
- Advanced tab
- Tray Settings tab
- Support
- Features in the BR-Script (PostScript® 3™ language emulation) printer driver
- 2 Scanning
- 3 ControlCenter3
- 4 Remote Setup (MFC-9120CN and MFC-9320CW only)
- 5 Brother PC-FAX Software (MFC-9120CN and MFC-9320CW only)
- 6 Firewall settings (For Network users)
- 1 Printing
- Apple Macintosh
- 7 Printing and Faxing
- Printer operation key
- Status Monitor
- Features in the printer driver (Macintosh)
- Removing the Printer driver for Macintosh
- Using the BR-Script3 Driver (PostScript® 3™ language emulation printer driver)
- Features in the BR-Script 3 (PostScript® 3™ language emulation) printer driver
- Sending a fax (MFC-9120CN and MFC-9320CW only)
- 8 Scanning
- 9 ControlCenter2
- 10 Remote Setup
- 7 Printing and Faxing
- Using The Scan key
- 11 Scanning (For USB cable users)
- 12 Network Scanning
- Index

Scanning (For USB cable users)
179
11
d Press a or b to choose Scan to USB.
Press OK.
e Choose one of the options below:
To change the setting press a or b to choose Change Setting. Press OK and go to step f.
To start scanning with the settings you set in the Function Menu (Menu, 5, 2), choose Start Scan.
Press OK and go to step i.
f Press a or b to choose the quality you want.
Press OK.
g Press a or b to choose the file type you want.
Press OK.
Note
• If you choose color or grey in the resolution setting, you cannot choose TIFF.
• If you choose monochrome in the resolution setting, you cannot choose JPEG or XPS.
• If you choose Secure PDF, the machine will ask you to enter a 4 digit password using numbers 1-9 before
it starts scanning.
h The file name is set automatically. However, you can create a name of your choice using the dial pad.
You can only change the first 6 digits of the file name.
Press OK.
Note
Press Clear/Back to delete the letters you entered.
i Press Mono Start or Color Start to start scanning.
Note
Scan Type depends on the settings of the DeviceButton tab, Mono Start or Color Start do not change
the settings.
CAUTION
The LCD shows Scanning while reading the data. DO NOT unplug the power cord or remove the USB
Flash memory drive from the machine while it is reading the data. You could lose your data or damage the
USB Flash memory drive.