
User Manual


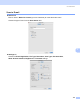

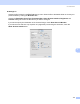
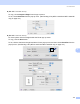
Table Of Contents
- SOFTWARE USER’S GUIDE DCP-9010CN MFC-9120CN MFC-9320CW
- Trademarks
- Table of Contents
- Windows®
- 1 Printing
- Using the Brother printer driver
- Printing a document
- Duplex printing
- Simultaneous scanning, printing and faxing
- Printer operation keys
- Status Monitor
- Printer driver settings
- Features in the Windows® printer driver
- Basic tab
- Advanced tab
- Tray Settings tab
- Support
- Features in the BR-Script (PostScript® 3™ language emulation) printer driver
- 2 Scanning
- 3 ControlCenter3
- 4 Remote Setup (MFC-9120CN and MFC-9320CW only)
- 5 Brother PC-FAX Software (MFC-9120CN and MFC-9320CW only)
- 6 Firewall settings (For Network users)
- 1 Printing
- Apple Macintosh
- 7 Printing and Faxing
- Printer operation key
- Status Monitor
- Features in the printer driver (Macintosh)
- Removing the Printer driver for Macintosh
- Using the BR-Script3 Driver (PostScript® 3™ language emulation printer driver)
- Features in the BR-Script 3 (PostScript® 3™ language emulation) printer driver
- Sending a fax (MFC-9120CN and MFC-9320CW only)
- 8 Scanning
- 9 ControlCenter2
- 10 Remote Setup
- 7 Printing and Faxing
- Using The Scan key
- 11 Scanning (For USB cable users)
- 12 Network Scanning
- Index

ControlCenter2
171
9
COPY / PC-FAX (PC-FAX is on MFC-9120CN and MFC-9320CW
only) 9
COPY - Lets you use your Macintosh and any printer driver for enhanced copy operations. You can scan a
page on the machine and print the copies using any of the features of the machine’s printer driver, or you can
direct the copy output to any standard printer driver installed on your Macintosh including network printers.
PC-FAX - Lets you scan a page or document and automatically send the image as a fax from the Macintosh.
(MFC-9120CN and MFC-9320CW only)
You can configure your preferred settings on up to four buttons.
The Copy1-Copy4 buttons can be customized to let you use advanced copy and fax functions such as N in
1 printing.
To use the Copy buttons, configure the printer driver by clicking the button while holding down the Ctrl key.
Enter a name in Name for Copy (up to 30 characters).
Choose the Copy Ratio, Resolution, Scan Type, Document Size, Show Scanner Interface, Brightness
and Contrast settings to be used.
Before finishing the Copy button configuration, select the Printer. Then choose your print settings from the
Presets pop-up menu, then click OK to close the dialog box. By clicking the configured copy button, the print
dialog box opens.