
User Manual
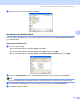
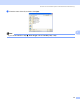

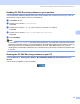
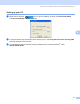
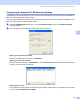
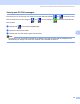
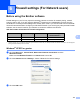

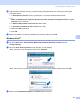
Table Of Contents
- SOFTWARE USER’S GUIDE DCP-9010CN MFC-9120CN MFC-9320CW
- Trademarks
- Table of Contents
- Windows®
- 1 Printing
- Using the Brother printer driver
- Printing a document
- Duplex printing
- Simultaneous scanning, printing and faxing
- Printer operation keys
- Status Monitor
- Printer driver settings
- Features in the Windows® printer driver
- Basic tab
- Advanced tab
- Tray Settings tab
- Support
- Features in the BR-Script (PostScript® 3™ language emulation) printer driver
- 2 Scanning
- 3 ControlCenter3
- 4 Remote Setup (MFC-9120CN and MFC-9320CW only)
- 5 Brother PC-FAX Software (MFC-9120CN and MFC-9320CW only)
- 6 Firewall settings (For Network users)
- 1 Printing
- Apple Macintosh
- 7 Printing and Faxing
- Printer operation key
- Status Monitor
- Features in the printer driver (Macintosh)
- Removing the Printer driver for Macintosh
- Using the BR-Script3 Driver (PostScript® 3™ language emulation printer driver)
- Features in the BR-Script 3 (PostScript® 3™ language emulation) printer driver
- Sending a fax (MFC-9120CN and MFC-9320CW only)
- 8 Scanning
- 9 ControlCenter2
- 10 Remote Setup
- 7 Printing and Faxing
- Using The Scan key
- 11 Scanning (For USB cable users)
- 12 Network Scanning
- Index

Firewall settings (For Network users)
102
6
h Add port 137 for network scanning, network printing and Network PC-Fax receiving by entering the
information below:
1In Description of service: Enter any description, for example "Brother Network Print".
2In
Name or IP address (for example 192.168.0.12) of the computer hosting this service on your
network: Enter "Localhost".
3In External Port number for this service: Enter "137".
4In Internal Port number for this service: Enter "137".
5 Make sure UDP is selected.
6Click OK.
i Make sure that the new setting is added and is checked, and then click OK.
Windows Vista
®
6
a Click the Start button, Control Panel, Network and Internet, Windows Firewall and click
Change settings.
b When the User Account Control screen appears, do the following.
For users who have administrator rights: Click Continue.
For users who do not have administrator rights: Enter the administrator password and click OK.
c Make sure that Windows Firewall on the General tab is set to On.