
User`s guide

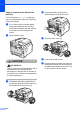

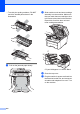
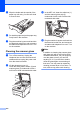
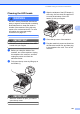
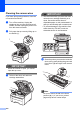
Table Of Contents
- USER’S GUIDE MFC-9120CN MFC-9320CW
- Approval Information and Compilation and Publication Notice
- EC Declaration of Conformity
- Table of Contents
- Section I: General
- 1 General information
- Using the documentation
- Accessing the Software User’s Guide and Network User’s Guide
- Viewing documentation
- Viewing documentation (Windows®)
- How to find scanning instructions
- Software User’s Guide:
- ScanSoft™ PaperPort™ 11SE with OCR How-to-Guides:
- How to find Network setup instructions
- Viewing documentation (Macintosh)
- How to find scanning instructions
- Software User’s Guide:
- Presto! PageManager User’s Guide:
- How to find Network setup instructions
- Viewing documentation
- Accessing Brother Support (For Windows®)
- Control panel overview
- 2 Loading paper and documents
- 3 General Setup
- 4 Security features
- 1 General information
- Section II: Fax
- 5 Sending a fax
- How to fax
- Broadcasting (black & white only)
- Additional sending operations
- Sending faxes using multiple settings
- Electronic cover page (black & white only)
- Contrast
- Changing Fax Resolution
- Dual access (black & white only)
- Real Time Transmission
- Overseas Mode
- Delayed Fax (black & white only)
- Delayed batch transmission (black & white only)
- Checking and cancelling waiting jobs
- Sending a fax manually
- Out of memory message
- 6 Receiving a fax
- 7 Telephone and external devices
- 8 Dialling and storing numbers
- 9 Remote Fax Options (black & white only)
- 10 Polling
- 11 Printing reports
- 5 Sending a fax
- Section III: Copy
- Section IV: Direct printing
- Section V: Software
- Section VI: Appendixes
- A Safety and legal
- B Options
- C Troubleshooting and routine maintenance
- Troubleshooting
- Error and maintenance messages
- Routine maintenance
- Replacing the consumable items
- Replacing periodic maintenance parts
- Machine Information
- Packing and shipping the machine
- D Menu and features
- E Specifications
- F Glossary
- Index
- brother UK/IRE

144
• To avoid print quality problems, DO NOT
touch the shaded parts shown in the
illustrations.
d Pull out the jammed paper slowly.
e Slide each drum unit and toner cartridge
assembly into the machine. Make sure
that you match the toner cartridge colour
to the same colour label on the machine.
Repeat this for all the drum unit and
toner cartridge assemblies.
C-Cyan M-Magenta Y-Yellow K-Black
f Close the top cover.
g Plug the machine’s power cord back into
the electrical socket first, and reconnect
all cables and telephone line cord. Turn
on the machine.
K
Y
M
C