
User`s guide


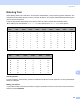


Table Of Contents
- NETWORK USER’S GUIDE
- Table of Contents
- 1 Introduction
- 2 Configuring your machine for a network
- Overview
- IP addresses, subnet masks and gateways
- Step by step chart
- Setting the IP address and subnet mask
- Changing the print server settings
- Using the BRAdmin Light utility to change the print server settings
- Using the BRAdmin Professional 3 utility to change print server settings (Windows®)
- Using the control panel to change the print server settings
- Using Web Based Management (web browser) to change the print/scan server settings
- Using Remote Setup to change the print server settings (Not available for Windows Server® 2003/2008) (Not available for DCP-8085DN)
- Using other methods to change print server settings
- 3 Control panel setup
- 4 Driver Deployment Wizard (Windows® only)
- 5 Network printing from Windows®: basic TCP/IP Peer-to-Peer printing
- 6 Internet printing for Windows®
- 7 Network printing from Macintosh using the BR-Script 3 driver
- 8 Web Based Management
- Overview
- How to configure the machine settings using Web Based Management (web browser)
- Password information
- Secure Function Lock 2.0 (Not available for MFC-8370DN)
- Changing the Scan to FTP configuration using a web browser
- Changing the Scan to Network configuration using a web browser
- Changing the LDAP configuration using a web browser (For MFC-8880DN)
- 9 LDAP operation (For MFC-8880DN)
- 10 Internet fax and Scan to E-mail (E-mail server) (For MFC-8880DN)
- Internet fax Overview
- Getting connected
- Control panel key functions
- Sending an Internet fax
- Manually entering text
- Receiving E-mail or Internet fax
- Receiving an Internet fax to your computer
- Forwarding received E-mail and fax messages
- Relay broadcasting
- TX Verification Mail
- Setup Mail TX
- Setup Mail RX
- Error mail
- Important information on Internet fax
- Scan to E-mail (E-mail server) overview
- Internet fax Overview
- 11 Security features
- 12 Troubleshooting
- Appendix A
- Using services
- Other ways to set the IP address (for advanced users and administrators)
- Using DHCP to configure the IP address
- Using BOOTP to configure the IP address
- Using RARP to configure the IP address
- Using APIPA to configure the IP address
- Using ARP to configure the IP address
- Using the TELNET console to configure the IP address
- Using the Brother Web BRAdmin server software for IIS to configure the IP address
- Installation when using web services (Windows Vista®)
- Installation when using a Network Print Queue or Share (printer driver only)
- Appendix B
- Appendix C
- Index

Appendix B
135
B
7.Network
(continued)
2.Ethernet — Auto*
100B-FD
100B-HD
10B-FD
10B-HD
3.E-mail/IFAX
1.Mail Address Name (up to 60 characters)
2.Setup Server 1.SMTP Server Name (Up to 64 characters)
IP Address
[000-255].[000-255].[000-
255].[000-255]
2.SMTP Port 00025*
[00001-65535]
3.Auth. for SMTP None*
SMTP-AUTH
POP bef.SMTP
4.POP3 Server Name (Up to 64 characters)
IP Address
[000-255].[000-255].[000-
255].[000-255]
5.POP3 Port 00110*
[00001-65535]
6.Mailbox Name (Up to 60 characters)
7.Mailbox Pwd (Up to 32 characters)
8.APOP On
Off*
3.Setup Mail RX
1.Auto Polling On*
Off
2.Poll Frequency 10Min*
(01Min to 60Min)
3.Header All
Subject+From+To
None*
4.Del Error Mail On*
Off
Main menu Submenu Menu selections Options